Tools:
Ratchet
10, 12, 14 &16mm sockets
Extension Bar
12, 14 and 17mm wrench
Container to pour the old power steering fluid in
Breaker bar or long pipe
1.5 pints of power steering fluid
Jack Stands
Jack
Oil Pan
Helper Monkey
Disclaimer: What follows is what I did to replace the Rack and Pinion on my ’92 Honda Accord EX. There might be a difference between models especially if your car is not equipped with Power Steering. Please follow these directions at your own risk, I am not responsible if you lose a limb or if you burn yourself when you’re checking for leaks and you accidentally touch the exhaust with your forearm…believe me, it hurts…err, or so I’ve been told. Now on to the DIY
1. First raise the car and place it securely on jack stands. When raising the whole front end I like placing the jack where the engine crossbeam meets the chassis and lifting both front wheels at the same time.
2. Now disconnect the power steering fluid return hose and empty out the reservoir into a small container. Be ready with a cup because as soon as you disconnect the hose the fluid will start pouring out until the reservoir is empty.
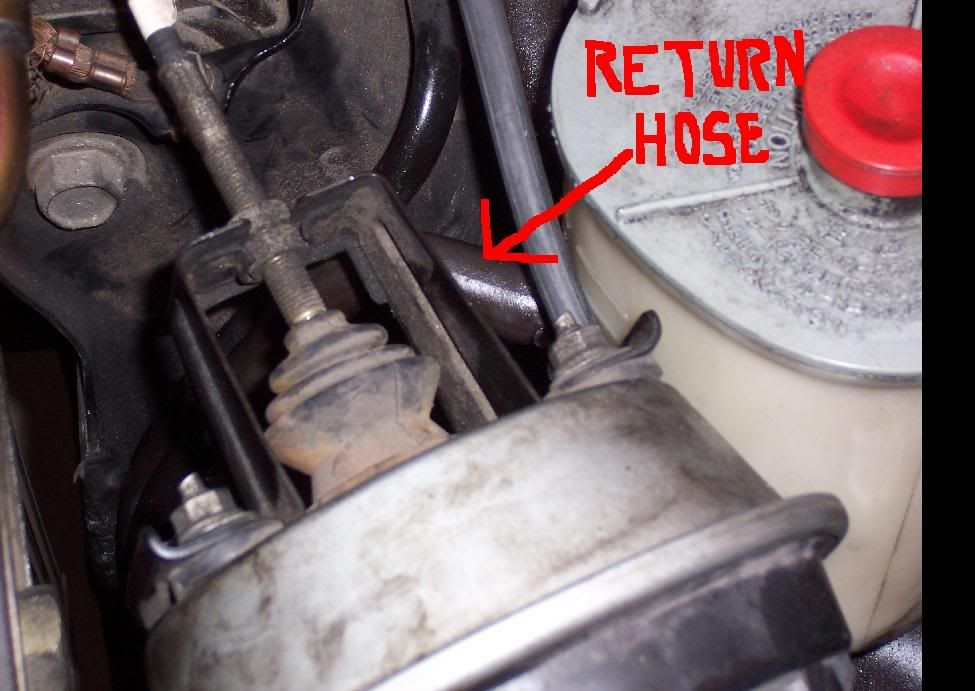
3. Now this is where the helper monkey comes in to play…if you don’t have a helper monkey and hot chick will do…if you don’t have a hot chick then I guess your geeky neighbor will do. Have him turn the car on while you are at the power steering reservoir. As soon as the car turns on you will see the rest of the fluid start gushing out (which filled up my cup rather quickly). If need be, turn the car off and dispose of the fluid that has filled up your cup…there is still more in the system and you need to try to get it all out. Now turn the car on again and have your helper monkey turn the steering wheel from lock position to lock position until no more fluid is coming out of the hose…you have successfully drained the power steering fluid. Now reconnect the hose but DO NOT refill the reservoir yet.
4. Now go in the car and start removing the steering rack cover that is held in place by 3 plastic screws at the base and 2 ring springs on the column. Just unscrew the 3 plastic screws by hand and pull down on the ring springs until they pop off. Now just peel the plastic cover off and the steering rack will be exposed.
5. There are 2 10mm bolts that hold the rack and pinion to the steering rack. Turn the steering wheel until you are able to get to the 2 bolts. Remove them and slide the joint up.
6. Remove the cotter pin and the castle nut that connects the tie rod to the knuckle. Use a ball joint remover to safely disconnect the tie rod from the knuckle without damaging the ball joint.
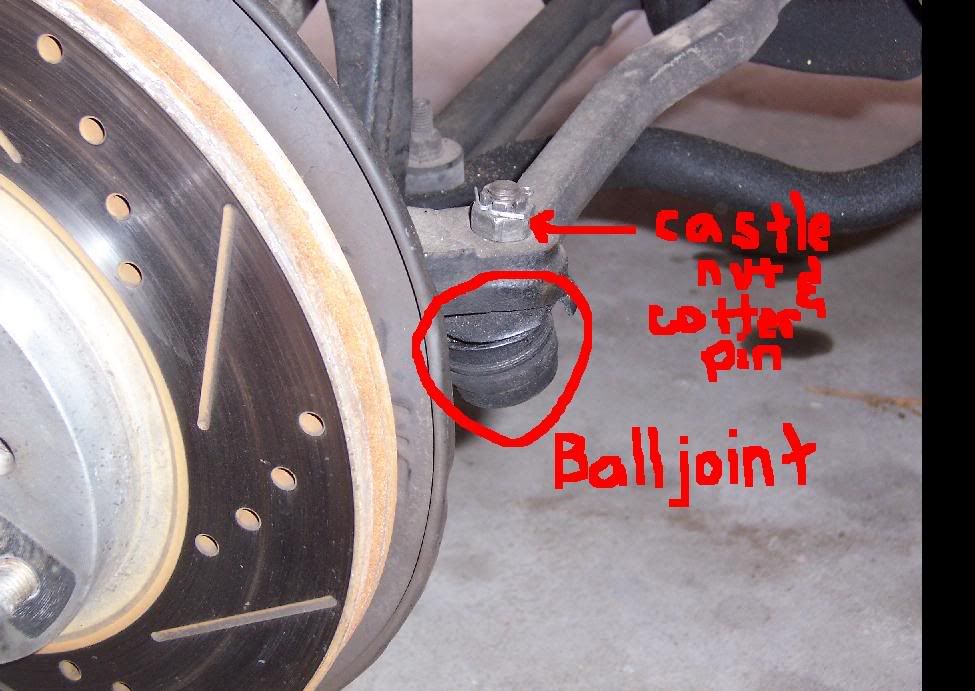
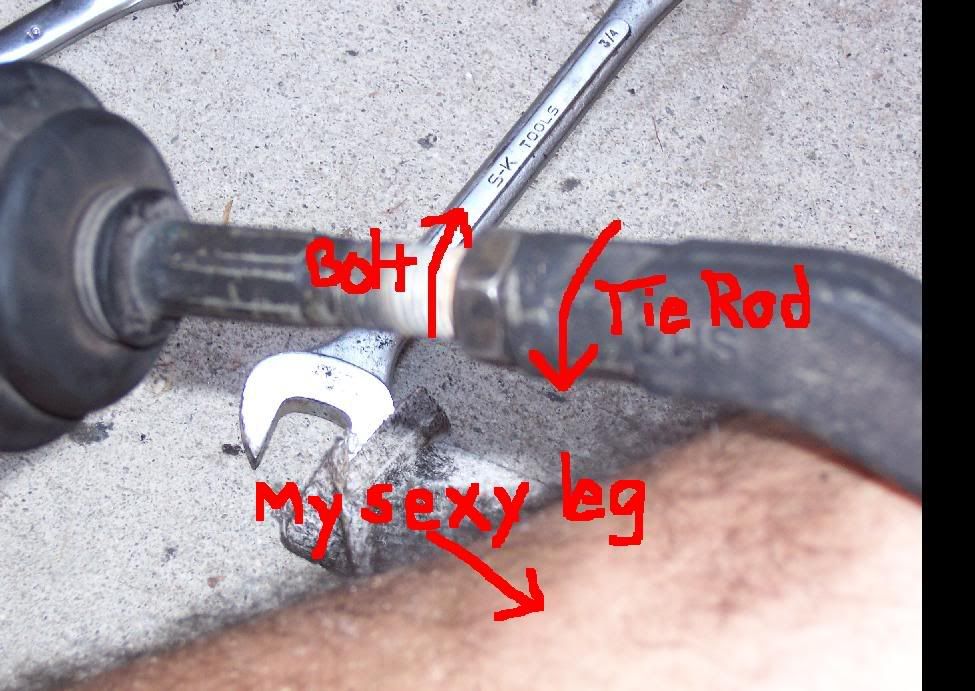
7. Removing the tie rod makes it easier and gives you more room to remove the rack and pinion later. You do this by turning the nut at the end of the tie rod to your right while turning the tie rod to your left. Count how many turns it takes to remove the tie rod and write it down somewhere so when you are installing them onto the new R/P your toe will not be way off.
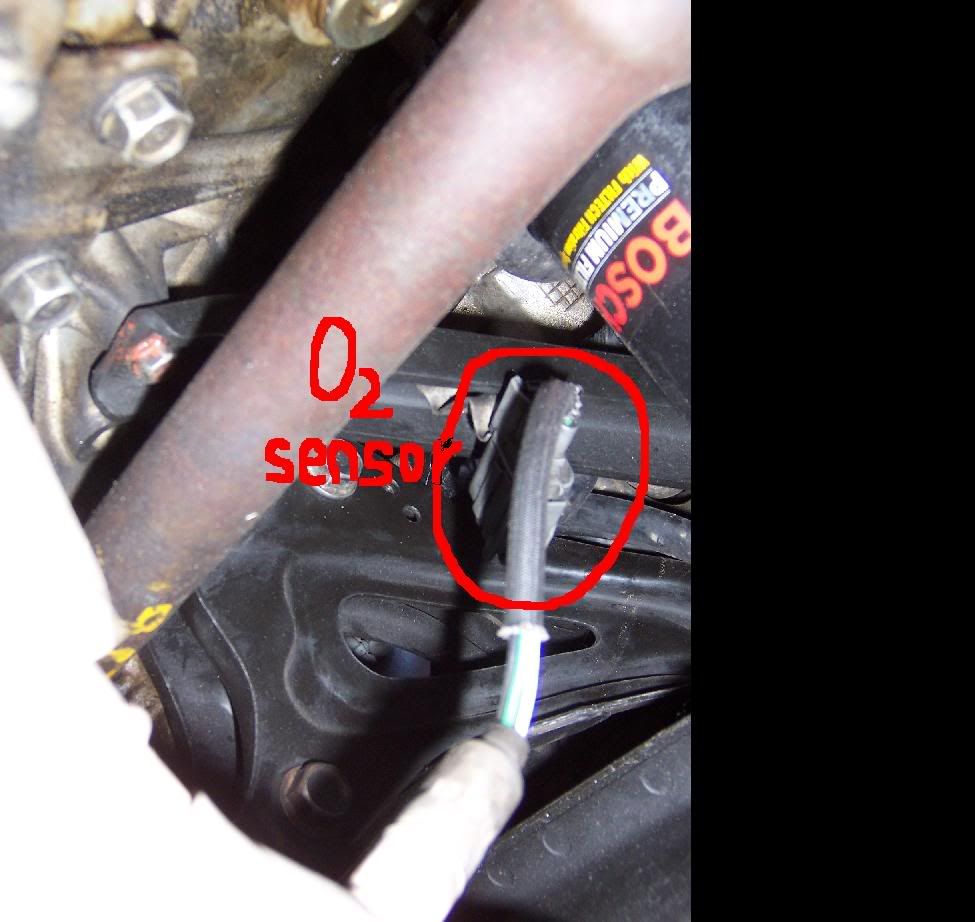
8. Disconnect the oxygen sensor and remove the b-pipe of the exhaust (3 14mm bolts at the header and 3 14mm bolts that connect to the exhaust) and the hanger that is connected to the engine cross bar
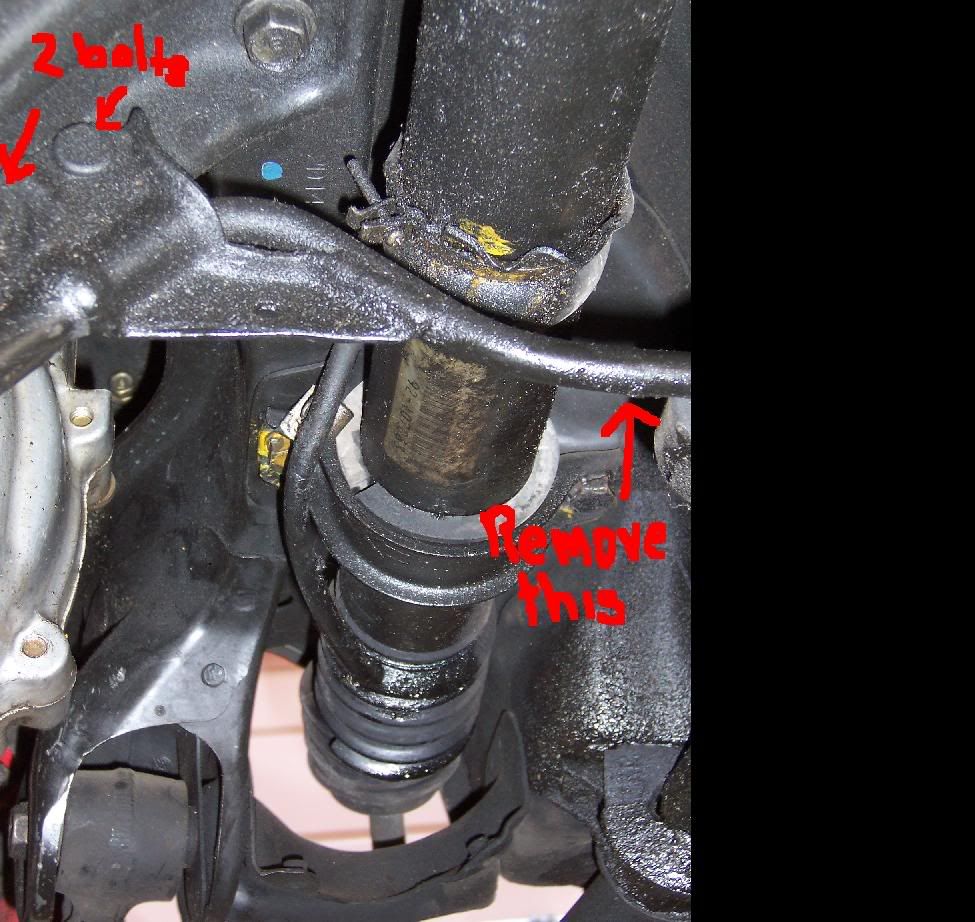
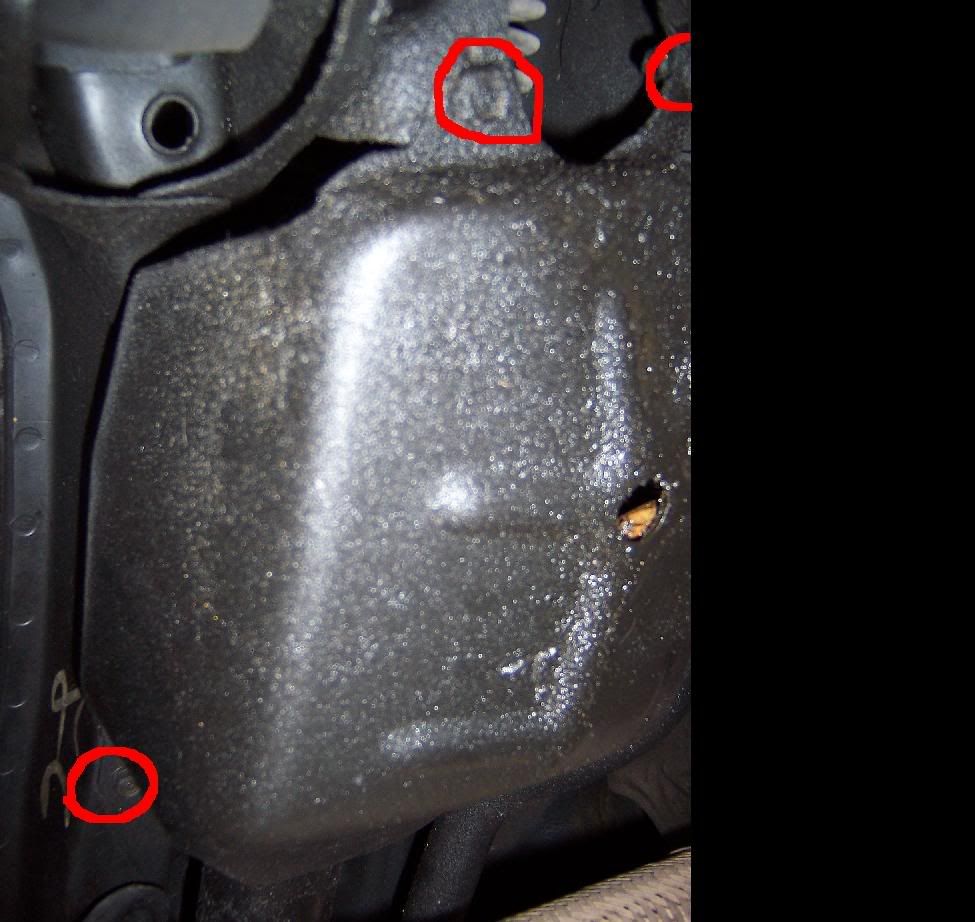
9. Remove the 3 10mm bolts that hold up the cover that exposes the lines that connect to the R/P
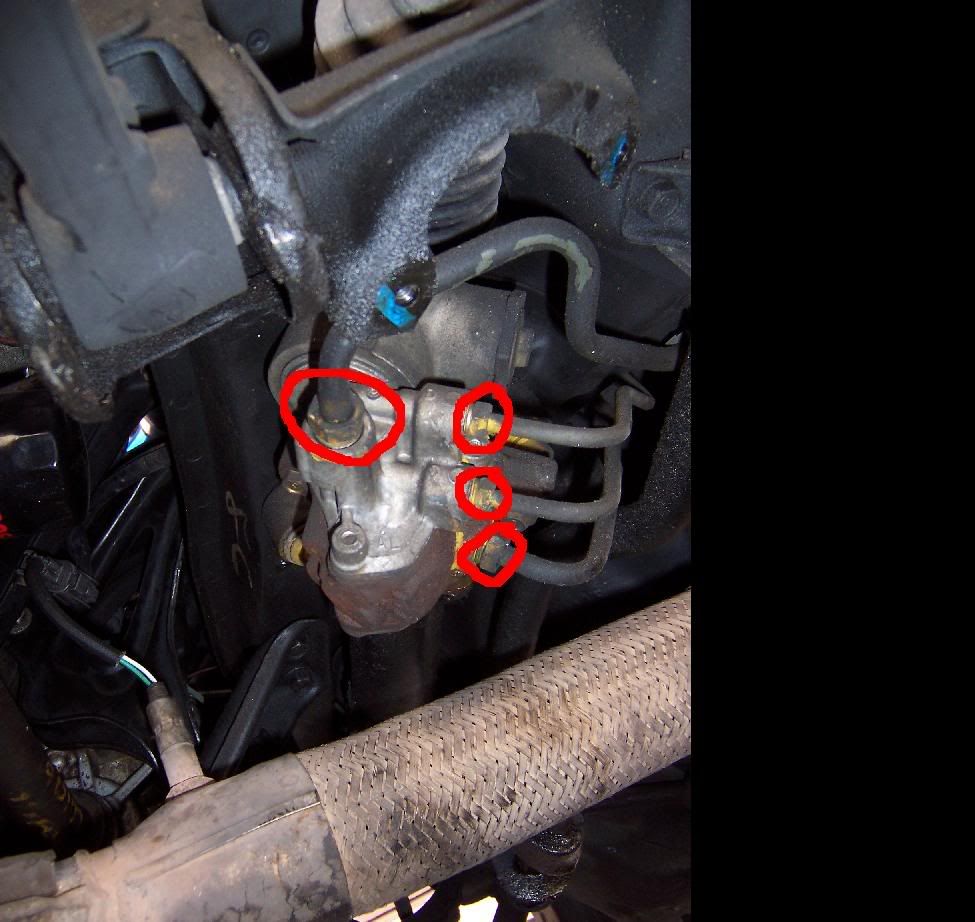
10. Use the wrenches to disconnect the 4 lines from the R/P…a small amount of power steering fluid will leak out.
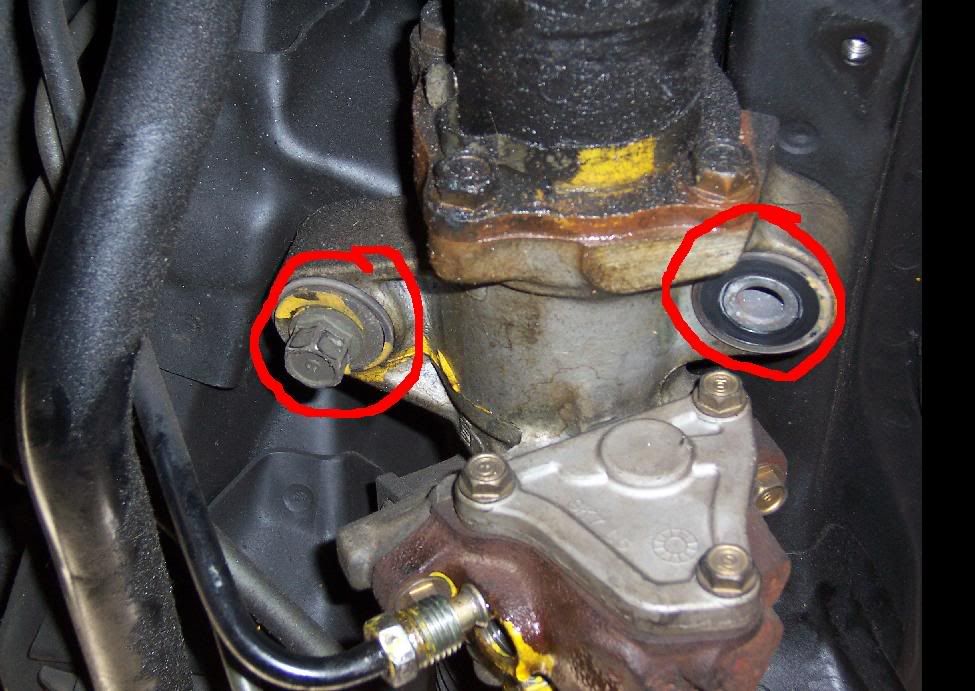
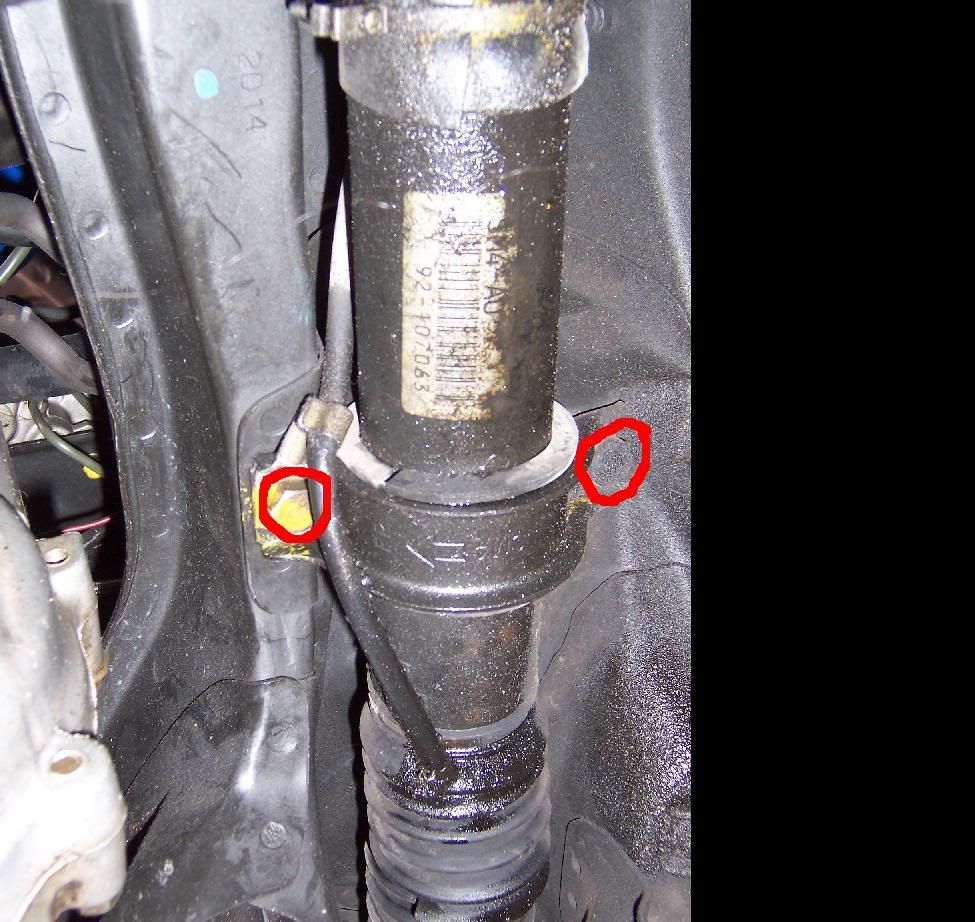
11. Now remove the 4 bolts that hold the R/P to the chassis of the car. 2 Bolts are found next to where the lines are connected and 2 are located on a bracket near the driver side. Now you can remove the R/P by wiggling it out and to the right to clear the various body parts.
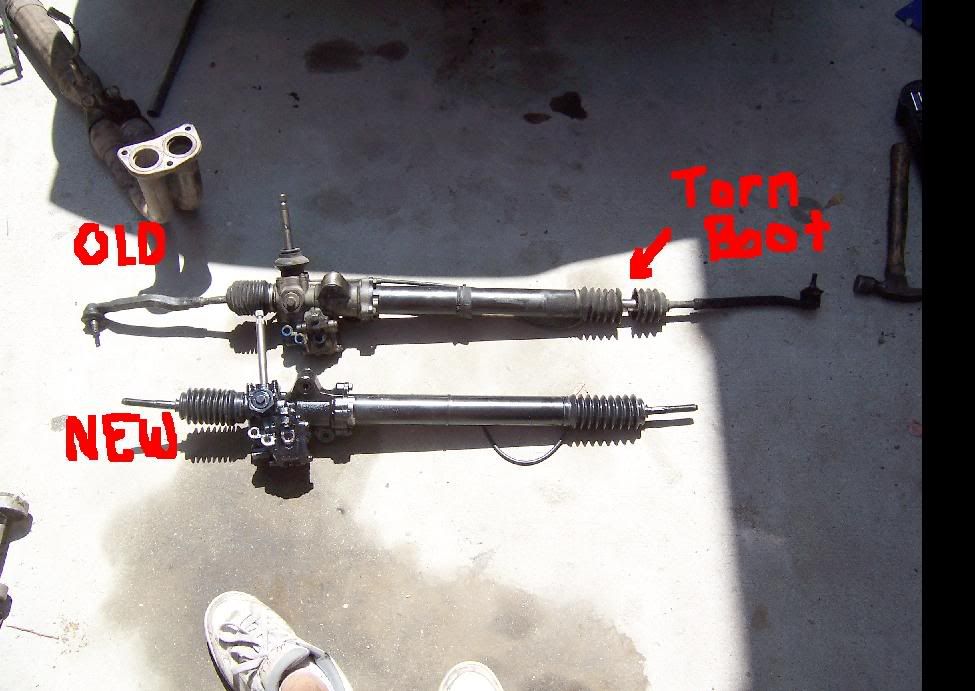
Here is a side by side shot of the old and new R/P. Notice the tear on the passenger side boot…that’s how I knew it needed to get replaced. Plus there was a lot of play at the tie rods on the old R/P and none on the new R/P.
12. Installation is the reverse of removal. Install the new R/P--> Connect the 4 hoses--> Install the exhaust b-pipe, hanger and oxygen sensor--> Install the Tie rods--> Connect them to the knuckle--> Connect the R/P to the steering rack--> Place the steering rack cover on.
13. Now refill the reservoir checking that there are no leaks. Turn the car on and turn the steering wheel from lock to lock to bleed the system from air. Add more fluid as needed (I used about a pint and a half). Now get under the car again and check that there are no leaks coming from the 4 hoses. If there are not any, place the cover back on and you are done. Put the wheels back on and lower your car and take her out for a spin checking afterwards if you need to add more fluid. Now go get an alignment and you’re done…enjoy your new steering R/P.
*note* when disposing of old power steering fluid, I simply placed it in an oil can and took it to my friendly neighborhood oil recycling center and disposed of it there…DO NOT pour it down a storm drain because I will get green peace to kick your @$$!
As always, feedback is always welcomed.
Ratchet
10, 12, 14 &16mm sockets
Extension Bar
12, 14 and 17mm wrench
Container to pour the old power steering fluid in
Breaker bar or long pipe
1.5 pints of power steering fluid
Jack Stands
Jack
Oil Pan
Helper Monkey
Disclaimer: What follows is what I did to replace the Rack and Pinion on my ’92 Honda Accord EX. There might be a difference between models especially if your car is not equipped with Power Steering. Please follow these directions at your own risk, I am not responsible if you lose a limb or if you burn yourself when you’re checking for leaks and you accidentally touch the exhaust with your forearm…believe me, it hurts…err, or so I’ve been told. Now on to the DIY
1. First raise the car and place it securely on jack stands. When raising the whole front end I like placing the jack where the engine crossbeam meets the chassis and lifting both front wheels at the same time.
2. Now disconnect the power steering fluid return hose and empty out the reservoir into a small container. Be ready with a cup because as soon as you disconnect the hose the fluid will start pouring out until the reservoir is empty.

3. Now this is where the helper monkey comes in to play…if you don’t have a helper monkey and hot chick will do…if you don’t have a hot chick then I guess your geeky neighbor will do. Have him turn the car on while you are at the power steering reservoir. As soon as the car turns on you will see the rest of the fluid start gushing out (which filled up my cup rather quickly). If need be, turn the car off and dispose of the fluid that has filled up your cup…there is still more in the system and you need to try to get it all out. Now turn the car on again and have your helper monkey turn the steering wheel from lock position to lock position until no more fluid is coming out of the hose…you have successfully drained the power steering fluid. Now reconnect the hose but DO NOT refill the reservoir yet.
4. Now go in the car and start removing the steering rack cover that is held in place by 3 plastic screws at the base and 2 ring springs on the column. Just unscrew the 3 plastic screws by hand and pull down on the ring springs until they pop off. Now just peel the plastic cover off and the steering rack will be exposed.
5. There are 2 10mm bolts that hold the rack and pinion to the steering rack. Turn the steering wheel until you are able to get to the 2 bolts. Remove them and slide the joint up.
6. Remove the cotter pin and the castle nut that connects the tie rod to the knuckle. Use a ball joint remover to safely disconnect the tie rod from the knuckle without damaging the ball joint.

7. Removing the tie rod makes it easier and gives you more room to remove the rack and pinion later. You do this by turning the nut at the end of the tie rod to your right while turning the tie rod to your left. Count how many turns it takes to remove the tie rod and write it down somewhere so when you are installing them onto the new R/P your toe will not be way off.

8. Disconnect the oxygen sensor and remove the b-pipe of the exhaust (3 14mm bolts at the header and 3 14mm bolts that connect to the exhaust) and the hanger that is connected to the engine cross bar


9. Remove the 3 10mm bolts that hold up the cover that exposes the lines that connect to the R/P

10. Use the wrenches to disconnect the 4 lines from the R/P…a small amount of power steering fluid will leak out.

11. Now remove the 4 bolts that hold the R/P to the chassis of the car. 2 Bolts are found next to where the lines are connected and 2 are located on a bracket near the driver side. Now you can remove the R/P by wiggling it out and to the right to clear the various body parts.


Here is a side by side shot of the old and new R/P. Notice the tear on the passenger side boot…that’s how I knew it needed to get replaced. Plus there was a lot of play at the tie rods on the old R/P and none on the new R/P.

12. Installation is the reverse of removal. Install the new R/P--> Connect the 4 hoses--> Install the exhaust b-pipe, hanger and oxygen sensor--> Install the Tie rods--> Connect them to the knuckle--> Connect the R/P to the steering rack--> Place the steering rack cover on.
13. Now refill the reservoir checking that there are no leaks. Turn the car on and turn the steering wheel from lock to lock to bleed the system from air. Add more fluid as needed (I used about a pint and a half). Now get under the car again and check that there are no leaks coming from the 4 hoses. If there are not any, place the cover back on and you are done. Put the wheels back on and lower your car and take her out for a spin checking afterwards if you need to add more fluid. Now go get an alignment and you’re done…enjoy your new steering R/P.
*note* when disposing of old power steering fluid, I simply placed it in an oil can and took it to my friendly neighborhood oil recycling center and disposed of it there…DO NOT pour it down a storm drain because I will get green peace to kick your @$$!
As always, feedback is always welcomed.




 ill let ya know how it goes....
Comment