
This is my First DIY write up, please be patient, I know it wont be perfect.
If you have anything in the boot of your car, remove it, and fold the rear seats down flat. you'll need it later.
Tool List:
8,10, and 12 mm socket
flat head screwdriver
Ratchet
Phillips head screwdriver
Trim removal tools (optional)
Step 1: To start, Disconnect the Water jet connection for the rear jet.
Step 2: Remove The rubber seal From around the hatch.
Step 3:Remove the plastic trim Covering the headliner, careful as it needs to be Bent down to remove it from the other trim.
Step 4. remove the handle. to do so, pry the small trim piece from it, then remove the two bolts (10mm)
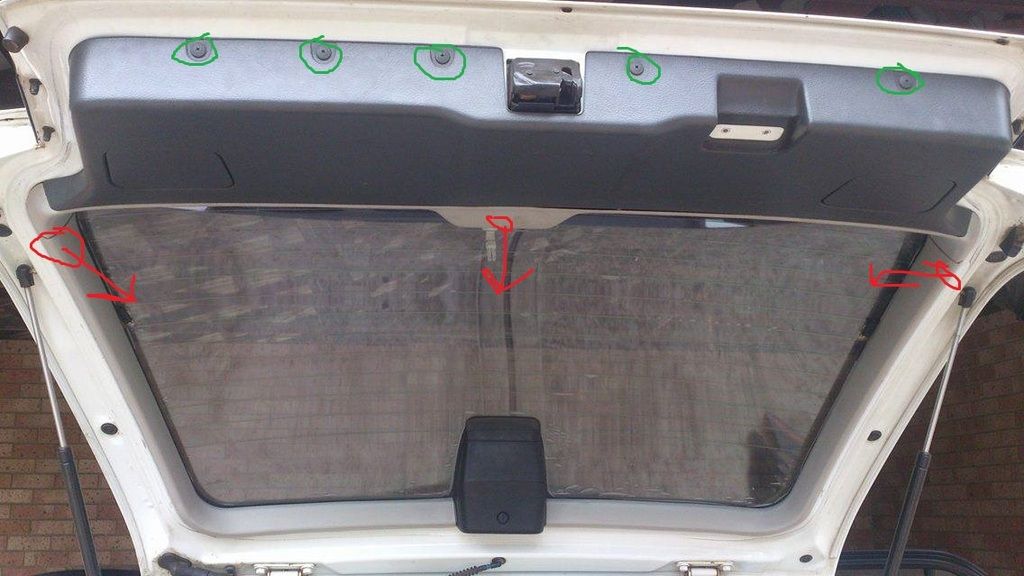
Step 5. Start Removing The trim off of the hatch, to do this start by Prying the two side trim pieces away from the small trim behind the large Grey panel, then removing the small trim piece (RED), then remove all the screws from around the large grey panel (GREEN). there should be five screws on the front, two on either side, and also remove the Taillight access panels.
Now remove the grey panel.
this part sucks. Proper sucks. and reinstalling it is worse. its time to remove the wiring harness.
Wiring harness:
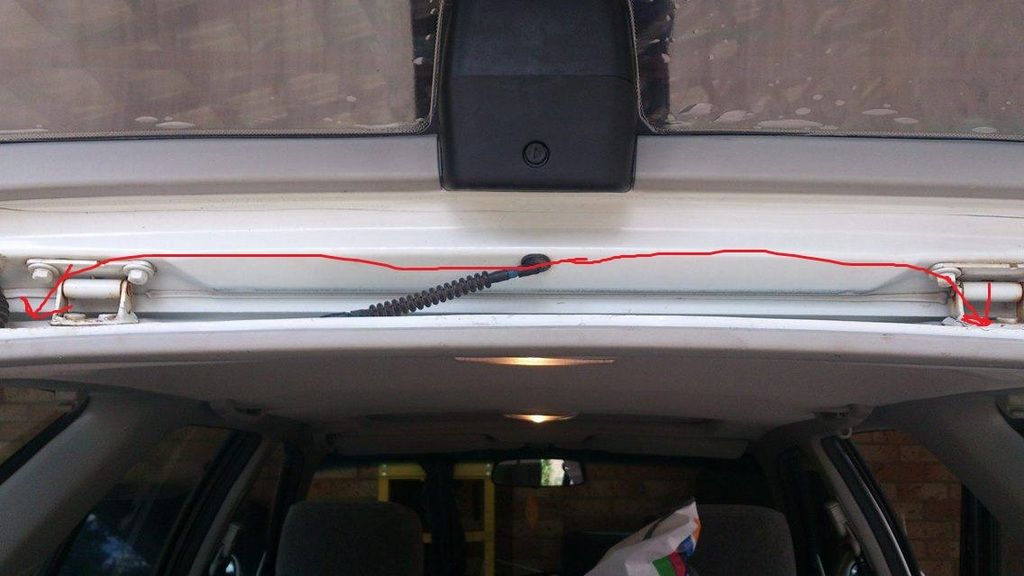
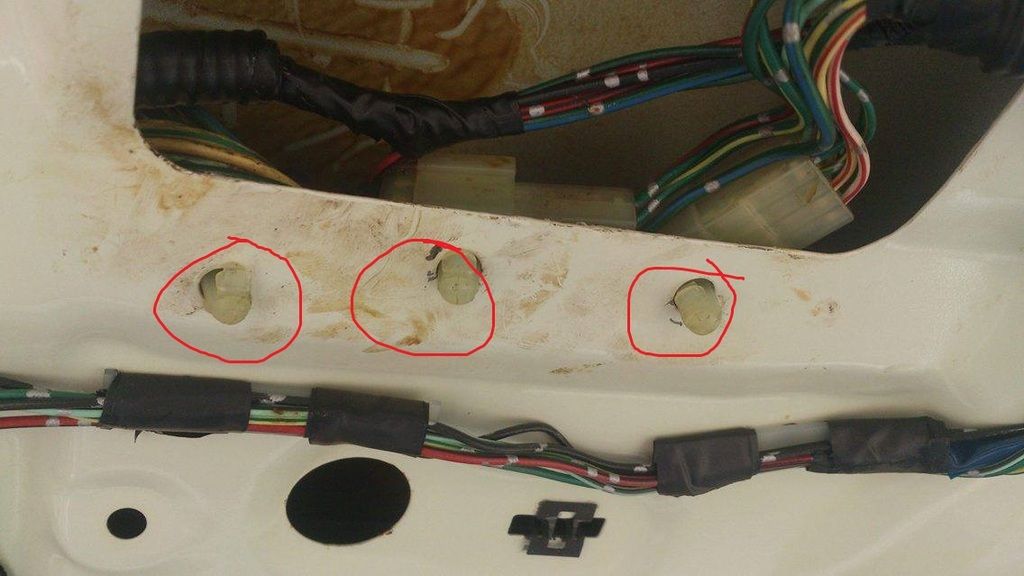
Step 6a: Locate the wire harness connections In the centre of the tailgate, and Disconenct the connectors from the Hatch by pressing the Plastic pins through as circled here:
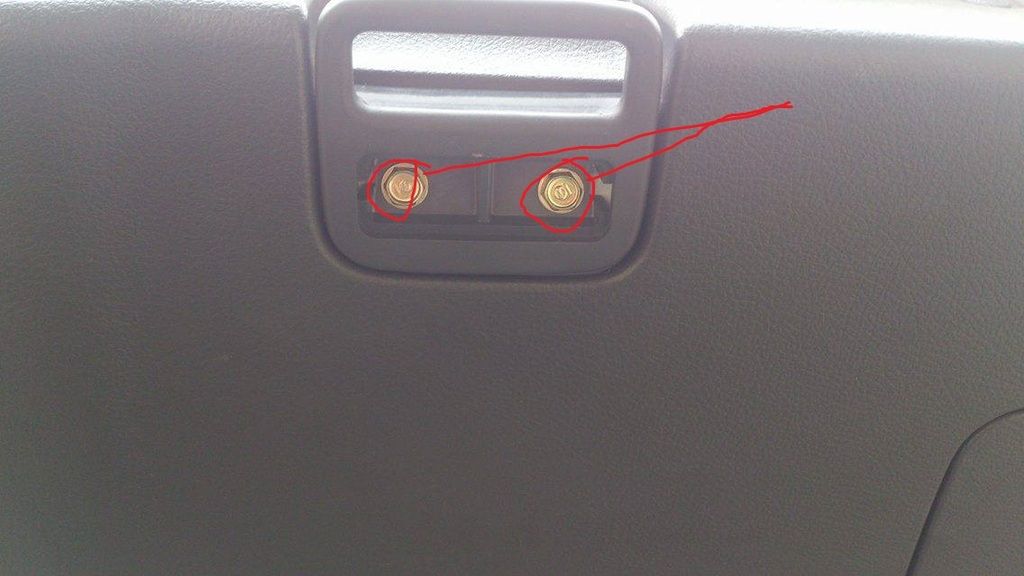
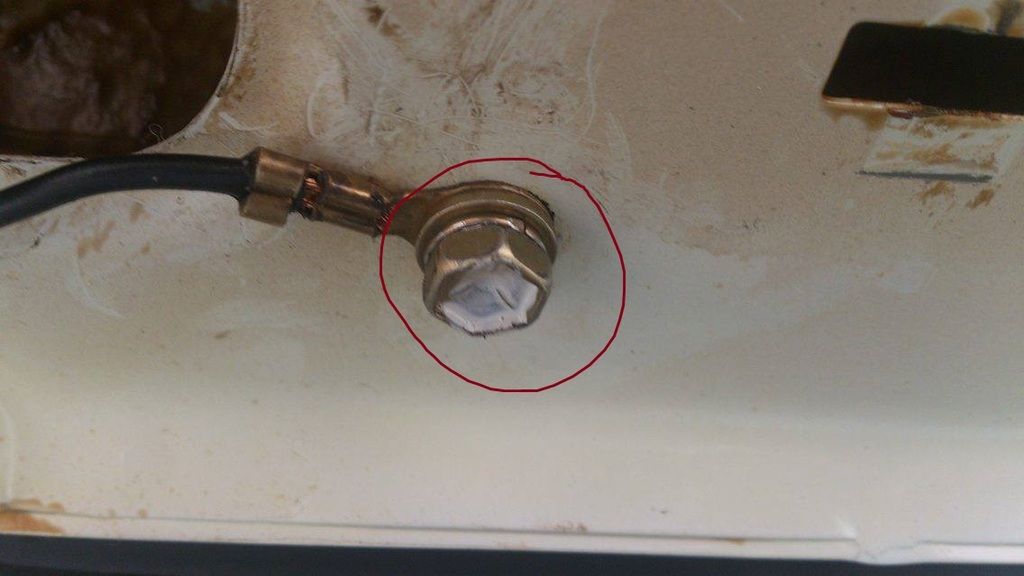
Step 6b. Disconnect the connectors, and the ground to the left (10 mm bolt):
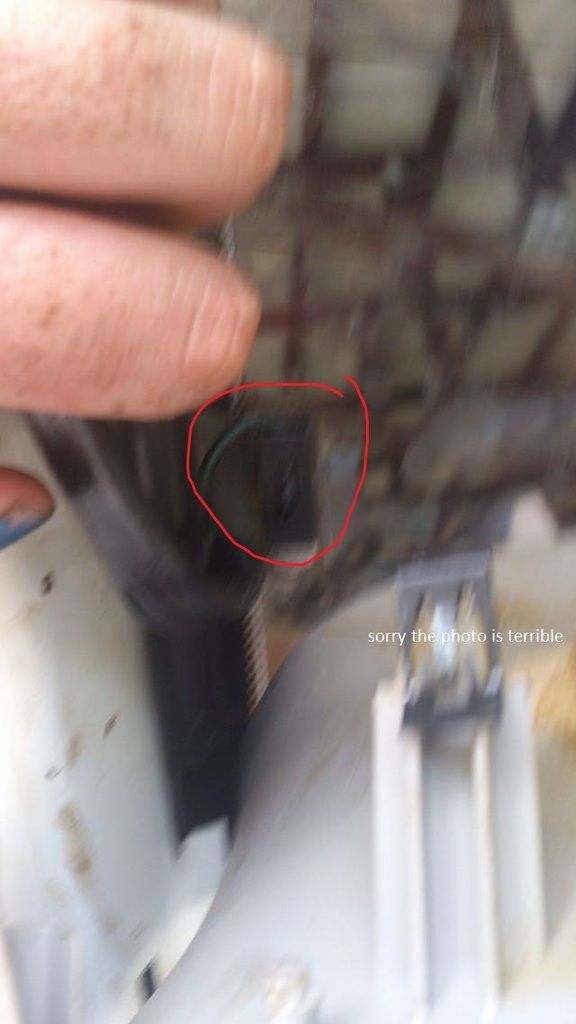
and the Demister Connection
Step 6C:
THIS IS THE MOST IMPORTANT STEP AND I DID NOT DO THIS AND SPENT AN EXTRA HOUR ON THIS PROJECT FOR NO GOOD REASON. MAKE SURE YOU DO THIS.
Honda, for whatever reason, did not make an easy connector at the hatch, so what this means is that you have to pull the harness completely out of the hatch, And reinsert it. trust me, it sucks.
There seems to be another way to do it, there are connectors near the OEM 6x9, and theoretically you could pull the harness through and leave it in the tailgate instead, but i didnt do it that way so i wont go into detail about it.
Now, to make your life a hell of alot easier later on, find a small piece of strong rope, like nylon or something. it needs to be very strong, and thin, like an electrical wire (dont use electrical wire, it will just snap).
Fishing wire is a good idea, or Whipper snipper (weed wacker?) wire is good too. Tie the line around all five connectors in the hatch (ground, demister, three harness connectors).
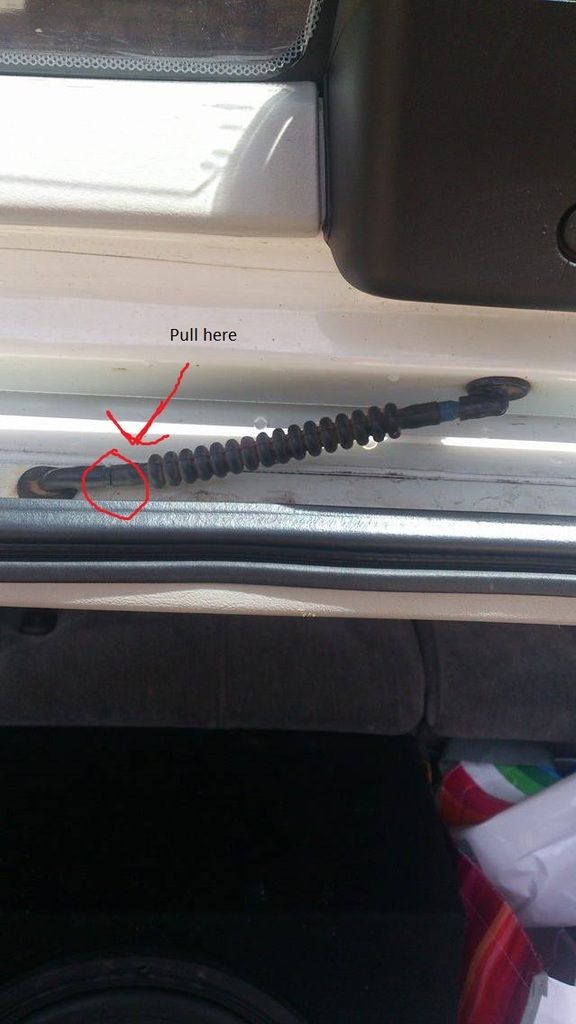
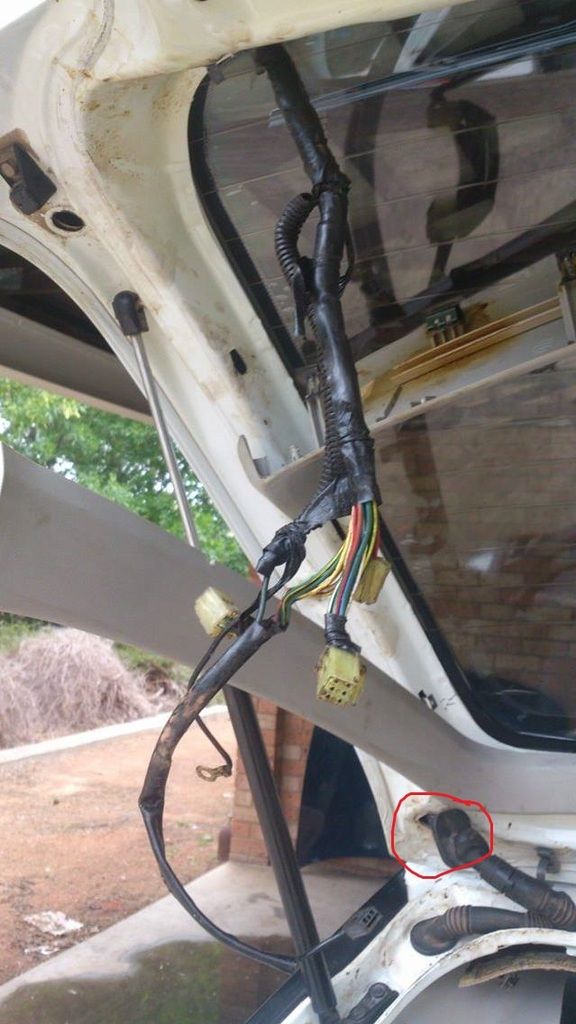
Now, start pulling the harness through, Making sure that the wire you have used is also going down. you need to pull it out of here:
 .
.
Keep going until all the connectors are out of that hole, and the rope is left in the wiring cavity. untie the harness, and let it free from the hatch. this will make it ALOT easier to pull the harness back through when you need to.
Step 7: now, the gas struts need to be disconnected. 2x10mm either side, Be careful when undoing as they are holding the hatch up! use a piece of wood or a pole to support it whilst you do this. once all four bolts are removed, pull the struts forward, and lower the hatch, so that the struts are keeping the tailgate from closing all the way, with about a 4 cm Gap.
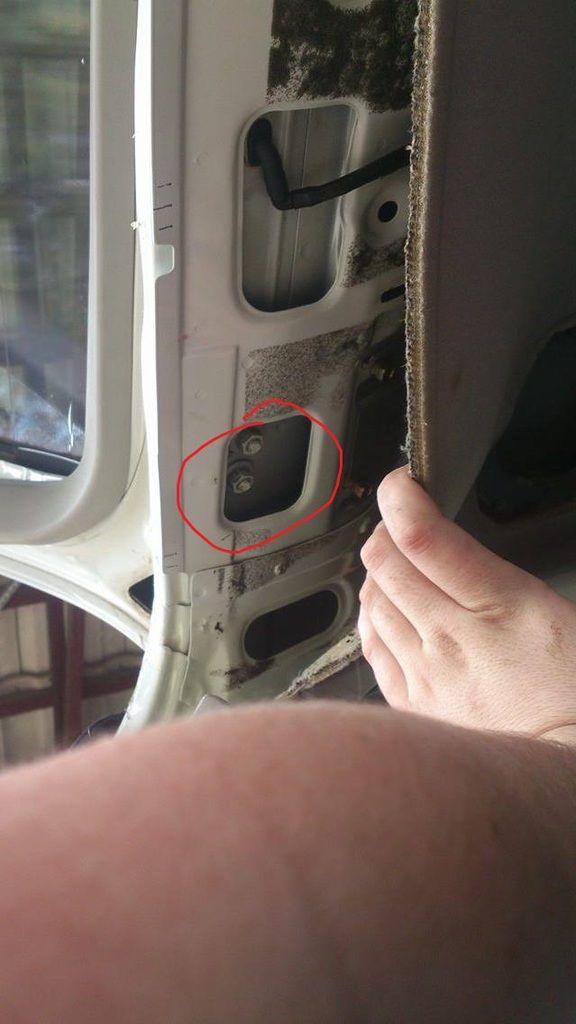
Step 8: Climb into the Rear seats, and lay down, facing the rear interior light. this needs to be removed. 2x8mm bolts, and one connector. Remove the light shroud first, there is a small cutout for a pry tool or flathead screwdriver on it. switch the light off, then remove the two bolts circled here:

The light should now come out.
Step 9: Pull down GENTLY on the headliner, and let the first clips come out. This will expose the tailgate bolts (12mm), one pair is circled here:
before removing them, Make a small mark with a texta on each side of the bolt, so that it can be aligned correctly when you reinstall the hatch. Remove all four bolts.
Step 10: with a friend (This is important, the hatch is heavy and if you drop it the glass will shatter!), remove the hatch, and lay it onto something soft, like a towel or ontop of a tire.
Thats it, job done!
Reinstallation is a reverse of the installation, taking care of two things!
1. When reinstalling the hatch, make sure the bolt marks Line up correctly.
2. when you pull the harness back through, be careful, and understand that the harness will get snagged. i use a small flat head to help it along, but that will damage the harness, so i cant say thats the best solution.
I hope the instructions are clear enough, any questions ask below!
If you have anything in the boot of your car, remove it, and fold the rear seats down flat. you'll need it later.
Tool List:
8,10, and 12 mm socket
flat head screwdriver
Ratchet
Phillips head screwdriver
Trim removal tools (optional)
Step 1: To start, Disconnect the Water jet connection for the rear jet.

Step 2: Remove The rubber seal From around the hatch.
Step 3:Remove the plastic trim Covering the headliner, careful as it needs to be Bent down to remove it from the other trim.

Step 4. remove the handle. to do so, pry the small trim piece from it, then remove the two bolts (10mm)

Step 5. Start Removing The trim off of the hatch, to do this start by Prying the two side trim pieces away from the small trim behind the large Grey panel, then removing the small trim piece (RED), then remove all the screws from around the large grey panel (GREEN). there should be five screws on the front, two on either side, and also remove the Taillight access panels.

Now remove the grey panel.
this part sucks. Proper sucks. and reinstalling it is worse. its time to remove the wiring harness.
Wiring harness:
Step 6a: Locate the wire harness connections In the centre of the tailgate, and Disconenct the connectors from the Hatch by pressing the Plastic pins through as circled here:

Step 6b. Disconnect the connectors, and the ground to the left (10 mm bolt):

and the Demister Connection

Step 6C:
THIS IS THE MOST IMPORTANT STEP AND I DID NOT DO THIS AND SPENT AN EXTRA HOUR ON THIS PROJECT FOR NO GOOD REASON. MAKE SURE YOU DO THIS.
Honda, for whatever reason, did not make an easy connector at the hatch, so what this means is that you have to pull the harness completely out of the hatch, And reinsert it. trust me, it sucks.
There seems to be another way to do it, there are connectors near the OEM 6x9, and theoretically you could pull the harness through and leave it in the tailgate instead, but i didnt do it that way so i wont go into detail about it.
Now, to make your life a hell of alot easier later on, find a small piece of strong rope, like nylon or something. it needs to be very strong, and thin, like an electrical wire (dont use electrical wire, it will just snap).
Fishing wire is a good idea, or Whipper snipper (weed wacker?) wire is good too. Tie the line around all five connectors in the hatch (ground, demister, three harness connectors).
Now, start pulling the harness through, Making sure that the wire you have used is also going down. you need to pull it out of here:
 .
.Keep going until all the connectors are out of that hole, and the rope is left in the wiring cavity. untie the harness, and let it free from the hatch. this will make it ALOT easier to pull the harness back through when you need to.
Step 7: now, the gas struts need to be disconnected. 2x10mm either side, Be careful when undoing as they are holding the hatch up! use a piece of wood or a pole to support it whilst you do this. once all four bolts are removed, pull the struts forward, and lower the hatch, so that the struts are keeping the tailgate from closing all the way, with about a 4 cm Gap.
Step 8: Climb into the Rear seats, and lay down, facing the rear interior light. this needs to be removed. 2x8mm bolts, and one connector. Remove the light shroud first, there is a small cutout for a pry tool or flathead screwdriver on it. switch the light off, then remove the two bolts circled here:

The light should now come out.
Step 9: Pull down GENTLY on the headliner, and let the first clips come out. This will expose the tailgate bolts (12mm), one pair is circled here:

before removing them, Make a small mark with a texta on each side of the bolt, so that it can be aligned correctly when you reinstall the hatch. Remove all four bolts.
Step 10: with a friend (This is important, the hatch is heavy and if you drop it the glass will shatter!), remove the hatch, and lay it onto something soft, like a towel or ontop of a tire.
Thats it, job done!

Reinstallation is a reverse of the installation, taking care of two things!
1. When reinstalling the hatch, make sure the bolt marks Line up correctly.
2. when you pull the harness back through, be careful, and understand that the harness will get snagged. i use a small flat head to help it along, but that will damage the harness, so i cant say thats the best solution.
I hope the instructions are clear enough, any questions ask below!


Comment