
Originally posted by GearBangnAccord
View Post
-
lol but i plan to leave the balance belt off anyway.
Be Clean -
Easy HOWTO put the rubber grommet back over the timing belt tension adjuster nut
Take a 15mm short socket and stretch the grommet around the end of it. Put the socket over the adjusting nut. Push the grommet off toward the timing cover and it will contract onto the bolt.
Learned/improvised the hard way.Comment
-
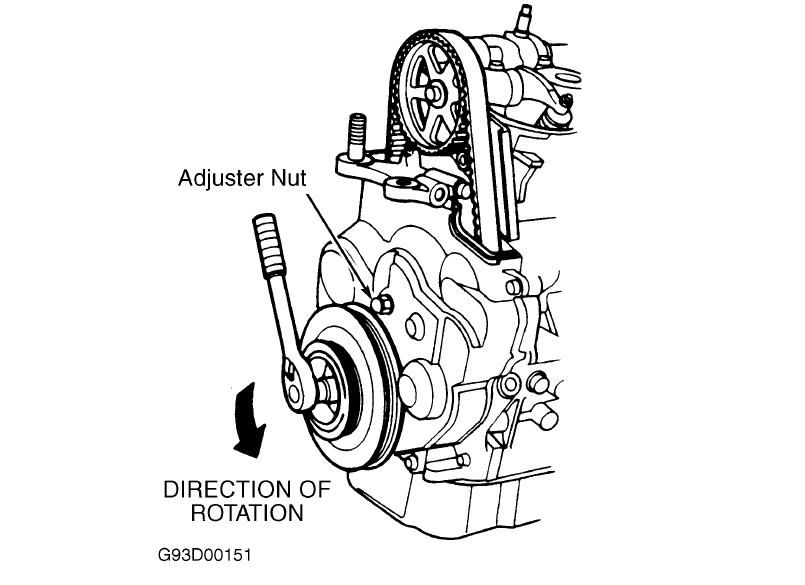
that tensioner arm does not go to the balance shaft belt pulley, it goes to the t-belt pulley...so regardless of whether the balance belt is on or off...when you FINISH, there should be no 10mm bolt in the t-belt tensioner arm...the 3rd picture in post #10Originally posted by nostringz View Post__ __
__Comment
-
why does leaving the 10mm bolt on the tensioner adjuster arm create any problems
I left my 10mm bolt in there (with 3 washers) with blue loctite. Reason being, my adjuster nut is stripped so I can't guage the torque I put on it (I had to tighten the adjuster nut with a vise-grip!) and I want to put sole trust it to hold the tension settings over time. I also didn't want to overtension the adjuster nut to compensate, so settled on securely installing that 10mm bolt on the arOriginally posted by bcjammerx View Post
m as a reasonable backup measure.
I have had the car to 5000 rpms and no problem so far, runs smooth (actually, it runs smoother than i ever remember it after this t.b. change) I see little reason that a properly tensioned belt with a nut on the adjuster arm would perform any differently than one without the nut.
The only difference would be that you can't readjust the timing belt tension from outside the covers when that nut is installed on the tensioner arm, and Honda wanted to make the belt adjustable from outside the covers. To me that is the sole purpose of not installing a nut on the tensioner arm.
T.B. tension *does not* change according to rpm, as the pulleys are set firmly in place once you tighten the big 14mm adjuster nut .
I realize that if/when the belt starts to stretch, I have to go again under the timing covers to reset the tension, but that *should* be the only problem/drawback with leaving that 10mm bolt on the tension adjuster arm.
I was concerned by bcjammerx's statement that the "10mm bolt will not stay there". Did you mean that the bolt will come out for some unknown reason, or that you're just not supposed to leave it there?
The only reason I can think of (and believe me, i thought about this before doing it) that leaving that bolt there would cause a problem would be (a) if it vibrated loose and got out, damaging or breaking the timing belt depending on where it landed or (b) if the slight deflection of the timing belt tensioner arm that the tightened bolt creates somehow stresses the bearing such that the bearing fails. I rate either risk as being small, as the 10mm bolt is tensioned and has loctite. issue (b) is more probably, but there really isn't that much deflection of the tension adjuster arm at all against the block (like maybe 3 hair's worth).
I am just throwing this out to get more info as it is a matter of some importance to me!Last edited by batever; 06-18-2009, 08:42 PM.Comment
-
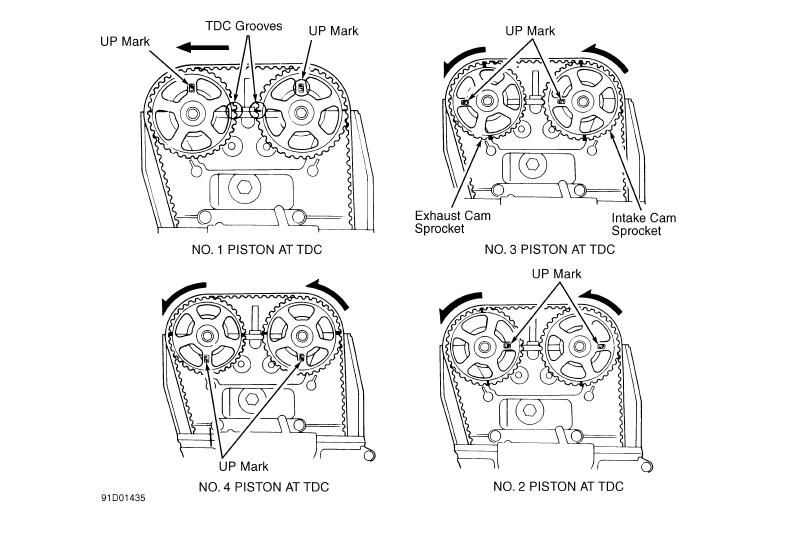
So which is it, the top of the tooth or the valley of the groove, that you align with the cylinder head? You sound like you are saying both here.Originally posted by 203CB7TUNER View Post
I'm interested in this because I just went by the side marker arrows on the camshaft pulley, not the tooth peak or tooth valley.Comment
-
I haven't noticed that problem with my car; perhaps it's actually because your belt is slightly undertensioned and the timing belt slap is showing up only at higher rpms??Originally posted by GearBangnAccord View PostComment
-
I've done quite a few tbelt jobs, some 200k past due and imho the tbelt wont strech far enough under severe duty on a stock engine to make retensioning a legitimate concern.Originally posted by batever View Post So I personally dont believe it matters if you leave the tension arm bolt in or out. Of course there is the chance that it will walk out and well thats a different concern. Flapping belts is most likely the result of undertensioning in the beginning.
Comment
-
Thanks for the feedback, Fake Thug. In the end I went back in and removed it as I had to go back in anyway because I had misaligned the crankshaft by a tooth or more on the crankshaft timing belt pulley when doing the job, and as a result the timing was severely retarded, like maybe 9 degrees (!!) and the car had no power, like dead, under 2800 rpms. On the way back out I decided I trusted the adjuster bolt and I took that extra bolt I had put on the timing belt tensioner arm off.Originally posted by Fake Thug View Post
Thanks for your response though, it's always good to hear the perspective of someone who is much more experienced at this than I am .Last edited by batever; 08-30-2009, 02:25 PM.Comment
-
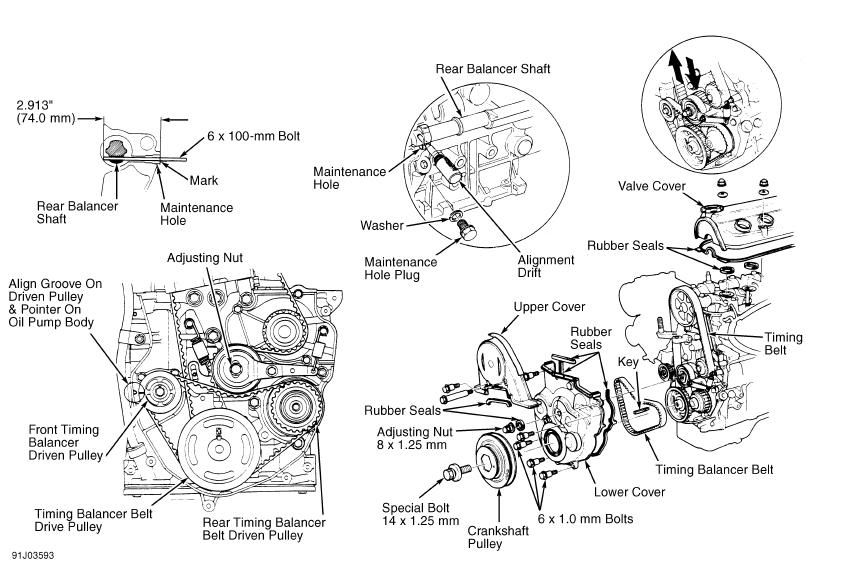
I had talked to a guy one day that said he didnt use balancer shafts.Belt and or or shaft? Whats up with that? Is that possible? If so what are the pros and cons to that other than less rotating mass?http://WWW.DUBWISE.NET
My Job!


9DUBWISE 92 LXhttp://www.cb7tuner.com/vbb/showthread.php?t=142580
RHD ITR conversionhttp://www.cb7tuner.com/vbb/showthread.php?t=172577Comment
-
It is possible to go without a balancer shafts belt. He probably just left the belt off as taking the shafts out would be a pain. Use the search function and you will find some discussions of this. It doesn't really fit under the thread title, which is for basic timing belt change/maintenance.Originally posted by 9DUBWISE View PostComment
-
as in...the 10mm bolt does NOT belong there once the job is finished____Comment
-
These exact same procedures apply to h22a motors right?Comment
-
Originally posted by CustomLowz View Post
DON'T START YOUR CAR UNTIL THE HARMONIC BALANCER IS ON AND TIGHT OF THE BELT WILL COME OFF!!! I almost killed my top end that way.Comment
-
why on earth would you start the car without securing all the components first? Starting the car is the LAST thing you do...right after a double checking of all the bolts you touched...Originally posted by thepowderblue View Post ____
____Comment
-
Anybody who wants the Eric the car guy video, go to the DIY section and look there.Last edited by GeoffM; 02-20-2011, 10:42 PM.MRT
37.5 MPG, AC on, cruising at 80.
30.0 MPG, AC on, aggressively driving around 90.
27.5 MPG, no AC, cruising at 90 with occasional gridlock. 40 degrees Fahrenheit
Lots of DIY videos specifically for our car
Get some awesome wipers! <-- It's a DIY
Originally posted by Tippey764Originally posted by deevergoteComment


Comment