
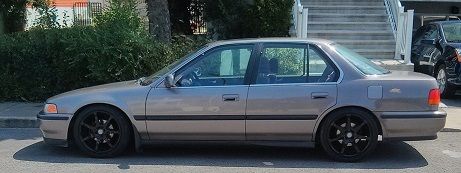
Alright, we all know that the general majority of the CB Accord population would prefer black interior over what they have currently. I know that some like the retro-looking colors, but generally, they're horrible. Especially if you have burgundy. If you have a sedan, you're in luck. The 1991 SE sedan in Solaris silver had black leather interior. If you wanted manual front belts then you could get them from a Canadian Accord or an Acura Vigor. If you wanted the wide console then your options were to look in Canada again or search for an EDM console. From that point, you have every conceivable part available to you as an OEM piece. OEM fitment with a black OEM finish that will practically never rub off.
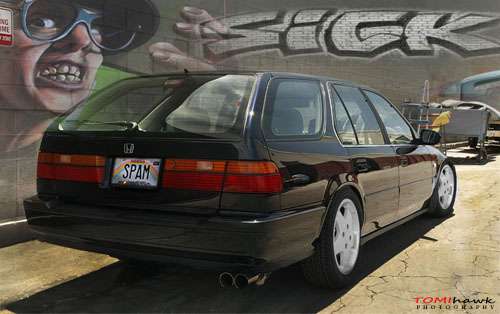
Coupes are a different story. If the coupe owners want black interior then we are forced to resort to using the parts we can from a sedan or finding a '90-'91 Phoenix red DX coupe. Even then, that will get us about halfway there if you have an LX/EX/SE coupe. As there was no coupe offered in any market in the world to come with a black interior and any power options, the '90-'91 Phoenix red DX coupe is as close as you're going to get. This still leaves us with the door-mounted armrests and front door panels (the DX panels have a hole for the crank handle) and rear lower grip handle, among many other things. Provided that you accept those shortcomings, you are also banking on the donor DX coupe to be in good condition. I have found three in my searches at junkyards and all of them were very ratted out. This is not a rule by any stretch, but something that factors into your decision to with a black interior as a coupe owner. You're also settling for DX quality interior finishes.
I have spent a long time and a lot of effort trying to acquire everything I needed to convert my coupe's interior to black from the original Palmy blue. Apart from black, blue is probably my second favorite, but I REALLY liked black. Not to mention I feel it modernizes the interior's feel. In the end, some of the interior pieces were either too difficult to find in decent condition, not available at all or I felt I could easily replicate their quality with an SEM paint or dye.
What I will show you is the process I went through to properly color my interior pieces black. You can obviously choose any color you want if you decide to do this. SEM's color range is fairly significant. I have chosen to not really show how to disassemble the interior from the car or to break the larger pieces down into individual components. If that's something that people need, I'll try to help out.
The tools you need to finish this job are simply a hair dryer and a HVLP paint gun with compressor.
Here are the materials that I used.
In addition to what's pictured, you will also need degreasing soap and water, many clean rags, a water hose close by, saw horses and ample storage. If you don't have saw horses then you can hang many of the pieces with coat hangers from the ceiling or a tree branch, but I found the saw horses easiest.

To get started, as with many projects, you must clean the piece that you're working on. I did this project at my parent's summer house and my mom happened to be there so she got put to work. Here she is cleaning parts with a hot water and degreasing dish soap solution.

Then, go ahead and wash them off.

From this point we will separate the parts into two categories. Soft vinyls and hard plastics. They take the paint differently and require different prep work. I've documented some of what was necessary to make the pieces take paint properly. We'll start with the soft vinyls such as the material the door panels are made of.
Now you'll want to dry the soft vinyl parts with a clean rag.

Next, you'll want to spray the entire area to be painted with 38343 Vinyl Prep. This is a cleaner as well as a solvent that will react with the vinyl to break down the first layer of the surface and open its pores. You could feel a slight heat coming from the vinyl once it was wiped off. You can also see the additional dirt that it loosened and I was able to get off with a rag. This part was scrubbed and cleaned just moments before with hot water and degreasing soap. You'll also notice I chose to remove the cloth lining from my panels. If you want to paint them, go ahead and leave them on and paint them at the same time. Just remember to brush the fabric constantly to prevent bunching of the fibers.

At this point, once the part is dry again, you're ready for paint. While the part is drying from the Vinyl Prep you can begin to warm up the paint. This is not absolutely necessary, but it is just a general good practice when painting from aerosol cans for the first time. It allows things to mix together much better. I'm using 15013 Color Coat in Landau black.

Then paint! Use LIGHT coats! You can always go back. You also SHOULD go back for multiple coats.

Of course, after this you'll want to set the part off to dry for a period of time so that you can get to the rest of them. Once you have everything painted, go back for a second round. What I chose to do was use the second round to get the edges and sides that I wasn't able to get from the angle I had the part resting at. For instance, the second time to paint a part I might lay it on the painted surface to paint the backs and sides of the edges. Then, for the third round, I would paint the originally painted front surface again.
Here's what I mean about a back edge.

Now you're ready to paint the hard plastics. The hard plastics are the ones that people usually have trouble with. That is understandable considering they are far less porous, they don't have any give to them to cushion impact, it's difficult to get grease and oily off of them permanently. Given all of those obstacles, you're going to need all the help you can get in order to get the paint to stick. One of the primary factors people attribute to poor results on hard plastics even with SEM products is that chemicals in the aerosol present only to enable the paint to come out of the can. Using paint that you spray with an air gun is an easy way to eliminate that as a potential issue. SEM also makes a product to prepare the surface of hard plastics to be used in exactly these instances. It's 38363 Sand Free and I used one aerosol can for all of my hard plastics and still had plenty. This stuff is tricky, though. It's designed to be applied in a wet-wet fashion. That means you need to spray the part with Sand Free and then immediately follow it up with paint before the surface has fully dried. This is another time where having a buddy to help out may come in handy. Assuming all of the parts are clean and dried from when you cleaned everything beforehand, then proceed.
Spray your parts with Sand Free...

...and then immediately hit the piece with paint from your air gun. Be sure to turn the pressure down to whatever your gun recommends. This is the $25 Harbor Freight gun and it recommends 40 psi. By the way, for a small project like this, I fully recommend this paint gun. It's cheap, but it does the job flawlessly.

When I say that you should spray in light coats, this is generally what I mean. The lower side of this piece has been gone over once with black paint and you can just barely notice the transition into the lighter gray. Multiple coats spraying this lightly will help to ensure that the paint bonds well to the plastic.

Remember to hit the back edges on these as well.

Another pointer that is applicable to both methods is to make sure that you get down into the groove that is the perimeter of the upholstered section. you want to make sure that nothing gets missed there and shows up later. Don't worry about how heavy the paint was sprayed here. The only exposed surface will be the leather grain-textured surface.

Once everything is dry, it should look like this:


I don't know if you can tell from the pictures, but it looks amazing in person. This is without any clear. I've compared them to my black dashboard and all of my other black pieces and it looks identical. Because of the light coats and how well SEM products adhere to the surface, the grain shows through perfectly to the surface.
I still have to spray clear on all of the parts but I wanted to let the paint cure first. I will leave them here for a couple of weeks and will clear them when I have a chance to go back up and spend a couple more hours on them. They were left out in the sun for a few hours so that they could bake in the Texas heat and then moved inside before I had to leave town. When leaving town I gathered them all up and brought them inside. I was in a hurry and I was more rough with them than I intended to be. Painted surfaces were rubbing against mounting clips on the backside of other panels, they were hitting door frames throughout the house and overall just not handled with museum care. There were zero scratches or any indication that there might be evidence of imperfections because of contact. Again, this is without clear coat. This is just using high quality painting products and following their process to the word.
If you have any questions, please ask away. I'll update this thread with any applicable answers. I'll also update this post once I've had a chance to actually clear these parts. I chose the low luster clear as I feel it would be the best match for the OEM shine.
Thanks for reading!
Coupes are a different story. If the coupe owners want black interior then we are forced to resort to using the parts we can from a sedan or finding a '90-'91 Phoenix red DX coupe. Even then, that will get us about halfway there if you have an LX/EX/SE coupe. As there was no coupe offered in any market in the world to come with a black interior and any power options, the '90-'91 Phoenix red DX coupe is as close as you're going to get. This still leaves us with the door-mounted armrests and front door panels (the DX panels have a hole for the crank handle) and rear lower grip handle, among many other things. Provided that you accept those shortcomings, you are also banking on the donor DX coupe to be in good condition. I have found three in my searches at junkyards and all of them were very ratted out. This is not a rule by any stretch, but something that factors into your decision to with a black interior as a coupe owner. You're also settling for DX quality interior finishes.
I have spent a long time and a lot of effort trying to acquire everything I needed to convert my coupe's interior to black from the original Palmy blue. Apart from black, blue is probably my second favorite, but I REALLY liked black. Not to mention I feel it modernizes the interior's feel. In the end, some of the interior pieces were either too difficult to find in decent condition, not available at all or I felt I could easily replicate their quality with an SEM paint or dye.
What I will show you is the process I went through to properly color my interior pieces black. You can obviously choose any color you want if you decide to do this. SEM's color range is fairly significant. I have chosen to not really show how to disassemble the interior from the car or to break the larger pieces down into individual components. If that's something that people need, I'll try to help out.
The tools you need to finish this job are simply a hair dryer and a HVLP paint gun with compressor.
Here are the materials that I used.
In addition to what's pictured, you will also need degreasing soap and water, many clean rags, a water hose close by, saw horses and ample storage. If you don't have saw horses then you can hang many of the pieces with coat hangers from the ceiling or a tree branch, but I found the saw horses easiest.
To get started, as with many projects, you must clean the piece that you're working on. I did this project at my parent's summer house and my mom happened to be there so she got put to work. Here she is cleaning parts with a hot water and degreasing dish soap solution.
Then, go ahead and wash them off.
From this point we will separate the parts into two categories. Soft vinyls and hard plastics. They take the paint differently and require different prep work. I've documented some of what was necessary to make the pieces take paint properly. We'll start with the soft vinyls such as the material the door panels are made of.
Now you'll want to dry the soft vinyl parts with a clean rag.
Next, you'll want to spray the entire area to be painted with 38343 Vinyl Prep. This is a cleaner as well as a solvent that will react with the vinyl to break down the first layer of the surface and open its pores. You could feel a slight heat coming from the vinyl once it was wiped off. You can also see the additional dirt that it loosened and I was able to get off with a rag. This part was scrubbed and cleaned just moments before with hot water and degreasing soap. You'll also notice I chose to remove the cloth lining from my panels. If you want to paint them, go ahead and leave them on and paint them at the same time. Just remember to brush the fabric constantly to prevent bunching of the fibers.
At this point, once the part is dry again, you're ready for paint. While the part is drying from the Vinyl Prep you can begin to warm up the paint. This is not absolutely necessary, but it is just a general good practice when painting from aerosol cans for the first time. It allows things to mix together much better. I'm using 15013 Color Coat in Landau black.
Then paint! Use LIGHT coats! You can always go back. You also SHOULD go back for multiple coats.
Of course, after this you'll want to set the part off to dry for a period of time so that you can get to the rest of them. Once you have everything painted, go back for a second round. What I chose to do was use the second round to get the edges and sides that I wasn't able to get from the angle I had the part resting at. For instance, the second time to paint a part I might lay it on the painted surface to paint the backs and sides of the edges. Then, for the third round, I would paint the originally painted front surface again.
Here's what I mean about a back edge.
Now you're ready to paint the hard plastics. The hard plastics are the ones that people usually have trouble with. That is understandable considering they are far less porous, they don't have any give to them to cushion impact, it's difficult to get grease and oily off of them permanently. Given all of those obstacles, you're going to need all the help you can get in order to get the paint to stick. One of the primary factors people attribute to poor results on hard plastics even with SEM products is that chemicals in the aerosol present only to enable the paint to come out of the can. Using paint that you spray with an air gun is an easy way to eliminate that as a potential issue. SEM also makes a product to prepare the surface of hard plastics to be used in exactly these instances. It's 38363 Sand Free and I used one aerosol can for all of my hard plastics and still had plenty. This stuff is tricky, though. It's designed to be applied in a wet-wet fashion. That means you need to spray the part with Sand Free and then immediately follow it up with paint before the surface has fully dried. This is another time where having a buddy to help out may come in handy. Assuming all of the parts are clean and dried from when you cleaned everything beforehand, then proceed.
Spray your parts with Sand Free...
...and then immediately hit the piece with paint from your air gun. Be sure to turn the pressure down to whatever your gun recommends. This is the $25 Harbor Freight gun and it recommends 40 psi. By the way, for a small project like this, I fully recommend this paint gun. It's cheap, but it does the job flawlessly.
When I say that you should spray in light coats, this is generally what I mean. The lower side of this piece has been gone over once with black paint and you can just barely notice the transition into the lighter gray. Multiple coats spraying this lightly will help to ensure that the paint bonds well to the plastic.
Remember to hit the back edges on these as well.
Another pointer that is applicable to both methods is to make sure that you get down into the groove that is the perimeter of the upholstered section. you want to make sure that nothing gets missed there and shows up later. Don't worry about how heavy the paint was sprayed here. The only exposed surface will be the leather grain-textured surface.
Once everything is dry, it should look like this:
I don't know if you can tell from the pictures, but it looks amazing in person. This is without any clear. I've compared them to my black dashboard and all of my other black pieces and it looks identical. Because of the light coats and how well SEM products adhere to the surface, the grain shows through perfectly to the surface.
I still have to spray clear on all of the parts but I wanted to let the paint cure first. I will leave them here for a couple of weeks and will clear them when I have a chance to go back up and spend a couple more hours on them. They were left out in the sun for a few hours so that they could bake in the Texas heat and then moved inside before I had to leave town. When leaving town I gathered them all up and brought them inside. I was in a hurry and I was more rough with them than I intended to be. Painted surfaces were rubbing against mounting clips on the backside of other panels, they were hitting door frames throughout the house and overall just not handled with museum care. There were zero scratches or any indication that there might be evidence of imperfections because of contact. Again, this is without clear coat. This is just using high quality painting products and following their process to the word.
If you have any questions, please ask away. I'll update this thread with any applicable answers. I'll also update this post once I've had a chance to actually clear these parts. I chose the low luster clear as I feel it would be the best match for the OEM shine.
Thanks for reading!

 Man, this is awesome! I have been thinking about doing this for some time. I think I'm going to be doing this in the near future.


Comment