Announcement

Collapse
No announcement yet.

Rilas : 1993 Accord SE

Collapse
X
 
  • Filter
  • Time
  • Show
Clear All
new posts

    Originally posted by Darkcloud View Post
    Nice build so far

    How do you like the dohc f22b
    Thanks Darkcloud!

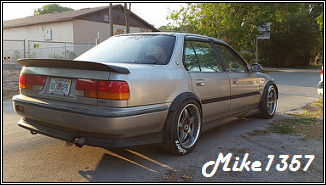
    Honestly I have no real opinion of it so far. I've maybe driven it 10 miles since it was swapped to the F22B dohc of which it has been an auto. This being the only auto CB7 I've driven, I don't even have anything to compare it to. Hopefully in a few weeks I'll have a better opinion of how I like it. But it runs fantastic as it is currently. I've had no issues with it since tearing it down. Then again I would certainly hope I haven't had any issues lol. As I can compare it to the F22A4 that has a bunch of toys and get a true sense of where it is. Also it will be getting the H23A1 transmission from the sedan, so I should have a really good idea of how it compares.
    MRT: 1993 Honda Accord SE Coupe (Lola)

    Comment


      I admire your perseverance and dedication. You've got so many things going on and you still make time. I get tired just thinking of my plans for the CB.
      1993 Accord DX | Rosewood Brown Metallic

      Comment


        Originally posted by apalileo View Post
        I admire your perseverance and dedication. You've got so many things going on and you still make time. I get tired just thinking of my plans for the CB.
        Thanks for the compliment Apalileo! There are days that I don't even have the motivation to even change and go out in the garage. Yet somehow I always manage to drag my ass to it. For some reason I'm the only person to work on my projects so if I don't suck it up and do it, well it won't get done. Trust me though the last 2 nights working on tearing this auto trans out I haven't been very motivated at all. I just keep plugging away at it though.
        MRT: 1993 Honda Accord SE Coupe (Lola)

        Comment


          So a few updates for the last couple of days. Lola has undergone the knife and is currently down for a bit.

          The transmission is more or less fully prepped to come out of the car tonight. The only things still left to disconnect are the 2 coolings lines, 3 bolts to engine, and the motor mount. After getting out the rear T bracket and the rear motor mount, I got to see just how bad the remaining 2 mounts are. I can literally rock the motor by hand till the transmission hits the rear subframe or forward till it hits something else. Good thing I have the new Innovative side mounts to replace these guys, they should help a tremendous amount. So in the process of doing this conversion I got the drivers side knuckle out and ready to go to the tire shop to see if they can break loose the frozen axle nut. I'll know more on that later today. Also if they can get the axle out I'm going to have them press out the lower ball joint in the knuckle and press in the new OEM ball joint. Also they are going to press out the ball joint on the upper control arm for me. So that will wrap up a few long outstanding issues the car has had. So I did take a few pictures with the cell phone last night. I'm so sorry for the quality, as the lens is scratched to shit and also has 3 cracks in it.

          Passenger Side Auto Transmission Removal


          Driver Side Auto Transmission Removal


          Engine Bay (Sorry for the blur the camera refused to focus on what I was trying to get it to.)


          Auto Transmission Fully Prepared to Remove (Same deal stupid camera kept wanting to focus on the upper radiator hose and not anything else.)


          PLM H22 Header with F22 Flange Welded Solid (Yet again the camera would not focus on any part of the exhaust, this was the best picture I got of it.)


          So tonight the transmission will come out and I'll get the rest of the interior torn out, and prepped. I need to go up to my parts car and get the shifter plate and the pedals. I might do that tonight depending on how quick the transmission comes out. I don't really foresee any problems though. I have the jack ready for the engine and had to dig out and assemble the cherry picker to lower the transmission out. Hopefully that will take no more than 1/2-1 hour then I can make the drive up to the other garage where the parts car resides and get what I need done there. At least there is progress being made again on this car. On Friday morning I'm going to see how much the registration is going to be. I'm hoping that by the end of the weekend or early next week she will be road legal and ready.
          MRT: 1993 Honda Accord SE Coupe (Lola)

          Comment


            Not sure why I haven't been following this build however great job on everything so far, making quite the progress! Looking forward to more updates.

            One thing I find strange and may just be the camera angle but im concerned about the powder coating on your tower bars. Outside of the chip it looks like there tons of cracks running through the clear coating in the powder coating and if that's the case there was either and error in the powder coating process or they were shipped in the wrong packaging for the item allowing them to bang around and dmg the paint.

            This pic shows it along with the other bars like the lower rear sub frame brace.


            This has a lot of cracks running in it in the side facing the camera and the box ends.
            Last edited by baracuda; 04-27-2016, 03:15 PM.


            Sold too: Grumpys93, '93CB7Ex, Bunta, prodh22accord, SSMAccord, fleetw00d

            Comment


              Baracuda I have concerns about all the cracks in the powder coating as well. But that is how they looked when I unwrapped them. I haven't even read on it to see if I should be concerned. But for the price of these bars, imo it shouldn't have even been chipped let alone have cracks in the color/clear.

              Thanks for the compliments man!
              MRT: 1993 Honda Accord SE Coupe (Lola)

              Comment


                Originally posted by Rilas View Post
                Baracuda I have concerns about all the cracks in the powder coating as well. But that is how they looked when I unwrapped them. I haven't even read on it to see if I should be concerned. But for the price of these bars, imo it shouldn't have even been chipped let alone have cracks in the color/clear.

                Thanks for the compliments man!
                The clear coat then appears to have been under cured by either not allowing it long enough time in the oven or that temps were too low. It might be possible to toss it back in an oven to allow the coat to reflow and that would get rid of the cracks and fully cure it, however I'm not 100% sure on how long you have from time its 1st out of the oven and then trying to re-cure it and it being effective. For the money you spent on them call ESP and complain about it, I have their motor mounts and have zero cracking. The entire point of powder coating is it being super durable hard shell that doesn't chip or crack.

                The cracking is a classic indication of undercure. This could be caused by under time or under temp. I experienced this same problem when we were first getting involved with powder coating. I had coated a piece of chrome and a few days later I noticed the spider web crack pattern. I placed the part back in the oven for another cure cycle and the cracks went away never to return.

                In the interim, I’ve coated numerous parts without a recurrence of the cracking problem. The problem will very likely go away if you increase the cure time.

                You can test to make sure your getting a full cure with an impact test or solvent wipe test. A properly cured Polyester or Polyurethane finish should not leave much color or soften significantly when lightly wiped with a rag with MEK. If you lightly strike the surface with a screwdriver blade there should be no chipping.


                Sold too: Grumpys93, '93CB7Ex, Bunta, prodh22accord, SSMAccord, fleetw00d

                Comment


                  That new header is wicked!!! Great job, that should be better than Bisimoto in every single way. Awesome progress on the car as always too. I have an idea for ya and I honestly think you've probably thought of it already! On my auto to manual swap, I utilized "abandoned/no longer used" wiring from the auto tranny for my reverse lights. Since those wires are already in the engine harness, it comes out way cleaner than adding wires thru the firewall. Plus, extra wires could be used for VTEC too. By the ecu, I simply jammed male pins directly into the old TCU connector. My reverse lights use grn/blk + yel (old shift solenoid wires) which is funny b/c those are the same exact colors for the rev lights on a manual car.

                  Comment


                    Originally posted by Granite CB7 View Post
                    That new header is wicked!!! Great job, that should be better than Bisimoto in every single way. Awesome progress on the car as always too. I have an idea for ya and I honestly think you've probably thought of it already! On my auto to manual swap, I utilized "abandoned/no longer used" wiring from the auto tranny for my reverse lights. Since those wires are already in the engine harness, it comes out way cleaner than adding wires thru the firewall. Plus, extra wires could be used for VTEC too. By the ecu, I simply jammed male pins directly into the old TCU connector. My reverse lights use grn/blk + yel (old shift solenoid wires) which is funny b/c those are the same exact colors for the rev lights on a manual car.
                    Thanks Granite! I hope that this header finally performs the way I always hoped it would. But there was no option of making it one solid piece without the traction bar. There would be no way to install or remove it without having to remove the entire front sub frame every time. I really didn't want to go down that road. Also I had thought about using one pair of the wires for the backup lights on the manual. Also using another set for VTEC is a great idea. Although my eventual plan is to find a engine and body harness of a 92-93 manual coupe and swap the entire thing at some point. But once I'm on that road I can just add in the wires to the harness itself. For the time being though, using the extra wires from the auto harness to take care of my extra stuff.
                    MRT: 1993 Honda Accord SE Coupe (Lola)

                    Comment


                      A bit of an update. Last night yielded probably the best progress of the week. Finally the transmission is out of the car. It came out flawlessly. Well if I had remembered to unplug the VSS it would have been flawless. Also I got all the other auto related odds and ends removed. I also managed to start taking apart the center console, but didn't get very far on it. The auto brake pedal is now removed, the block plate for the clutch is removed. The main hard line on the firewall for the clutch is installed. What a bitch this was, I should have just used one of the other methods and skipped the OEM hard line. Oh well it's done and over now . I feel like I'm forgetting some stuff, but mainly the hardest of the work for removal and re-installation is now done. It is going to be so much easier to get the manual transmission into place as it's so much smaller. I didn't take any pictures last night since, there wasn't much to look at besides a half empty engine bay, and my phone camera is sucking due to the messed up lens.

                      Tonight I'm headed up to the parts car to get the brake pedal, clutch pedal and associated mounting brackets, shifter plate, and anything else I might be forgetting at the moment. So I'm well on my way to having this wrapped up this weekend. Also yesterday I got a pair of shifter cables to pick up locally tomorrow. So that is another huge relief off my shoulders. Also everything at the tire shop was able to get taken care of. So now my driver side auto axle is out of the knuckle. The knuckle has a new OEM ball joint in it, and the upper control arm has it's ball joint pressed out so I can install a new adjustable one. I seriously feel like there is actually a light at the end of the tunnel, and once in the light I finally get to drive it legally!!
                      MRT: 1993 Honda Accord SE Coupe (Lola)

                      Comment


                        Thanks for the update! This is great news.
                        1993 Accord DX | Rosewood Brown Metallic

                        Comment


                          The header looks great. That's a neat idea for the reverse light. Mine still aren't hooked up. The manual swap is a fun swap as it's not really a huge pain. I know you said you have the stock line in already but you may want to just get the braided line anyways. With the stock lines, I've heard bleeding the clutch sucks. With the stainless line, a few minutes of gravity bleeding and three with someone pumping the clutch had the system completely bled in less than ten minutes. Just something to think about.

                          Comment


                            Originally posted by Mike1357 View Post
                            The header looks great. That's a neat idea for the reverse light. Mine still aren't hooked up. The manual swap is a fun swap as it's not really a huge pain. I know you said you have the stock line in already but you may want to just get the braided line anyways. With the stock lines, I've heard bleeding the clutch sucks. With the stainless line, a few minutes of gravity bleeding and three with someone pumping the clutch had the system completely bled in less than ten minutes. Just something to think about.
                            Thanks Mike!

                            Actually I don't have any issues bleeding these damn stock clutches as I've had more than enough practice at it now. Last time I had to bleed it, I had it done in about 10 minutes by myself. I just used a 2x4 to hold the clutch down after pumping, then just go open the bleeder at the slave cylinder, once the pressure pumps out as much fluid as it can, I just squeeze the slave cylinder the rest of the way by hand then tighten it up. Usually the air gets trapped in the last little bit of the slave cylinder. Squishing it by hand like this usually 3-4 times and the clutch is fully bled. But yes I have had the hours long battles just to bleed the clutch in the past. Down the road I have plans to swap to a S2K master cylinder and use a braided line between it and the slave and rip all the rest out. Just I didn't have the funds to go down that road currently. As everything I picked up at the junk yard for the swap ran me $32.
                            MRT: 1993 Honda Accord SE Coupe (Lola)

                            Comment


                              ^I totally agree with ya, there's always a ton of air @ the slave + manually squeezing it out works wonders! Ditching the clutch damper does wonders too for faster bleeding and better clutch feel. I hear you with the 1 piece header, it def has it's drawbacks since we have a front x member! I'm in the same boat with my Bisimoto header, as the slipjoints HAVE TO be welded shut (awful fit and finish). May add a v band just below the collector. Very very ambitious with changing out the chassis harness, that's a pretty big undertaking!

                              Comment


                                Originally posted by Granite CB7 View Post
                                ^I totally agree with ya, there's always a ton of air @ the slave + manually squeezing it out works wonders! Ditching the clutch damper does wonders too for faster bleeding and better clutch feel. I hear you with the 1 piece header, it def has it's drawbacks since we have a front x member! I'm in the same boat with my Bisimoto header, as the slipjoints HAVE TO be welded shut (awful fit and finish). May add a v band just below the collector. Very very ambitious with changing out the chassis harness, that's a pretty big undertaking!
                                I've seriously been thinking about putting a v-band at the end of this thing. I actually have a 2.5" Vibrant stainless steel flex pipe for the exhaust, and 8' of straight 2.5" Vibrant stainless steel tubing. So I have what I need to fix the stupid flex join POS, that is currently at the end of it. Glad to hear that you think this PLM header will actually out perform Bisimoto's. I always lusted after one but could never justify the price of one after missing the group buy, by years. Also since PLM has released a Bisimoto replica for the H22 I was debating getting one for the H22. But I might just go with the another PLM like this one or grab one of the 4-1 long pipes like Mike and (I think) Illinois_Eric has (can't remember the brand for the life of me right now). Those damn Bisimoto's just look so damn cool though.
                                MRT: 1993 Honda Accord SE Coupe (Lola)

                                Comment

                                Working...
                                X