
So i just changed my rear motor mount today. It's wasn't that bad. I was looking at all the DIY's on here and no one had any pictures of a DIY removal from the top without removing the intake manifold.
I'll post what i have now and fix the rest later
You need basic tools, liquid wrench, long pry bar, extensions (2 feet), two flex heads, jack, breaker bar, and torque wrench.
Jack up the front of the car and put it on jack stands.
Lets start with the most tricky bolt first because if you can't get this off theirs no point skipping steps.
Use extensions and 2 flex heads to turn the drivers side bolt on the motor mount. This will come out right behind the intake near the firewall. This is meant to bust the bolt lose.
Get under the car and loosen the bolt with a wrench but don't remove it
Remove intake tube/box
Spray the two lower mount bolts with liquid wrench (Passengers side). Loosen them up but do not remove

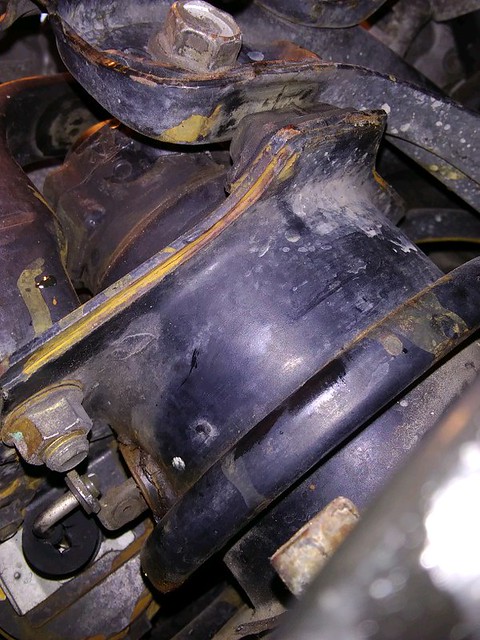
^You will need to remove that big metal cover on top of the mount (You can see the metal cover on the last picture on this write up. Loosen up and remove the two bolts with extensions. Remove the metal cover as it will allow for more wiggle room.
Place a jack on the transmission. This will allow you to raise and lower the engine a few inches for room.
This is where you have to play around a bit.
[IMG] [/IMG]
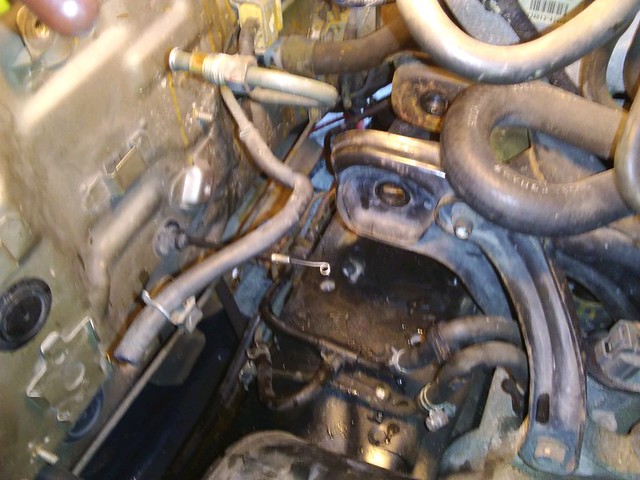
Remove the control box

Remove your charcoal canister and unbolt your fuel filter from the bracket. (You can remove the fuel filter if you need more room check for proper removal).
Once that's out of the way remove your big bolt.
Unplug the vacuum hose connected to the rear motor mount.
^remove the heater hose from the fire wall. Make sure the switch is pointed to the back of the car this will prevent lose of coolant.

Now it's time to remove the 3 lower mount bolts. Use a pry bar and remove slide the mount towards the back. The heater hose will get in the way so take your time working around it.
Twist and turn the mount and work it out from the passengers side.
Once it's out take a break
Unbolt and unplug the vacuum unit from the firewall. This is the one connected to the rear motor mount.
Be careful! I broke the nipple that the hose holds on to on the old mount. You don't want to spend more money just because you broke a tiny peace.

I used a blow dryer to warm up the original hose before i put it on. Just to be on the safe side that i got a good bite i used some heat shrink on the tube (red tube).
Remove the top metal cover on the new mount. Put the new rear motor mount in and bolt in the middle big bolt first. Now bolt it the 3 lower bolts an torque everything in to spec.
I'll post what i have now and fix the rest later
You need basic tools, liquid wrench, long pry bar, extensions (2 feet), two flex heads, jack, breaker bar, and torque wrench.
Jack up the front of the car and put it on jack stands.
Lets start with the most tricky bolt first because if you can't get this off theirs no point skipping steps.
Use extensions and 2 flex heads to turn the drivers side bolt on the motor mount. This will come out right behind the intake near the firewall. This is meant to bust the bolt lose.
Get under the car and loosen the bolt with a wrench but don't remove it
Remove intake tube/box
Spray the two lower mount bolts with liquid wrench (Passengers side). Loosen them up but do not remove
^You will need to remove that big metal cover on top of the mount (You can see the metal cover on the last picture on this write up. Loosen up and remove the two bolts with extensions. Remove the metal cover as it will allow for more wiggle room.
Place a jack on the transmission. This will allow you to raise and lower the engine a few inches for room.
This is where you have to play around a bit.
[IMG]
[/IMG]Remove the control box
Remove your charcoal canister and unbolt your fuel filter from the bracket. (You can remove the fuel filter if you need more room check for proper removal).
Once that's out of the way remove your big bolt.
Unplug the vacuum hose connected to the rear motor mount.
^remove the heater hose from the fire wall. Make sure the switch is pointed to the back of the car this will prevent lose of coolant.
Now it's time to remove the 3 lower mount bolts. Use a pry bar and remove slide the mount towards the back. The heater hose will get in the way so take your time working around it.
Twist and turn the mount and work it out from the passengers side.
Once it's out take a break
Unbolt and unplug the vacuum unit from the firewall. This is the one connected to the rear motor mount.
Be careful! I broke the nipple that the hose holds on to on the old mount. You don't want to spend more money just because you broke a tiny peace.
I used a blow dryer to warm up the original hose before i put it on. Just to be on the safe side that i got a good bite i used some heat shrink on the tube (red tube).
Remove the top metal cover on the new mount. Put the new rear motor mount in and bolt in the middle big bolt first. Now bolt it the 3 lower bolts an torque everything in to spec.


Comment