
Got pictures up now. Check up above. I'm new to DIY posting so give me a break, ok.
This DIY is for those whose like the sleek looking LED lights. Cool thing about these lights is that you can cut them to size where they say to cut them at!! You can do this with very little modification to your car and its very easy to do! I am in no way responsible for anything that happens while installing these. You do this at your own risk. This is my first DIY so if I'm doing this wrong please let me know. Thank you.
Items needed:
LED lights- Got mine from AutoZone- New style and they just got them in
Wiring
Electrical Tape
Cutters/Wire Strippers
Phillips Screwdriver
Wire Splices
Connectors for ground wires
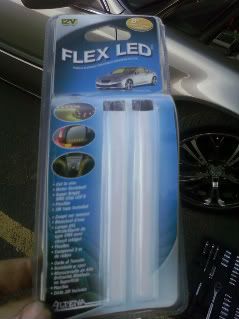
1) First off you need to have the LEDs that you want. They had White, Yellow or Amber or Red. I used Amber to keep in the law and not get into trouble.
This DIY is for those whose like the sleek looking LED lights. Cool thing about these lights is that you can cut them to size where they say to cut them at!! You can do this with very little modification to your car and its very easy to do! I am in no way responsible for anything that happens while installing these. You do this at your own risk. This is my first DIY so if I'm doing this wrong please let me know. Thank you.
Items needed:
LED lights- Got mine from AutoZone- New style and they just got them in
Wiring
Electrical Tape
Cutters/Wire Strippers
Phillips Screwdriver
Wire Splices
Connectors for ground wires
1) First off you need to have the LEDs that you want. They had White, Yellow or Amber or Red. I used Amber to keep in the law and not get into trouble.
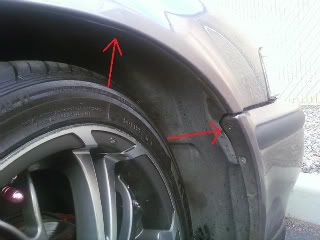
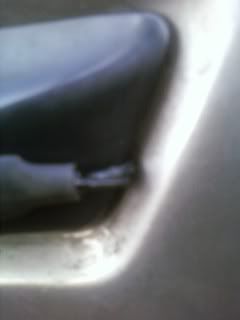
2) Next you want to loosen the screws that holds the wheels splash guard on, or you can work around them. I didn’t bother unscrewing the first screw closest to the gap on the front bumper. See Picture:
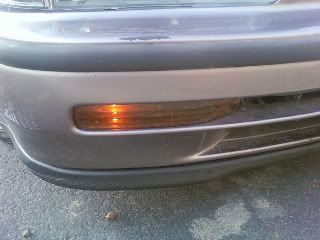
3) I hooked my positive wire to the lower turn light so they only be on when those lights where on. You can hook them up so the stay on all the time and flash when using your turn signals but I think it saves the life of the lights by just using them for just turn signals and nothing else. Have fun and mess around with however you want them to light up. Hook up the positive wire and use step 2 as a guide on how to hide wire.
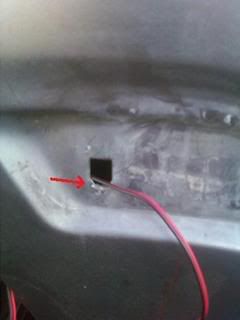
4) Next you want to remove the small black trim piece on both sides of the car. Use some wire cutters to cut some of the sheet metal to allow the wire some extra room to fit and so the trim fits back nicely when
You put it back on. See how very little I cut out? Nice thing is, this is all the cutting for this mod!! Put your wire through first hole and wrap the first 4-6 inches so the sharp edges don’t cut wire and cause shorts or kill the LEDs themselves. Find a spot for the ground wire to go. I was lazy and put mine on one of screws that holds the splash guard on. I would recommend using a larger circle connector than I did. I had to cut mine to fit. Hook up the wires and tuck away. I feed the wire all the way in before I put it on the trim piece. I then centered and applied the lights.
5) I feed the wire all the way in before I put it on the trim piece. I then centered and applied the lights. Here are some pictures on where I put the lights and how well the trim fits back on.
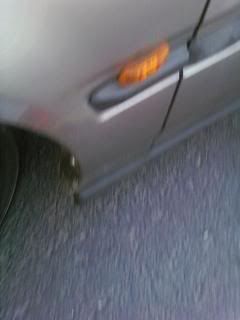
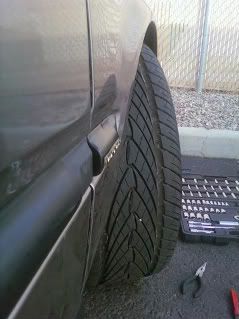
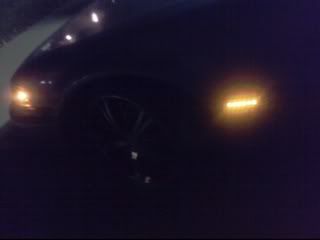
6) Turn on flashers or lights and check to see if they are working. Have fun showing them off! Here are some before and after pictures and what a big difference.
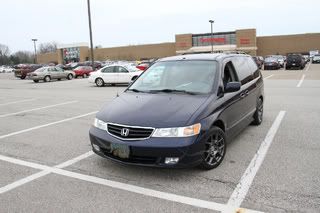
Before:
After:
Night shot:
Sorry if pictures are blurry. I couldn’t find my camera and I used my cell phone instead.
Have fun with the lights!!
This DIY is for those whose like the sleek looking LED lights. Cool thing about these lights is that you can cut them to size where they say to cut them at!! You can do this with very little modification to your car and its very easy to do! I am in no way responsible for anything that happens while installing these. You do this at your own risk. This is my first DIY so if I'm doing this wrong please let me know. Thank you.
Items needed:
LED lights- Got mine from AutoZone- New style and they just got them in
Wiring
Electrical Tape
Cutters/Wire Strippers
Phillips Screwdriver
Wire Splices
Connectors for ground wires
1) First off you need to have the LEDs that you want. They had White, Yellow or Amber or Red. I used Amber to keep in the law and not get into trouble.
2) Next you want to loosen the screws that holds the wheels splash guard on, or you can work around them. I didn’t bother unscrewing the first screw closest to the gap on the front bumper. See Picture:
3) I hooked my positive wire to the lower turn light so they only be on when those lights where on. You can hook them up so the stay on all the time and flash when using your turn signals but I think it saves the life of the lights by just using them for just turn signals and nothing else. Have fun and mess around with however you want them to light up. Hook up the positive wire and use step 2 as a guide on how to hide wire.
4) Next you want to remove the small black trim piece on both sides of the car. Use some wire cutters to cut some of the sheet metal to allow the wire some extra room to fit and so the trim fits back nicely when
You put it back on. See how very little I cut out? Nice thing is, this is all the cutting for this mod!! Put your wire through first hole and wrap the first 4-6 inches so the sharp edges don’t cut wire and cause shorts or kill the LEDs themselves. Find a spot for the ground wire to go. I was lazy and put mine on one of screws that holds the splash guard on. I would recommend using a larger circle connector than I did. I had to cut mine to fit. Hook up the wires and tuck away. I feed the wire all the way in before I put it on the trim piece. I then centered and applied the lights.
5) I feed the wire all the way in before I put it on the trim piece. I then centered and applied the lights. Here are some pictures on where I put the lights and how well the trim fits back on.
6) Turn on flashers or lights and check to see if they are working. Have fun showing them off! Here are some before and after pictures and what a big difference.
Before:
After:
Night shot:
Sorry if pictures are blurry. I couldn’t find my camera and I used my cell phone instead.
Have fun with the lights!!


Comment