Announcement

Collapse
No announcement yet.

Electrolytic Cleaning of iron parts

Collapse
X
 
  • Filter
  • Time
  • Show
Clear All
new posts

    Electrolytic Cleaning of iron parts

    Hey folks, I started cleaning my exhaust manifold today and I thought I would share some pictures of the process.

    Exhaust manifold before cleaning.


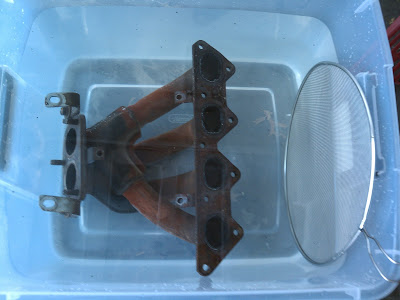
    Exhaust manifold (cathode) in electrolyte (water + baking soda), along with anode (stainless steel splatter screen).


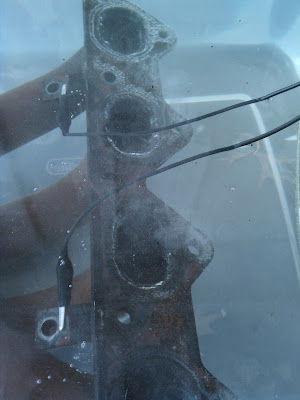
    Electrolysis in the making.


    A video of the setup.

    #2
    There was write up about cleaning fuel tank using this method. I heard it came out good.

    Didn't see your vid. How did you make out?
    A&P-IA

    Comment


      #3
      I just turned it on about an hour ago. It seems to be going along well. I'll definitely need to run it twice, as the process is happening only on the portions closest to the anode. It's pretty much line of sight; electricity takes the shortest path possible (think lightning, same principle). I may alter the setup and grab another screen to place on the other side of the tank so I don't have to do it twice.

      Comment


        #4
        I'm looking forward to the outcome! I've never even heard of this before. Could be a cool way to refresh lots of aging (but perfectly functional) parts!

        Nice use of the computer power supply. I have an extra one sitting around... What wattage is it?


        Comment


          #5
          This is cool.

          Definitely want to see the outcome as well.


          Form.Follows.Function

          Comment


            #6
            Originally posted by deevergote View Post
            I'm looking forward to the outcome! I've never even heard of this before. Could be a cool way to refresh lots of aging (but perfectly functional) parts!
            Originally posted by Function>Form View Post
            This is cool.

            Definitely want to see the outcome as well.
            I'll be sure to take photos when it's done, . The process works best on iron, but I think it's possible to use it on aluminum parts as well. Fortunately, aluminum oxidation (rust is the term for iron oxidization) doesn't cause problems like rust does, so it's not really a problem that needs addressing often. Just a note, this process only removes rust, it can't replace metal.

            Originally posted by deevergote View Post
            Nice use of the computer power supply. I have an extra one sitting around... What wattage is it?
            It's an old PSU from a DELL machine. It's 375 W max continuous power. It has two twelve volt rails, rated 18 A individually. Max combined power on the two rails is 360 W, but usually PSUs don't limit the combined, only the individual. I highly doubt I'm drawing even close to maximum ratings though, I think the setup has too much resistance (the nature of the beast, nothing I can do really). I would need more voltage to get more current, and that's not something the PSU does. I might stick an ammeter on it if I get a hold of one that's rated for it.

            Comment


              #7
              It's a really similar process if you wanna try and anodize any aluminum too. Difference is you gotta use sulfuric acid instead of water and baking soda.

              Comment


                #8
                Originally posted by Sarthos View Post
                It's a really similar process if you wanna try and anodize any aluminum too. Difference is you gotta use sulfuric acid instead of water and baking soda.
                And swap the anode and cathode, hence "anodizing," ! Yep, electroplating is basically the opposite of electrolysis. There are a bunch of different chemical reactions that can take place in an electrolytic.
                Last edited by reklipz; 07-21-2012, 08:51 PM.

                Comment


                  #9
                  Ah yes, I didn't pay enough attention to notice they were flipped. But you're looking for a better power supply? If you know anyone with an old refrigerator or an old microwave you might be able to get one. Or some cheap household stereos have larger power supplies too. Otherwise you can just throw together multiple supplies together

                  Comment


                    #10
                    Originally posted by Sarthos View Post
                    It's a really similar process if you wanna try and anodize any aluminum too. Difference is you gotta use sulfuric acid instead of water and baking soda.
                    And you need to use different voltages besides 12 volts to get different colors.

                    Comment


                      #11
                      I use this method all the time. I am restoring a 69 mini and used it to clean most of the parts. Stick with 12v . I use a deep cycle battery and a good charger.

                      IT IS WHAT IT IS

                      Comment


                        #12
                        I rearranged the anode (mesh) so that it is laying over top of the exhaust (not touching it though! that would cause a short circuit). I measured with my ammeter and it was reading ~12 amps. Adding more electrolyte to the solution (more baking soda, or salt, something ionic), will up the current a bit. My power supply is more than capable for this job, can do 30 amperes, so the power supply is not the issue, the setup is. Upping the voltage will allow more current, or adding more baking soda to the solution (to allow more reaction to happen at once). I think I'll stick with it as it is, though.

                        Also, with the anodization. The anodized portion (the black on aluminum) is very porous. The way folks get exotic colors (like on consumer electronics, think portable music players), is by dying the anodized portion with an organic dye. Pretty cool.

                        Comment


                          #13
                          I don't have any photos this go around, so you'll have to take my word for it. Parts of the screen corroded through and it is falling apart, so I'll have to find a new anode to finish with. I took the manifold out of the tank and wiped it "clean" with a rag. It had a green film on it, along with a black one underneath. I could wipe the film off, and it looks like clean iron underneath; I'll have to take a bit more abrasive pad (scotch brite pad) and see what I can. Otherwise, it appears to work. Photos in the next post hopefully.

                          Comment


                            #14
                            So, how do you intend to keep it as clean iron when you're done? Ceramic clearcoat?

                            Comment


                              #15
                              I intend to paint it with a high temp flat black.

                              Comment

                              Working...
                              X