
Matsushita CQ-LH1410S Rotary Switch Knob Removal
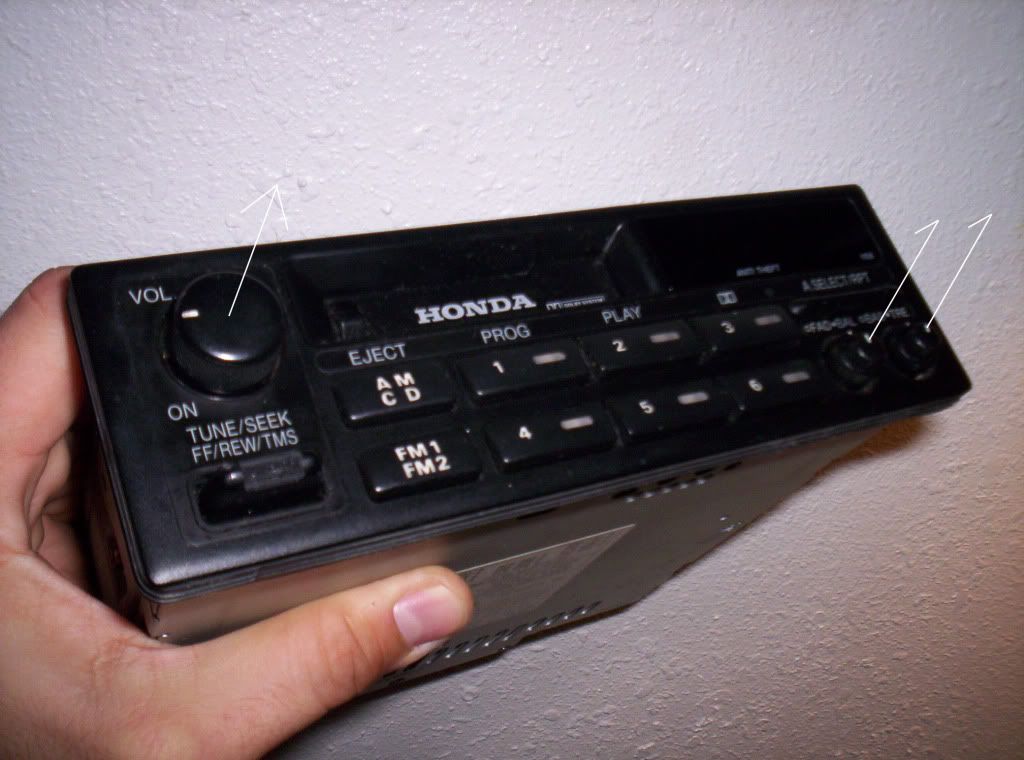
The Matsushita CQ-LH1410S (Honda P/N 39100-SV4-A000) was the stock head unit that came on my 1997 Honda Accord EX-V6. This removal procedure may help with other Honda units with a Single-shaft Rotary Switch type Knob such as the stock head units found on the CB Accords. My Switch Knob started to loose its ability to switch the head unit off, I have seen this on other rotary switch knob equipped Honda head units. This thread should be good info for you guys wanting to maintain a stock look in your classic (+20 y.o.) Hondas.
Tools
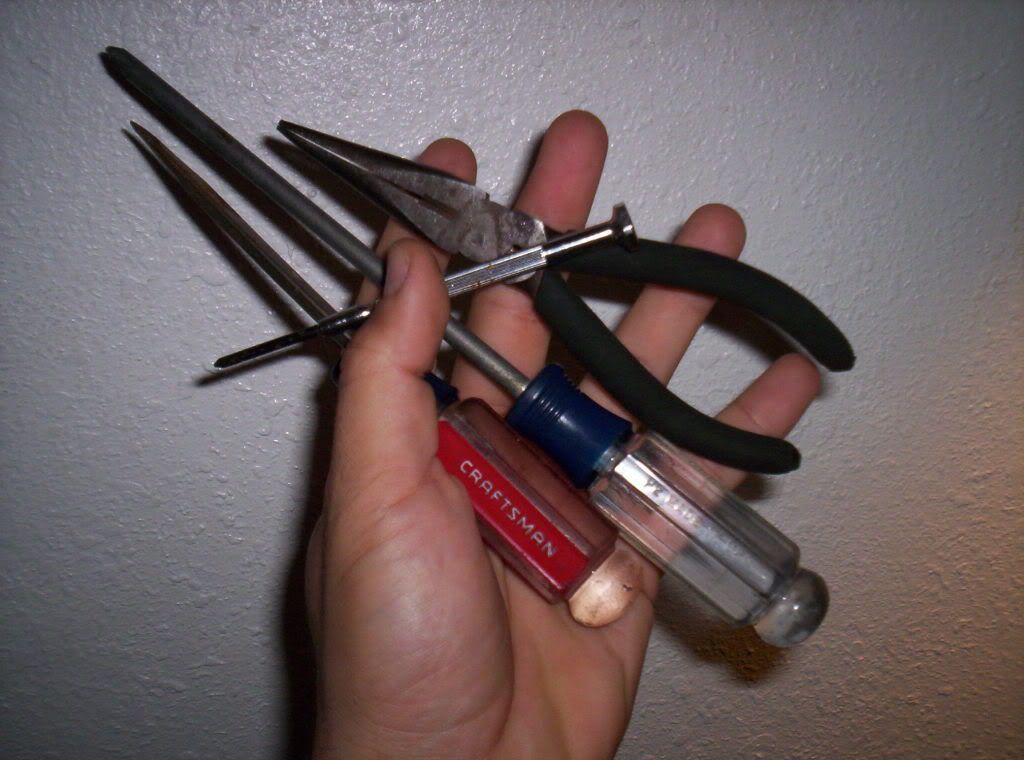
Note: Keep track of which screws go where, they vary in length and are organized by the fastener's ability to impact other components within the head unit.
Instructions
Step 1. Remove the radio.
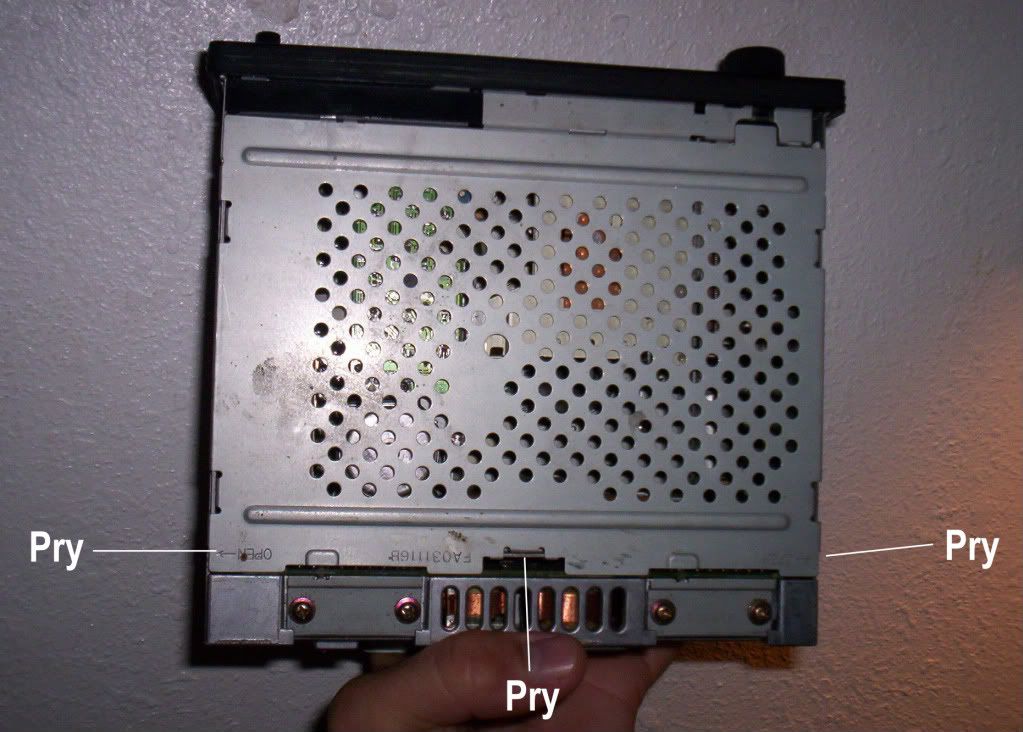
Step 2. Remove the top cover by prying up on it at the points shown below.
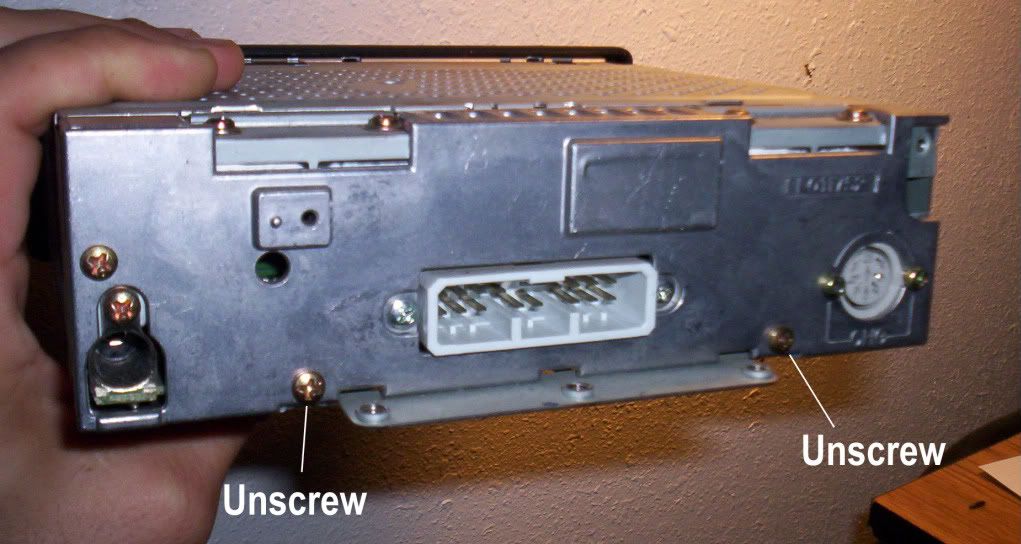
Step 3.1. Remove the bottom cover by first removing screw numbers one and two shown below.
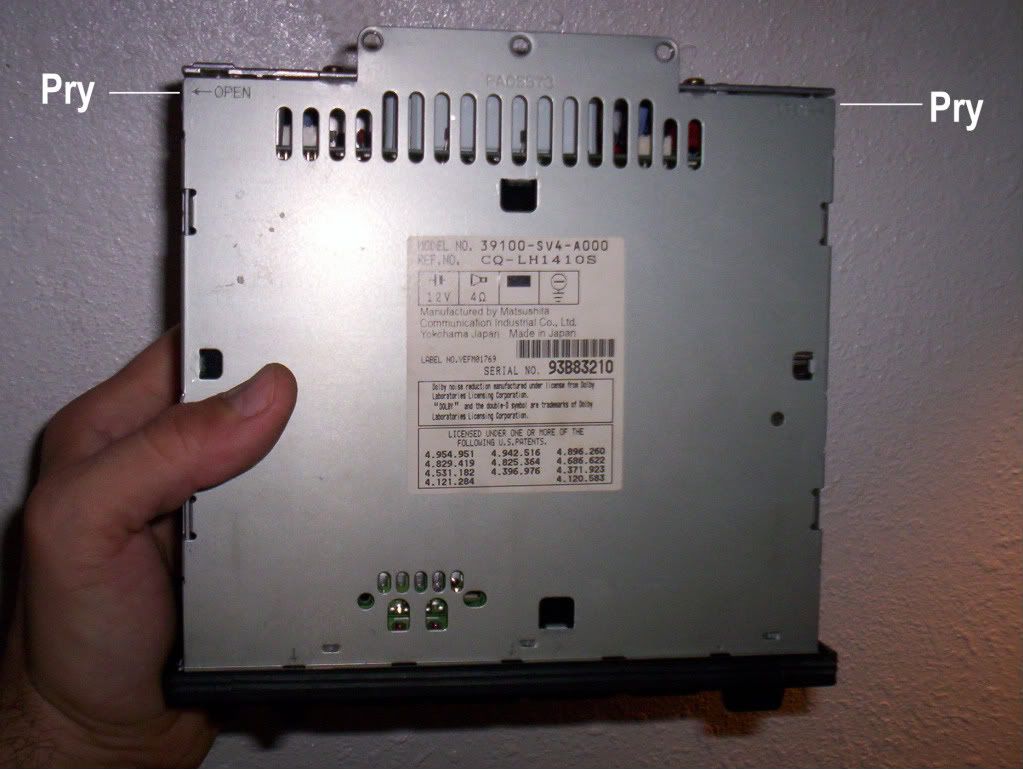
Step 3.2. Now pry the bottom cover off at the points shown below.
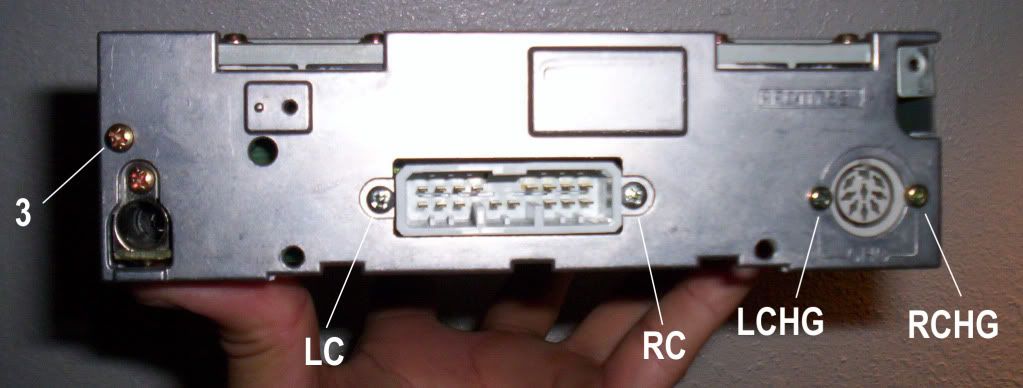
Step 4. Remove the back cover by removing the: Left Connector screw (LC), Right Connector screw (RC), Left CD Changer Connector screw (LCHG), Right CD Changer Connector screw (RCHG), and screw number three; all shown below.
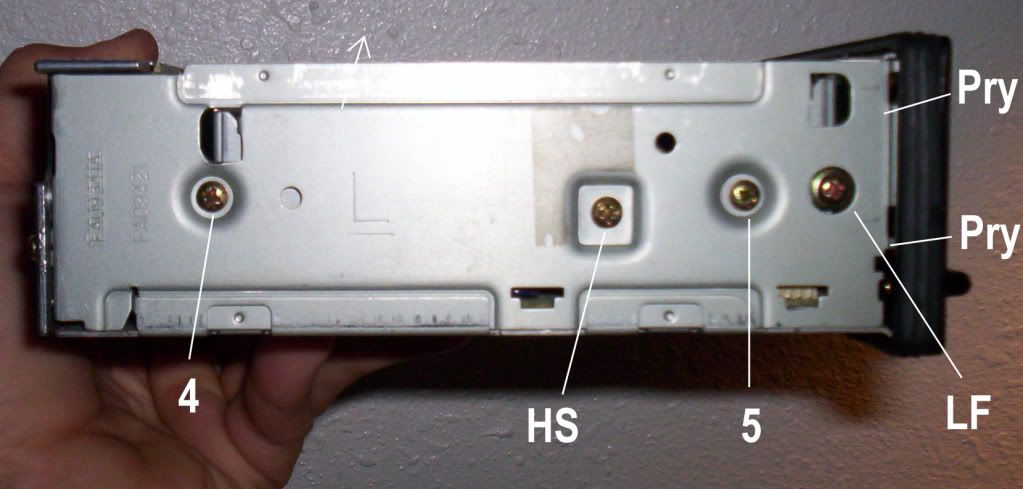
Step 5. Remove the left cover by removing the: Heat Sink screw (HS), Left Face screw (LF), and screw numbers four and five. Pry the bottom of the face first, the left cover is hooked at the top and will need to swing up to come out; pry the top of the face second to get the cover free from the unit.
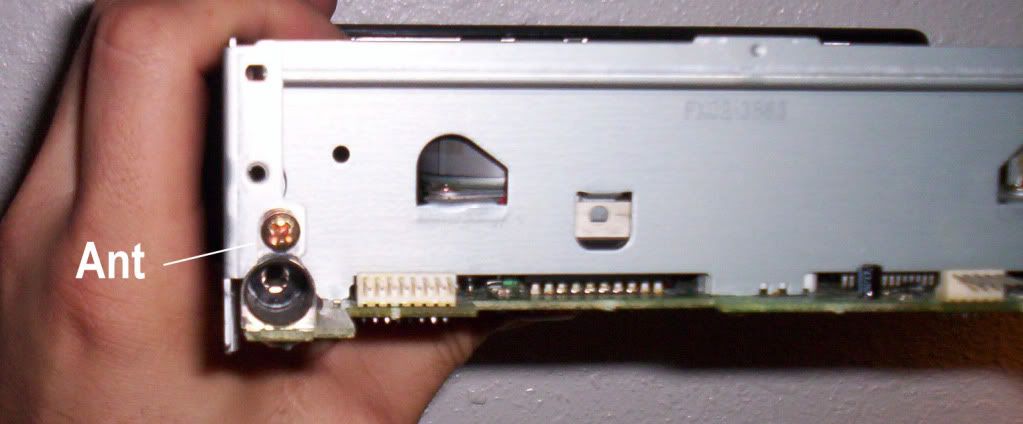
Step 6.1. Remove the right cover by first removing the Antenna screw (Ant).
Step 6.2. Now remove the: Right Face screw (RF), and screw numbers six and seven. Pry the Face at the bottom then top to release the right cover in a similar method as used on the left cover.

Step 7.1. GENTLY remove the knobs from the unit.
Step 7.2. The Face is only held at the top. To remove the Face, pry at the three points shown below. Careful, the Face has three connectors at the bottom and the circuit board where all the buttons are attached is only loosely held to the black plastic.

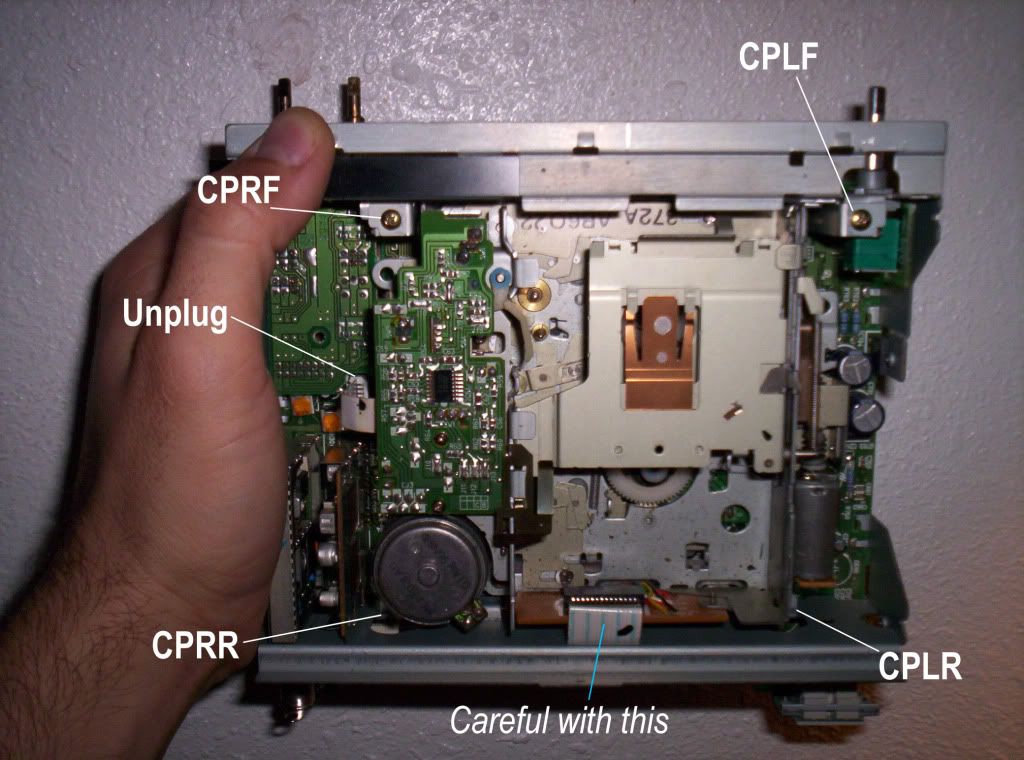
Step 8. Remove the Cassette Player by removing the Cassette Player's: Left-Front (CPLF), Right-Front (CPRF), Left-Rear (CPLR), and Right-Rear (CPRR) screws; and unplugging the Cassette Player's side-connector. The screws holding the Cassette Player in were torqued down really tight, I pressed the precision phillips screw driver down while holding the shaft with the pliers to exert sufficient torque to break them free. I also used the pliers to pull the connector from its plug. Be careful with the Cassette Player's back-connector, it would not come free for me and pulling on it seemed to stress the circuit board below.
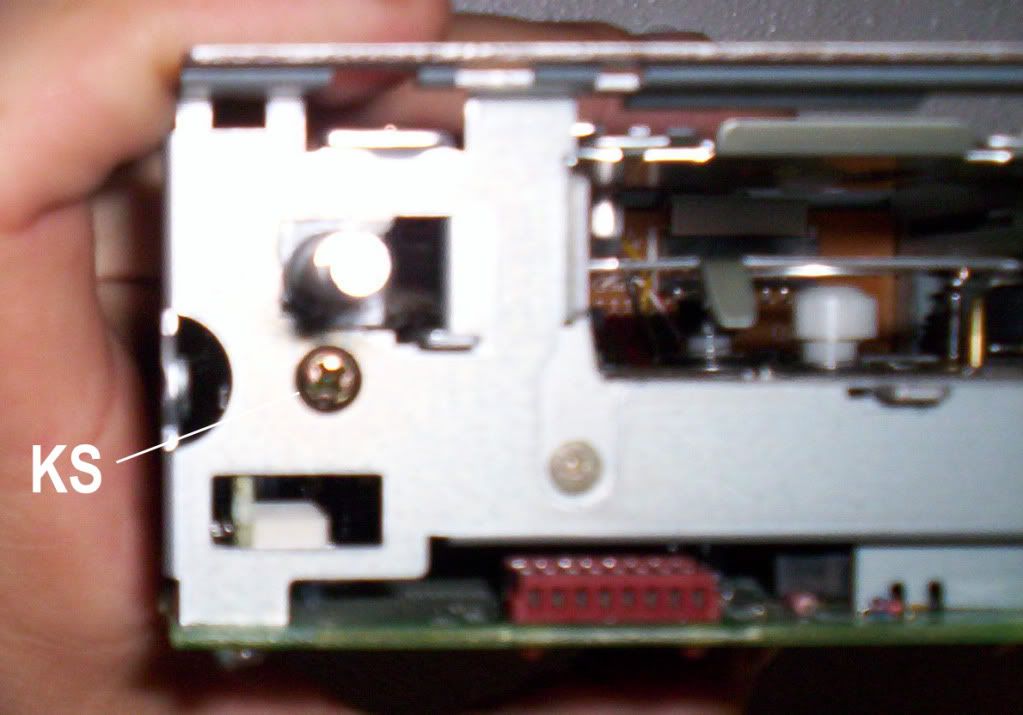
Step 9.1. Remove the Knob-Switch by first removing the Knob Switch screw (KS) located on the front of the unit.
Step 9.2. Now pry the Knob-Switch away from its connector.
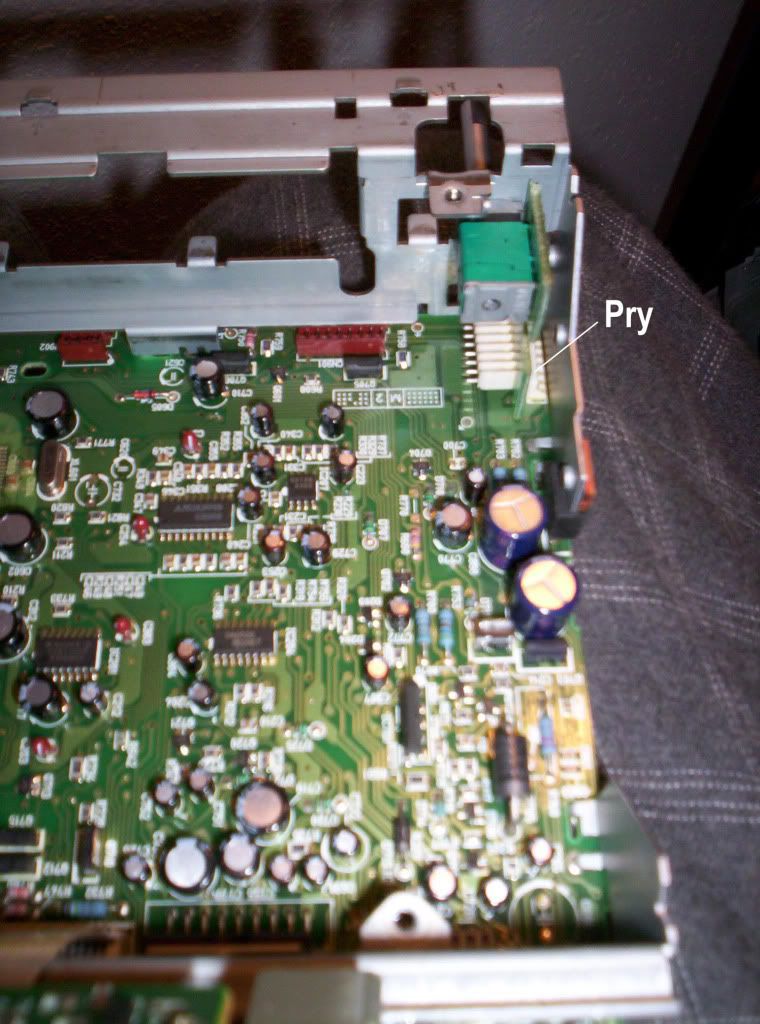
Now you have removed the Knob Switch.
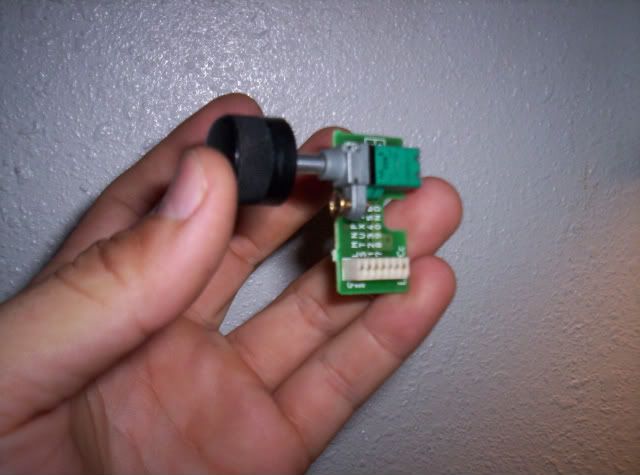
The marking on the back of mine says "ALPS" "JAPAN", the top has "503", "6", and "XV". The board it is mounted on may actually have been purchased by Matsushita from another manufacturer. A few websites say that Matsushita is actually a subsidiary of Panasonic, and they do share a similar format for product numbers. The Knob Switch is a rotary potentiometer with dual resistor units and a single side tap. By inspecting the Switch Knob and reviewing the ALPS website, I have noted the following:
Manufacturer: ALPS Electric Co., Ltd.
Part No.: ?
Switch Type: Single-shaft with rotary switch type
Shaft Length: 25mm
Mounting Direction: Horizontal Type
I have tried to search their database for a simillar switch, but have had no luck. Even if I found it, they list an order unit as being 500-800 switches. I think the next time I am in the salvage yard I will tear into a few head units and pull the switches out.
Re-assembly
Step 10. Perform step 9 in reverse.
Step 11. Perform step 8 in reverse. Use the pliers to re-connect the Cassette Player.
Step 12. Perform steps 6 and 5 in reverse.
Step 13. Perform step 4. Remember, there is a single threaded hole to the top-right of the back cover that is used for a CD Changer Cable Hold that was not shown above; leave this hole empty.
Step 14. Perform steps 3 and 2 in reverse.
Step 15. Perform step 7 in reverse.
Step 16. Perform step 1 in reverse.
End.
The Matsushita CQ-LH1410S (Honda P/N 39100-SV4-A000) was the stock head unit that came on my 1997 Honda Accord EX-V6. This removal procedure may help with other Honda units with a Single-shaft Rotary Switch type Knob such as the stock head units found on the CB Accords. My Switch Knob started to loose its ability to switch the head unit off, I have seen this on other rotary switch knob equipped Honda head units. This thread should be good info for you guys wanting to maintain a stock look in your classic (+20 y.o.) Hondas.
Tools
Note: Keep track of which screws go where, they vary in length and are organized by the fastener's ability to impact other components within the head unit.
Instructions
Step 1. Remove the radio.
Step 2. Remove the top cover by prying up on it at the points shown below.
Step 3.1. Remove the bottom cover by first removing screw numbers one and two shown below.
Step 3.2. Now pry the bottom cover off at the points shown below.
Step 4. Remove the back cover by removing the: Left Connector screw (LC), Right Connector screw (RC), Left CD Changer Connector screw (LCHG), Right CD Changer Connector screw (RCHG), and screw number three; all shown below.
Step 5. Remove the left cover by removing the: Heat Sink screw (HS), Left Face screw (LF), and screw numbers four and five. Pry the bottom of the face first, the left cover is hooked at the top and will need to swing up to come out; pry the top of the face second to get the cover free from the unit.
Step 6.1. Remove the right cover by first removing the Antenna screw (Ant).
Step 6.2. Now remove the: Right Face screw (RF), and screw numbers six and seven. Pry the Face at the bottom then top to release the right cover in a similar method as used on the left cover.
Step 7.1. GENTLY remove the knobs from the unit.
Step 7.2. The Face is only held at the top. To remove the Face, pry at the three points shown below. Careful, the Face has three connectors at the bottom and the circuit board where all the buttons are attached is only loosely held to the black plastic.
Step 8. Remove the Cassette Player by removing the Cassette Player's: Left-Front (CPLF), Right-Front (CPRF), Left-Rear (CPLR), and Right-Rear (CPRR) screws; and unplugging the Cassette Player's side-connector. The screws holding the Cassette Player in were torqued down really tight, I pressed the precision phillips screw driver down while holding the shaft with the pliers to exert sufficient torque to break them free. I also used the pliers to pull the connector from its plug. Be careful with the Cassette Player's back-connector, it would not come free for me and pulling on it seemed to stress the circuit board below.
Step 9.1. Remove the Knob-Switch by first removing the Knob Switch screw (KS) located on the front of the unit.
Step 9.2. Now pry the Knob-Switch away from its connector.
Now you have removed the Knob Switch.
The marking on the back of mine says "ALPS" "JAPAN", the top has "503", "6", and "XV". The board it is mounted on may actually have been purchased by Matsushita from another manufacturer. A few websites say that Matsushita is actually a subsidiary of Panasonic, and they do share a similar format for product numbers. The Knob Switch is a rotary potentiometer with dual resistor units and a single side tap. By inspecting the Switch Knob and reviewing the ALPS website, I have noted the following:
Manufacturer: ALPS Electric Co., Ltd.
Part No.: ?
Switch Type: Single-shaft with rotary switch type
Shaft Length: 25mm
Mounting Direction: Horizontal Type
I have tried to search their database for a simillar switch, but have had no luck. Even if I found it, they list an order unit as being 500-800 switches. I think the next time I am in the salvage yard I will tear into a few head units and pull the switches out.
Re-assembly
Step 10. Perform step 9 in reverse.
Step 11. Perform step 8 in reverse. Use the pliers to re-connect the Cassette Player.
Step 12. Perform steps 6 and 5 in reverse.
Step 13. Perform step 4. Remember, there is a single threaded hole to the top-right of the back cover that is used for a CD Changer Cable Hold that was not shown above; leave this hole empty.
Step 14. Perform steps 3 and 2 in reverse.
Step 15. Perform step 7 in reverse.
Step 16. Perform step 1 in reverse.
End.


 **Don't b scared be prepared for the worst**

Comment