
Instead of a round glass rod used by BMW, I used a clear acrlyic rod. I bought it for $2.99 at a home improvement store, such as Home Depot or Bed Bath & Beyond. The rod is actually made for your window blind to open/close the blind when you turn it left/right. It is about 3 feets long, and you can create 2 to 3 angel eyes depending on how big your ring is. The rod has a hex-shape structure, not a round shape like the BMW, but it will do just fine.
The first thing I did was to create a circular ring out of it. I measured the diameter of my high-beam projector housing, which comes out to be 4" long (or 2" radius). Using the circular formula (C=2'pi'r, where pi=3.14), you'll have to cut your rod about 12.5 inches long. I suggest cutting it 15" long, and use the extra inches as handles to help in the molding process.
Next, I find an aluminum can or jar that has the same diameter as the ring or close to it (I used a peanut jar). After heating the rod in a small toaster oven for about 5-7 minutes at 300°F, I held the two ends of the rod with a pair of pliers, and wrapped the rod around the glass jar with one end crossing over the other end. The flexible rod will harden within a minute. So, you may have to repeat this step 1 more time to mold it into a perfect circular ring. Once done, you can use a Dremel tool to cut the extra handles that were used during the molding process. You will end up with one end above the other, as shown. Don't worry, just simply put it back in the oven one last time and allow the end to soften and flatten.
Instead of using halogen light, I used LED light for my angel eye. Halogen bulb is not only very hot and inefficient, it doesn't last very long. I don't want to open up my headlight unit to replace the bulb every time it burns out. LED is a great alternative. It is very very efficient, lasts very very long, and produce very little heat. They cost from around $1.99 to $3.99 each at your local Radio Shack store. Note that LED bulbs are not like any other halogen bulbs where you can just connect positive and negative wires to them to light them up. You must use a resistor on the positive lead. The purpose of the resistor is to limit/resist high current going through the LED bulbs. LED bulbs require only a small amount of current to light up. Hence the efficiency. Resistors should cost from $0.99 to $1.99 for a set of 5.
LED light comes in many different color, red, blue, orange, yellow, green, and white. Red is really nice and will definitely make your car stand out, but I used white LED to be compliance with state laws. They even come in multi-blinking colors too, and I think cops love them. They'll be happy to turn on their version of multi-blinking color light.
After testing them out, it was time for me to put them into my HID projector headlight unit. First, I had to open apart my headlight unit. This is done by heating it in a cooking oven for about 10-15 minutes at 350°F or until the glue loosen. I had to remove any access components that may melt, including my 8000k HID bulb and any attached wires. Be very careful when separating your projector unit because the glue will stick to anything it can get a hold of. Think of hot melted cheese on a slice of pizza when you pull it apart.
Here's my recommendation: As you pull apart the front cover from the headlight unit, cut/trim the cheesy web-like glue. Remember, pull a little and then trim a little, and repeat this step. Take your time and do it slowly. You have about 20 minutes before the glue harden. Plenty of time. As you trim, the glue will retract, and you can reuse the glue later when re-attaching the headlight back together.
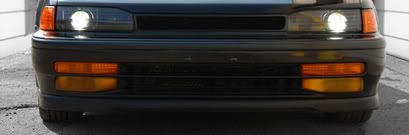
To secure the LED bulbs into my Eagle Eye ring, I drilled a hole in both ends of the ring. I used two white LED bulbs and paired them together. With a resistor and wires soldered to the LED bulbs, I inserted the bulbs inside the holes of the ring. I wrapped black electric tape around it to hide to LED bulbs. I ran the wires through the water drainage opening on the headlight unit. I then glued the rings to the outer frame of my high-beam housing, using clear silicon adhesive. I applied only a small amount of glue to the un-scratch/un-cut part of the ring.
Next, it was time for me to re-attach the front cover back onto the headlight unit, using the same glue. Just reheat them in the oven until the glue melt again and re-attach the two parts together. Remember to apply pressure to get an air-tight hold. I had to sit on it to get this done. Finally, I put the headlight unit back onto my car, and connected the wires to my parking lights.
The first thing I did was to create a circular ring out of it. I measured the diameter of my high-beam projector housing, which comes out to be 4" long (or 2" radius). Using the circular formula (C=2'pi'r, where pi=3.14), you'll have to cut your rod about 12.5 inches long. I suggest cutting it 15" long, and use the extra inches as handles to help in the molding process.
Next, I find an aluminum can or jar that has the same diameter as the ring or close to it (I used a peanut jar). After heating the rod in a small toaster oven for about 5-7 minutes at 300°F, I held the two ends of the rod with a pair of pliers, and wrapped the rod around the glass jar with one end crossing over the other end. The flexible rod will harden within a minute. So, you may have to repeat this step 1 more time to mold it into a perfect circular ring. Once done, you can use a Dremel tool to cut the extra handles that were used during the molding process. You will end up with one end above the other, as shown. Don't worry, just simply put it back in the oven one last time and allow the end to soften and flatten.
Instead of using halogen light, I used LED light for my angel eye. Halogen bulb is not only very hot and inefficient, it doesn't last very long. I don't want to open up my headlight unit to replace the bulb every time it burns out. LED is a great alternative. It is very very efficient, lasts very very long, and produce very little heat. They cost from around $1.99 to $3.99 each at your local Radio Shack store. Note that LED bulbs are not like any other halogen bulbs where you can just connect positive and negative wires to them to light them up. You must use a resistor on the positive lead. The purpose of the resistor is to limit/resist high current going through the LED bulbs. LED bulbs require only a small amount of current to light up. Hence the efficiency. Resistors should cost from $0.99 to $1.99 for a set of 5.
LED light comes in many different color, red, blue, orange, yellow, green, and white. Red is really nice and will definitely make your car stand out, but I used white LED to be compliance with state laws. They even come in multi-blinking colors too, and I think cops love them. They'll be happy to turn on their version of multi-blinking color light.
After testing them out, it was time for me to put them into my HID projector headlight unit. First, I had to open apart my headlight unit. This is done by heating it in a cooking oven for about 10-15 minutes at 350°F or until the glue loosen. I had to remove any access components that may melt, including my 8000k HID bulb and any attached wires. Be very careful when separating your projector unit because the glue will stick to anything it can get a hold of. Think of hot melted cheese on a slice of pizza when you pull it apart.
Here's my recommendation: As you pull apart the front cover from the headlight unit, cut/trim the cheesy web-like glue. Remember, pull a little and then trim a little, and repeat this step. Take your time and do it slowly. You have about 20 minutes before the glue harden. Plenty of time. As you trim, the glue will retract, and you can reuse the glue later when re-attaching the headlight back together.
To secure the LED bulbs into my Eagle Eye ring, I drilled a hole in both ends of the ring. I used two white LED bulbs and paired them together. With a resistor and wires soldered to the LED bulbs, I inserted the bulbs inside the holes of the ring. I wrapped black electric tape around it to hide to LED bulbs. I ran the wires through the water drainage opening on the headlight unit. I then glued the rings to the outer frame of my high-beam housing, using clear silicon adhesive. I applied only a small amount of glue to the un-scratch/un-cut part of the ring.
Next, it was time for me to re-attach the front cover back onto the headlight unit, using the same glue. Just reheat them in the oven until the glue melt again and re-attach the two parts together. Remember to apply pressure to get an air-tight hold. I had to sit on it to get this done. Finally, I put the headlight unit back onto my car, and connected the wires to my parking lights.




Comment