Announcement

Collapse
1 of 2 < >

ANY BUYING/SELLING IN THIS FORUM WILL RESULT IN AN INSTANT BAN!

Read the rules: http://www.cb7tuner.com/vbb/showthread.php?t=43956

Myself, and the other mods have been very nice and lenient with the rules. We have been deleting threads, and giving out warnings. Some members didn't get the clue and re-posted over and over... Now ANY member buying or selling in this section will be banned... No IF's AND's or BUT's.
2 of 2 < >

Beginner Forum Rules - EVERYBODY read! (old and new members alike!)

Beginners start here. Once you have 30 worthwhile posts (off topic doesn't count) you may post outside of the Beginner forums. Any "whoring" (posting simply to raise your post count) will return your count to 0, or result in a ban.

These are the rules. Read them. Live by them.

1) Absolutely NO flaming! "Flaming" is an outright attack on a member. ALL questions are encouraged to be asked here, no matter how basic. Members with over 30 posts will be subject to a ONE WEEK ban if caught flaming in this forum (and yes, moderators can read deleted posts). Members with under 30 posts will be subject to a ONE DAY ban.

2) Use appropriate language. Racial or sexual slurs will not be tolerated. A ban will be issued at the discretion of the cb7tuner.com staff.

3) No items may be sold in the Beginner forums. Any "for sale" threads will be deleted.

4) Temporarily banned members will be PERMANTLY banned if they are found posting on another account.

The rules can and will be added to. Any updates will be marked in the title.

The rules for the overall forum can be found here:
http://www.cb7tuner.com/vbb/forumdisplay.php?f=144
Read them. You will be expected to follow them.
See more
See less

How to take apart rear glove box on a coupe?

Collapse
X
 
  • Filter
  • Time
  • Show
Clear All
new posts

    How to take apart rear glove box on a coupe?

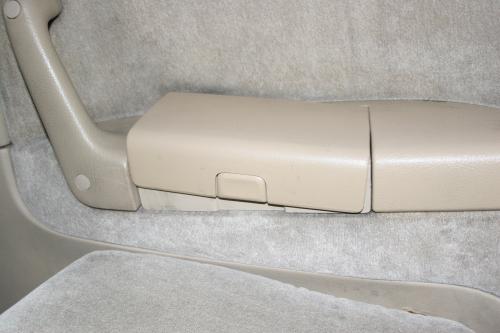
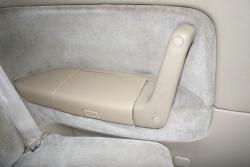
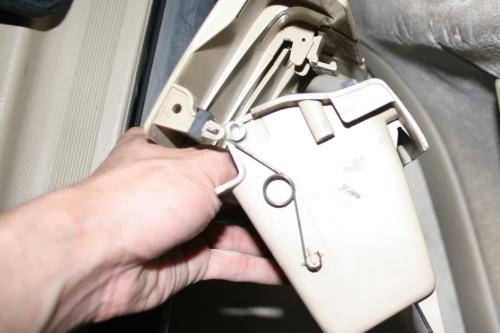
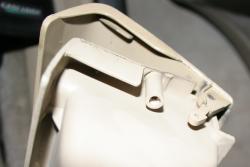
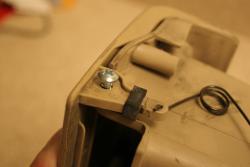
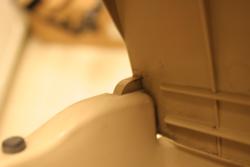
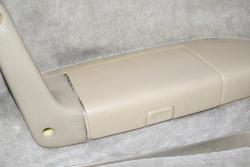
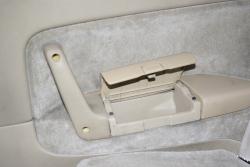
    The rear glove box on the passenger side of my coupe lost one of the springy things that holds the lid on. I've taken out a couple of screws in that area before to try to take the glove box out but that was before, when I had no clue what I was doing. I was hoping to get a little more info before I try again.

    I've taken a look at pictures at Majestic and also in the service manual but I can't really tell how the glove box comes apart. Looks like I have to take out the whole panel? And that looks like it'll involve taking out the seats? Has anyone done it before? Thanks!

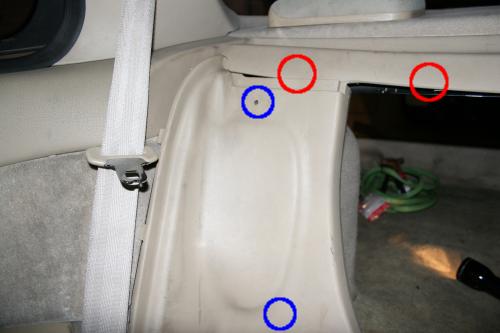
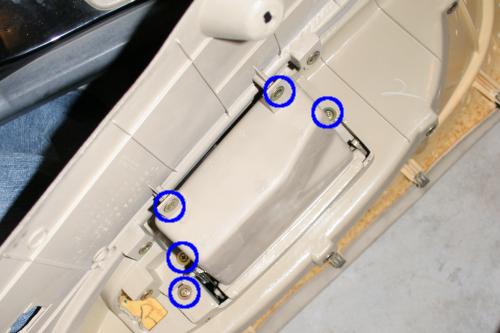
    Edit: Scroll down for my DIY.
    Last edited by chuonthis; 06-20-2006, 08:04 PM.

    #2
    can you get the thread for majestics pics cause i want to see what you mean by rear glove box as i ahve never heard of this lol just want to see
    1990 CB7 *RIP*

    Current-91 EX and 92 EX

    Comment


      #3


      Parts page

      The part that I'm missing is one of those little peg things going into the lid, above part #1. This happened a million years ago and I'm finally fed up with it. I don't have the missing piece so hopefully I can substitute it with something...otherwise, I'm not sure how I can get just my missing piece without getting the entire assembly?

      Comment


        #4
        Those dumb rear coupe compartments always break. Both my coupes had the same problem. I've heard they are a bitch to fix. Mine has been broke since the day I bought it and I don't really feel like trying to fix it.

        Good luck. Let me know if you do figure out how to fix it.
        "the J32a2 should be considered one of Honda's masterpieces..." Honda Tuning, July 2006

        Comment


          #5
          is it like a ashtry kind of thing
          1990 CB7 *RIP*

          Current-91 EX and 92 EX

          Comment


            #6
            No, it's a "glove box." Used to store stuff...can probably fit a fist or two in there. Can't really remember the size right now while I'm at work.

            Since I'm just missing the peg, I was originally thinking of just finding a spring-type peg, that you can squeeze to shorten, then when I push it through into the hole, it'll expand and stay! Don't know where to find that kind of piece though so I'm still looking for a way to take out the glove box to get a better look at things. Maybe I'll find the peg inside the panels!

            I'm going to take a look at it after work today...I'll try to take pictures and if I can get it out, then I can post a DIY!

            Comment


              #7
              well soooorryy i dont ahve one and havent seen one before
              1990 CB7 *RIP*

              Current-91 EX and 92 EX

              Comment


                #8
                Originally posted by honda4674
                well soooorryy i dont ahve one and havent seen one before
                LMAO!!!!
                1993 Accord LX - Sold
                93 BMW 525it - SOLD
                92 Accord EX Sedan - SOLD
                2000 Accord Coupe - Traded-In
                2003 Accord V6 6spd Coupe - Sold
                2001 Honda Civic Ex - SOLD
                2013 Chevy Traverse LTZ - Kid hauler
                2003 Acura Tl 3.2 - Daily Commuter

                Comment


                  #9
                  Here is my DIY. Hope you guys find it helpful.

                  PROBLEM:

                  I can barely remember when my passenger side rear glove box closed all the way. After fixing a couple other things on my car, I decided to tackle the glove box next but I couldn't find any DIY already posted. Referencing the service manual and the online parts catalog diagrams, I set to fix it once and for all.

                  Basically, it looks like I lost the peg that holds the lid of the glove box to the body at the pivot point. It looked like this:


                  This is how it is supposed to look like:


                  Whenever I had passengers in the back, they'd always think they could fix it. You could press it down and it might stay for a while due to friction or whatnot, but after a while, it'd just pop back up because it was missing the peg.

                  SOLUTION:

                  I am by no means an expert DIYer so I tend to make with what I have and try to make the best of it. Therefore, I highly advise that you do not do what I did to "fix" the glove box. I'm just hoping that these instructions will help you guys get to the point of accessing the glove box but from there, any solution will probably be better than mine.

                  Summary:

                  1. Remove back set
                  2. Remove side panel
                  3. Remove glove box
                  4. Fix glove box
                  5. Put everything back

                  Details:

                  1. Follow the instructions in this post to remove the entire back seat. You actually need to remove both cushions in order to access the screws needed to remove the side panel. I didn't take any pictures of this process because 1) I wasn't patient enough and 2) because zipcreature called dibs on the DIY.

                  You'll also have to remove the front side trunk panel behind the upper cushion of the seat. To get that panel out, you first need to get part of the front upper trunk panel off because they overlap. The upper panel is attached with these metal clips with a plastic thing in the middle (circled in red). I'm not sure what the proper way to detach them is but I think it was easiest when I just squeezed on them from below (inside the trunk) and at the same time, pulled the panel from the top (going from outside to inside, of course). I only needed to pull up two of them and felt like that was enough. Then you just need to pull on the side panel (making sure the upper panel is out of the way) which is secured with these plastic pegs (circled in blue). I'm not sure how to detach them properly either so I just put a flathead under the head and pryed it a little then pulled the pegs out. You can probably just pull outwards on the panel with support around the pegs.


                  2. After you have the seat and trunk side panel out, you can take the real side panel out. First, pull off the screwhole covers on the handle and unscrew those two screws (circled in red). Then unscrew the three screws that were blocked by the seat and side panel (circled in green). For some reason, I was missing the screw on the bottom in the back but I saw the hole for it and the diagrams showed that there should be one so I'm sure everyone else has it. All five of these screws have Phillips heads. Finally, there are four metal clips that hold the side panel to the body (circled in blue). These are the same clips as the ones holding the trunk upper panel but I couldn't squeeze the clips from the other side so I just pulled outwards on the panel starting with the backmost clip. Nothing broke! After that, you just need to detach it at the bottom from the door sill plastic molding and you're done (sorry no picture of that).


                  3. Looking at the back of the panel and from the bottom, the glove box is held in by five Phillips head screws (circled in blue. Just unscrew them all and the glove box will slide out of the top with no problems.


                  4. Here is a close up of first the broken side of the glove box and then the non-broken side:


                  So the peg that is missing is supposed to go through the hole in the upper left of the lid and into the pit on the upper right of the body (sorry, didn't want to circle the picture so that you can see everything). I don't think the non-broken side picture came out detailed enough to see what the peg on that side looks like. It is just a hollow peg that looks copper but is probably just corroded. I'm not sure how it's being held in but it seems pretty sturdy (for now).

                  I looked around my apartment to see what I could use as a substitute peg but couldn't think of anything until I found a coulpe extra #2 screws (not sure what to officially call it). These screws are 1/2" long and pointy. I held it against the glove box to see if it was long enough to start drilling into the plastic but short enough to not pierce through to the other side.


                  It sits in the hole and pit nicely. The screw's thickness is pretty good. However, it looked barely too long so I decided I'd stop screwing once I thought it would come out the other side (please, no jokes). To make sure it was secure, I thought I'd fill the pit with some Elmer's white glue first. How did I come up with this idea? I dunno, I just thought about those times that glue dries up into this hard piece and hoped that the same would happen, or at least it'd provide a little support by filling in any gaps and hardening a little.


                  Those are pictures of the screw screwed in. I didn't stop in time so you can see the plastic *about* to break on the inside (not sure if you can see it in the picture). It still felt smooth so I didn't care about it. On the outside, the screw head is sticking out a bit but I hoped that it wouldn't be a problem. I let the thing sit (with screw head pointing up) for about an hour to let the glue dry. Then I tested out my makeshift peg. It worked great! The screw felt pretty sturdy so I was happy and done (again, no jokes please).

                  5. Pretty much just do the opposite of taking the pieces apart to put everything back together. A couple things to note: 1) I think you should screw the glove box back in while the panel is right side up. Or at least try to push it as close as possible together. My finished glove box (see picture below) is a little raised. I'm not sure how I missed it before putting everything back together again but if you care about it, make sure it looks good before putting everything back! 2) When putting back the side panel, make sure the rear window trim makes good contact with the top of the panel. Mine was curled a little because I didn't make sure it was flat so I just took a flathead screwdriver and "uncurled" it. 3) Finally, I just had to smash the side panel to get the clips back on the frame. I'm not sure if there was a better way but I just estimated where the clips where and smashed the panel with medium strength and heard it clip back on.

                  Anyway, here is the picture of my glove box now. Woo!


                  Thanks for reading my insanely long DIY.

                  Comment


                    #10
                    informative DIY…

                    Comment


                      #11
                      someone might want to move this to the DIY section for coupe owners.
                      '92 Accord LX Sedan--Bordeaux Red Pearl --OEM--279k Daily Driver
                      EX Lip & Alpine OEM single CD Player. No more useless pocket!

                      Comment


                        #12

                        Comment


                          #13
                          That is very interesting...I have never even seen the backs of the coupes til just now....thats kinda cool. Its like just big enough to hold a can of pop or a phone or something. I actually a question or 2 about this, that are sorta OT. 1) Are there cupholders in the back of the coupe? If so, how many and where is it/they located? 2) Do coupes have that fold-down armrest in the middle of the backseat like the sedans have?


                          KeepinItClean | EnviousFilms | NoBigDeal | YET2BSCENE | .· ` ' / ·. | click here.
                          Originally posted by Jarrett
                          Is there a goal you're trying to accomplish besides looking dope as hell?

                          Comment


                            #14
                            thats what i figured on both. now that i think about it my ex doesnt have rear cupholders and that armrest seems like an ex/se thing..


                            KeepinItClean | EnviousFilms | NoBigDeal | YET2BSCENE | .· ` ' / ·. | click here.
                            Originally posted by Jarrett
                            Is there a goal you're trying to accomplish besides looking dope as hell?

                            Comment


                              #15
                              coupes dont have rear cupholders, unfortunately. the gloveboxes will fit a can of soda or two each, but not any bottles/cups because the lid of the box gets in the way when its open.

                              chuonthis - very nice DIY guide. i split your post out and turned it into its own thread in the DIY section (which unfortunately you wont be able to post in until you hit 30 posts, but i figured this guide was worthy of being in there)
                              Last edited by cp[mike]; 10-05-2006, 11:15 AM.


                              - 1993 Accord LX - White sedan (sold)
                              - 1993 Accord EX - White sedan (wrecked)
                              - 1991 Accord EX - White sedan (sold)
                              - 1990 Accord EX - Grey sedan (sold)
                              - 1993 Accord EX - White sedan (sold)
                              - 1992 Accord EX - White coupe (sold)
                              - 1993 Accord EX - Grey coupe (stolen)
                              - 1993 Accord SE - Gold coupe (sold)
                              Current cars:
                              - 2005 Subaru Legacy GT Wagon - Daily driver
                              - 2004 Chevrolet Express AWD - Camper conversion

                              Comment

                              Working...
                              X