
I was tooling around the garage a couple of weekends ago and came to the conclusion I needed to take something apart... Why would we do that? More power of course!
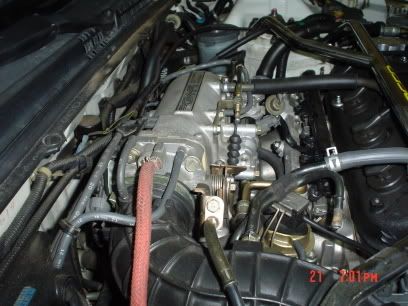
* Our hapless victim awaits...
Tools needed:
10MM socket and wrench
12MM socket and wrench
Various socket extensions
#2 Philips head screw driver
Flathead screw driver
Various pliers and channel locks
Intake plenum gasket (depending on the condition of your old one)
IACV O ring (probably a good idea since it won't be young, and it might not seal properly)
Shop manual of your choice (I made a goof on the coolant lines, that only Helm's could solve)
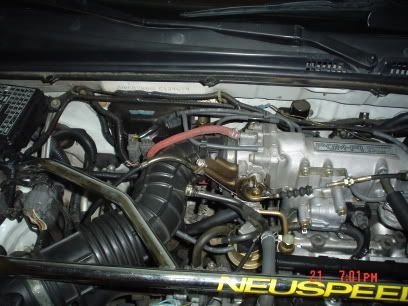
This swap is actually very straightforward if you have an F22A6 manifold already on your car. Obviously, it won't work with the F22A1 or F22A4 manifolds. The process could be substituted if you have an F22A6 manifold that you are going to install, and can hunt down an H22/H23 plenum. All of my research indicateds that they are identical.
Coolant line (depending on the condition of your old ones)
1) Unhook your battery
2) Remove your intake. If you have the stock airbox on the car, it is only necessary to remove the rubber tube.
3) Unplug the IACV, TPS, FPR and all other vacuum lines from the plenum. Make sure you keep track of which is which. Unhook the throttle cable. If you have an auto, you will also need to disconnect the kickdown cable that runs to the tranny.
4) Remove the coolant lines. If you are very careful, you should be able to get the coolant lines off of the IACV and FIV without spilling much at all. I lost about a Nyquil cup full. I then stuck them under something in the upright position. You will have to remove both of the coolant lines running to the throttle body. One line runs into the body just under the throttle plate and one runs out toward the wheel well. Again, if you keep the lines upright, you should lose very little coolant. I went ahead and drained them into a cup, because I already knew that I was going to have to fabricate at least one new hose. Remove only the TB end of the return hose in order to make it easier on reinstallation.
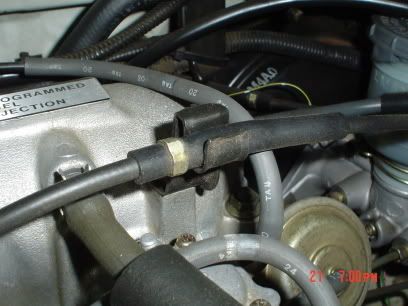
*The coolant pipe circled in yellow is the coolant inlet for the TB. It is connected to the steel tube that also contains the breather tube for the intake, and then a separate hose runs down to the very top of the thermostat housing. The red line is the coolant outlet, which runs to the back of the intake manifold.
5)Once everything is disconnected from the plenum, simply unbolt the 5 screws/nuts holding it down and remove vertically. Be as gentle as possible here, because this is where the plenum gasket is most likely to break. You may not be able to save it, but you can at least try. If it breaks, simply go get a new one. It is also a good idea, as it will lessen the chance of debris falling into the runners if it does break.
6) Replacing the plenum is pretty much the opposite of removal, at least until it is bolted on. Obviously, I took the opportunity to clean everything I could while the plenum was off of the car.
7) I first re-connected the coolant lines because they were the hardest to gain access to and are the most complex part of the install.
Since the H22 throttle body doesn't have a separate coolant channel to keep the plate warm, simply take some coolant hose and loop it from the thermostat housing to the back of the IM.
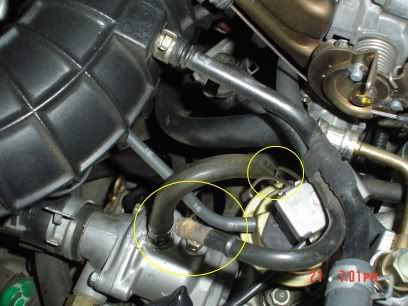
*Here you can see in the left bubble where the coolant comes out of the thermostat housing. In the right side of the left bubble you can see the metal tube that is attached to the breather.
*In the right bubble you can see where I ran the coolant line down to the back of the IM where the drain line from the TB used to go. This is where leaving the old drain line attached to the IM comes in handy. To avoid crawling under the car to gain a view, simply trace the hose to its origin, pull it off and place the looped hose in its place. Don't forget the hose clamp!
Now that the TB is bypassed, the rest of the coolant hoses need to be hooked back up.
The FIV on the H series is located on the bottom of the TB instead of on the front of the plenum like the F22 (the Air Boost Valve is located in the Accord FIV position on USDM H22s. JDM H22s have a block off plate there instead.)
You will want to remove the H series IACV from the plenum and put the F22 IACV in its place. Now is probably a good time to replace the IACV O ring. make sure to lube it with motor oil prior to install. They are interchangeable, but you will have to use both IACV bolts from the Accord as the H series IACV has one long bolt and one short bolt.
The reason you don't want to use the H series IACV is that the inlet sits so close to the intake runner, it is impossible to not kink the coolant hose.
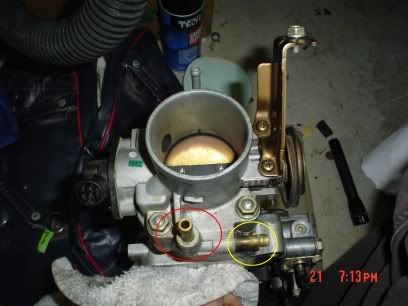
*You can see how the inlet circled in yellow points straight down into the runner. A hose will not fit inbetween here and the runner unless you are very creative. I just used the F22 IACV.
NOTE: The nipples circled in red were the outlets for the FIV and IACV respectively. The FIV inlet, circled in blue, will simply be rerouted to the H FIV as the hose is long enough. The outlet from the IACV (left red circle) will stay the same. It is the FIV outlet (the right red circle) that we will be making.
Since everything else lines up, simply take about an 18" length of coolant tube and run it from the new FIV outlet to the IACV inlet (you will want to gauge the necessary length of the hose based on your preferences).
Mine looked about like this when I was done:

*You can see how the side facing entrance nipple made it much easier to get a hose on without kinking it.
That pretty much finishes the coolant hoses. It is a good idea to open the bleeder bolt and top off the cooling system when you are done to avoid any unwanted complications.
8) You will reuse your stock throttle cable. My H22 throttle body was a manual and my car is an auto, so you may need to swap the throttle plates. Just make sure that everything is on tight and note how the return spring came off and make sure it goes back on the same way.
There was one complication with the F22 throttle plate that I didn't notice at first. The little stop tab on the F22 throttle plate (at least on mine) was located about 1-2mm closer to the stop screw. When I got done and started the car, it was idling at 2500 RPM. Once I backed the stop screw off, everything was fine. You may want to check this before putting the plenum on the car.
You may also need to move the kickdown cable bracket from the F22 TB over the the H. Hook your throttle cable/s back up to the TB.
*Every time I have tried to use an F22 throttle cable and an H series IM bracket, the little nut on the cable wants to occupy the same space as the bracket. Simply take the F22 bracket off and screw it onto the H plenum. This lowers the mounting point just enough for it to fit perfectly.
Readjust the throttle cable to spec.
10) The vacuum lines pretty much go back to the same relative area that they were before. The most important is the MAP sensor which hooks to a metered orifice in the TB. It still goes on the nipple closest to the throttle plate.
11) The two hoses that used to mount right next to the map on the F22 TB simply go right around to the back top of the plenum. The location should be fairly obvious.
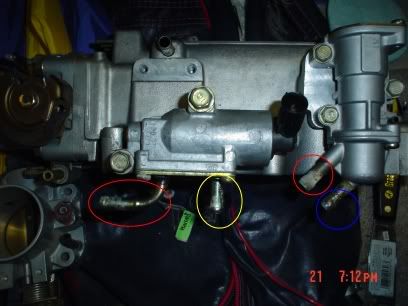
*Here you can see the new vacuum hose connection points near the TB.
12) The cruise control and the IAB will each occupy a nipple on the side of the plenum opposite the TB. If your car is a manual, you can also cap off one of the side nipples and run the IAB to the nipple on the back driver side of the plenum (pretty much the same as the F22). If you have an auto, you will need to hook the vacuum line for the engine mount control solenoid to the back nipple.
13) The Fuel Pressure Regulator hose will run to the big vacuum nipple right on the front of the plenum.
14)Reinstall your intake. If you are using the stock tube like me, it WILL fit on the H series TB, you will just have to work it because it is a tight fit.
**Product Review: I was amazed by how much of a difference it made.
I started with a stock F22A4 and after adding intake/full exhaust was rather disappointed.
I first swapped the A6 manifold. It improved low end torque significantly, but
didn't really contribute to the pull in the top end. It did pull to almost 6K though instead of falling off at 5.2K.
Then I installed the cam, and it was a very significant change. Well more than ALL previous stuff combined!
The H series plenum made almost as much of a difference as the A6 cam and manifold. It sounds meaner, pulls harder at all speeds/RPM's and pulls right into the rev limit at 6700 RPM.
All in all, highly recommended and well worth the effort.
* Our hapless victim awaits...
Tools needed:
10MM socket and wrench
12MM socket and wrench
Various socket extensions
#2 Philips head screw driver
Flathead screw driver
Various pliers and channel locks
Intake plenum gasket (depending on the condition of your old one)
IACV O ring (probably a good idea since it won't be young, and it might not seal properly)
Shop manual of your choice (I made a goof on the coolant lines, that only Helm's could solve)
This swap is actually very straightforward if you have an F22A6 manifold already on your car. Obviously, it won't work with the F22A1 or F22A4 manifolds. The process could be substituted if you have an F22A6 manifold that you are going to install, and can hunt down an H22/H23 plenum. All of my research indicateds that they are identical.
Coolant line (depending on the condition of your old ones)
1) Unhook your battery
2) Remove your intake. If you have the stock airbox on the car, it is only necessary to remove the rubber tube.
3) Unplug the IACV, TPS, FPR and all other vacuum lines from the plenum. Make sure you keep track of which is which. Unhook the throttle cable. If you have an auto, you will also need to disconnect the kickdown cable that runs to the tranny.
4) Remove the coolant lines. If you are very careful, you should be able to get the coolant lines off of the IACV and FIV without spilling much at all. I lost about a Nyquil cup full. I then stuck them under something in the upright position. You will have to remove both of the coolant lines running to the throttle body. One line runs into the body just under the throttle plate and one runs out toward the wheel well. Again, if you keep the lines upright, you should lose very little coolant. I went ahead and drained them into a cup, because I already knew that I was going to have to fabricate at least one new hose. Remove only the TB end of the return hose in order to make it easier on reinstallation.
*The coolant pipe circled in yellow is the coolant inlet for the TB. It is connected to the steel tube that also contains the breather tube for the intake, and then a separate hose runs down to the very top of the thermostat housing. The red line is the coolant outlet, which runs to the back of the intake manifold.
5)Once everything is disconnected from the plenum, simply unbolt the 5 screws/nuts holding it down and remove vertically. Be as gentle as possible here, because this is where the plenum gasket is most likely to break. You may not be able to save it, but you can at least try. If it breaks, simply go get a new one. It is also a good idea, as it will lessen the chance of debris falling into the runners if it does break.
6) Replacing the plenum is pretty much the opposite of removal, at least until it is bolted on. Obviously, I took the opportunity to clean everything I could while the plenum was off of the car.
7) I first re-connected the coolant lines because they were the hardest to gain access to and are the most complex part of the install.
Since the H22 throttle body doesn't have a separate coolant channel to keep the plate warm, simply take some coolant hose and loop it from the thermostat housing to the back of the IM.
*Here you can see in the left bubble where the coolant comes out of the thermostat housing. In the right side of the left bubble you can see the metal tube that is attached to the breather.
*In the right bubble you can see where I ran the coolant line down to the back of the IM where the drain line from the TB used to go. This is where leaving the old drain line attached to the IM comes in handy. To avoid crawling under the car to gain a view, simply trace the hose to its origin, pull it off and place the looped hose in its place. Don't forget the hose clamp!
Now that the TB is bypassed, the rest of the coolant hoses need to be hooked back up.
The FIV on the H series is located on the bottom of the TB instead of on the front of the plenum like the F22 (the Air Boost Valve is located in the Accord FIV position on USDM H22s. JDM H22s have a block off plate there instead.)
You will want to remove the H series IACV from the plenum and put the F22 IACV in its place. Now is probably a good time to replace the IACV O ring. make sure to lube it with motor oil prior to install. They are interchangeable, but you will have to use both IACV bolts from the Accord as the H series IACV has one long bolt and one short bolt.
The reason you don't want to use the H series IACV is that the inlet sits so close to the intake runner, it is impossible to not kink the coolant hose.
*You can see how the inlet circled in yellow points straight down into the runner. A hose will not fit inbetween here and the runner unless you are very creative. I just used the F22 IACV.
NOTE: The nipples circled in red were the outlets for the FIV and IACV respectively. The FIV inlet, circled in blue, will simply be rerouted to the H FIV as the hose is long enough. The outlet from the IACV (left red circle) will stay the same. It is the FIV outlet (the right red circle) that we will be making.
Since everything else lines up, simply take about an 18" length of coolant tube and run it from the new FIV outlet to the IACV inlet (you will want to gauge the necessary length of the hose based on your preferences).
Mine looked about like this when I was done:
*You can see how the side facing entrance nipple made it much easier to get a hose on without kinking it.
That pretty much finishes the coolant hoses. It is a good idea to open the bleeder bolt and top off the cooling system when you are done to avoid any unwanted complications.
8) You will reuse your stock throttle cable. My H22 throttle body was a manual and my car is an auto, so you may need to swap the throttle plates. Just make sure that everything is on tight and note how the return spring came off and make sure it goes back on the same way.
There was one complication with the F22 throttle plate that I didn't notice at first. The little stop tab on the F22 throttle plate (at least on mine) was located about 1-2mm closer to the stop screw. When I got done and started the car, it was idling at 2500 RPM. Once I backed the stop screw off, everything was fine. You may want to check this before putting the plenum on the car.
You may also need to move the kickdown cable bracket from the F22 TB over the the H. Hook your throttle cable/s back up to the TB.
*Every time I have tried to use an F22 throttle cable and an H series IM bracket, the little nut on the cable wants to occupy the same space as the bracket. Simply take the F22 bracket off and screw it onto the H plenum. This lowers the mounting point just enough for it to fit perfectly.
Readjust the throttle cable to spec.
10) The vacuum lines pretty much go back to the same relative area that they were before. The most important is the MAP sensor which hooks to a metered orifice in the TB. It still goes on the nipple closest to the throttle plate.
11) The two hoses that used to mount right next to the map on the F22 TB simply go right around to the back top of the plenum. The location should be fairly obvious.
*Here you can see the new vacuum hose connection points near the TB.
12) The cruise control and the IAB will each occupy a nipple on the side of the plenum opposite the TB. If your car is a manual, you can also cap off one of the side nipples and run the IAB to the nipple on the back driver side of the plenum (pretty much the same as the F22). If you have an auto, you will need to hook the vacuum line for the engine mount control solenoid to the back nipple.
13) The Fuel Pressure Regulator hose will run to the big vacuum nipple right on the front of the plenum.
14)Reinstall your intake. If you are using the stock tube like me, it WILL fit on the H series TB, you will just have to work it because it is a tight fit.
**Product Review: I was amazed by how much of a difference it made.
I started with a stock F22A4 and after adding intake/full exhaust was rather disappointed.
I first swapped the A6 manifold. It improved low end torque significantly, but
didn't really contribute to the pull in the top end. It did pull to almost 6K though instead of falling off at 5.2K.
Then I installed the cam, and it was a very significant change. Well more than ALL previous stuff combined!
The H series plenum made almost as much of a difference as the A6 cam and manifold. It sounds meaner, pulls harder at all speeds/RPM's and pulls right into the rev limit at 6700 RPM.
All in all, highly recommended and well worth the effort.
 I saw your airbox, and was thinking about it when I posted that. I just saw the pics the other day, but couldn't remember who it was. Where did you get that tubing?
 ....i'll PM my pics page to u and u can sort through what u want
  ....
....


Comment