Announcement

Collapse
No announcement yet.

EXT: Make your own tail light gaskets!

Collapse
X
 
  • Filter
  • Time
  • Show
Clear All
new posts

    EXT: Make your own tail light gaskets!

    What you need...er what I used.

    -Ratchet (3/8 drive)

    -8mm deep socket

    -yoga mat (yes a yoga mat)

    -razor blades (or other preferred cutting tool)

    -some kind of marker

    Well my tails were letting some water in to the trunk so I was thinking of replacing the old, hardened, worn out gaskets to hopefully solve the seeping problem.
    While walking through target I spotted a yoga mat ant the material seemed to be very similar to that of the tail light gaskets. So I though "why not make my own out of this stuff?"

    what you need to do first is open your trunk.

    you can achieve this by opening your driver side door


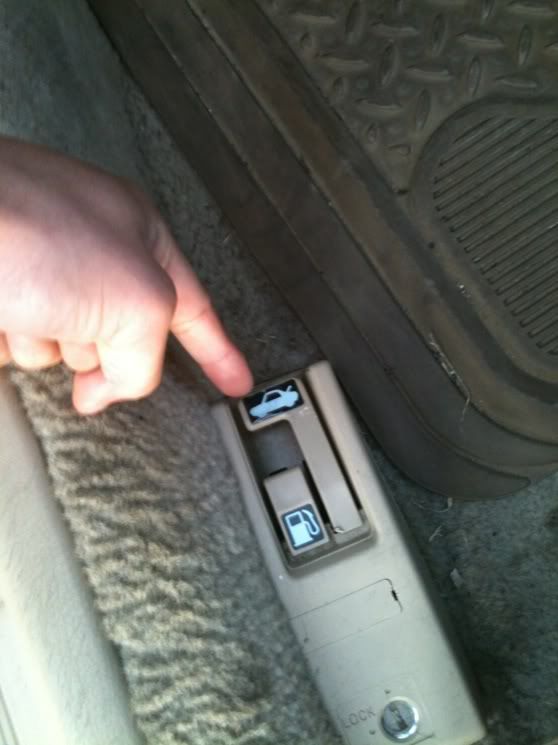
    then look at the bottom left corner of your driver seat and pull the long hadle with the picture of a car with a tail.


    lift up your trunk lid and you may find some carpeted plastic panels are in the way of your beloved tail light assembly.
    Not to worry simply remove the little plastic directly behind the tail light or take the whole thing off for easier access.
    (*I would show you how to do all this but my trunk had been bare for quite some time now.)

    this is what you will see


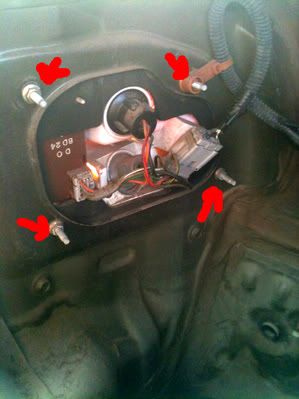
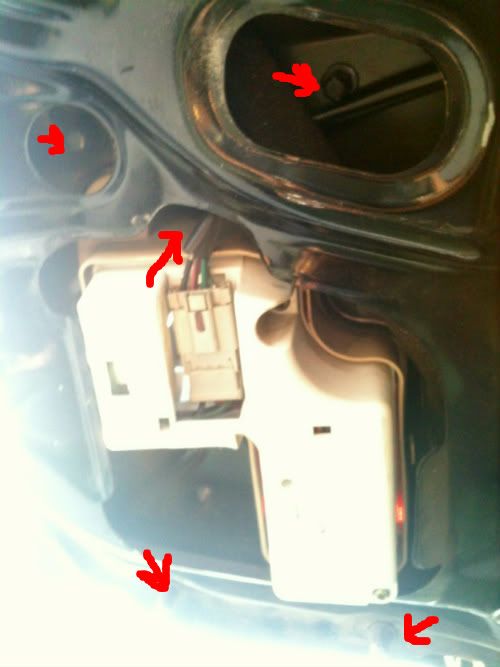
    all the nuts you need to remove have been marked. Outer taillights have four^ and inners have five\/ \/
    remove them nuts! The plastic wire fastener can be easily taken of simply twist wiggle and pull till it comes out.


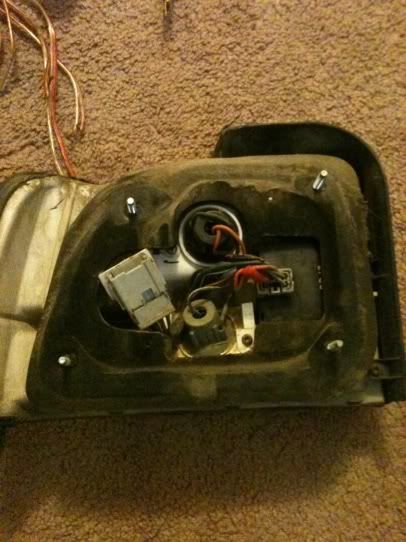
    this is the tail light off the car for a better idea of what it looks like.


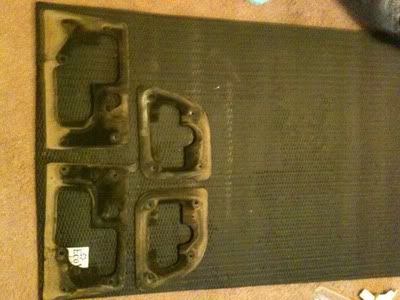
    now remove the gaskets (didn't bother to clean them since they will be replaced but it's a good idea) place them on top of the mat, and outline them like so:


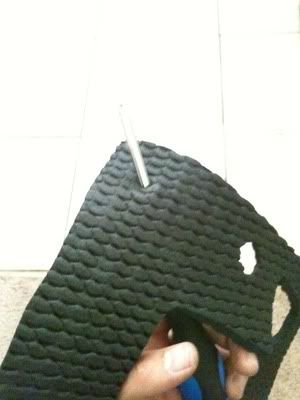
    Once outlined simply cut following the lines. For the bolt holes you can just stick a screwdriver through it.


    You're done!! Here's what the finished product looks like:


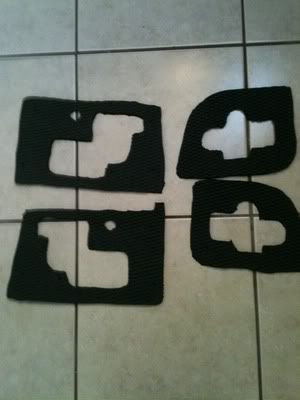
    A little side by side.


    Now put everything back together and enjoy! My total cost was $15 for the mat which I can still use for other padding projects or yoga!
    Last edited by mappyCB7; 02-25-2012, 03:33 PM.

    #2
    i used old free mousepads in times of need =P
    frostwhite225@gmail.com =VENMO


    http://www.youtube.com/watch?v=NOB38zJu66o

    [COLOR="Magenta"]

    Comment


      #3
      haha I think that might actually work better.

      Comment


        #4
        Ingenuity at its finest. I like it. I wonder if it would be beneficial to put black RTV on the outside edges of these things with your finger. Just enough so that the exposed porous material along the cuts are sealed to moisture. Maybe I'm not being descriptive enough.
        My Members' Ride Thread - It's a marathon build, not a sprint. But keep me honest on the update frequency!

        Comment


          #5
          Yeah I know what you're talking about but the OEM gaskets have the same porous material on the edges so I figured it wouldn't make a difference. It wouldn't hurt though I'm sure and I've also thought about somehow sealing the outside edges of the taillights/trunk but it seems like more hassle than it's worth.

          Comment


            #6
            I see what your trying to do. But the mat you used has valleys in it. Its gonna leak. Unless you mash tighten it down tighter than it should be.
            "My FOR SALE thread - Click here"

            MEMBERS RIDE

            99 SILVERADO

            WHEEL FLIP

            Comment


              #7
              I used silicone lol
              What makes me laugh about forums, is that no matter how much you try to help someone, they dont take the advice. Go ahead and do it the hard way.

              You got to respect what you drive, and appreciate what you have, making the best of what you got. and if that means putting CAI, HID's, a phat stereo system, and a idiot in the drivers seat...then so be it!

              Retro!

              Hater

              I love nooBs...They make me look good

              Comment


                #8
                back in the day i used a mousepad cut it all out and it still holds up
                <

                (129)Transactions and counting

                Comment


                  #9
                  Originally posted by drew12000 View Post
                  I see what your trying to do. But the mat you used has valleys in it. Its gonna leak. Unless you mash tighten it down tighter than it should be.
                  If you take your tail lights off you will see that the gasket does get a little "mashed" down and the material isn't hard plastic or even hard rubber its more of a thick sponge material (similar to OEM) so it will work just fine and I really like the mouse pad idea that kjnboi mentioned I think that might work and hold up even beter as its more rubbery.

                  Comment


                    #10
                    Coolio. At least u made a diy. Most ppl won't.
                    **Blk Housed Slut Crew Member #1**

                    **Don't b scared be prepared for the worst**
                    Da Drizzle's Sedan - Dr. Diy's Blk Housed Thread

                    '90 2Tone Coupe-Car Heaven_'89 Lude-Junk Yard
                    Mostly Usdm, some Jdm,Edm,&Puerto Rican RICE

                    Comment


                      #11
                      That is how I intend to do it also.

                      I dont agree with silicone and rtv etc. If it wasnt there from the factory dont put it.

                      Fix it like it was from the factory, which is just fresh new rubbery/foam material.

                      Mouse pads are not big enough to cut a single piece out of it in my opinion. Any joins is a potential leak.

                      I would go to a rubber store (here we have "Clark Rubber" and can get sheets of rubber or foam).

                      If you dont have a rubber/foam shop just buy yourself a camping mat (its the same as the above mentioned yoga mat) but people dont know its the same. Many $2 dollar stores have them. Just search and get plain flat ones (not grooved mats like the example above).

                      That is very similar in material composition which you can cut and shape into large single pieces (as it is large enough).
                      Last edited by JDMDriver; 03-29-2012, 08:35 AM.
                      Rides:

                      Accord
                      92-JDM-2.0 Si- "4ws" - Cobalt Blue Pearl
                      96-AUDM-2.2 VTiS- Heather Mist

                      CR-X
                      88-JDM-Si- Black

                      CR-X Del Sol
                      92-JDM-SiR "Transtop" Motegi Edition - Silver
                      95-JDM-SiR "Transtop" Daytona Edition - Silver
                      92-JDM-SiR "Transtop" - Black

                      Prelude
                      91-JDM-Si-4ws "Si States" - Phoenix Red
                      91-AUDM-Si-4ws "Cita Lux Edition" - Bordeaux Red Pearl
                      91-AUDM-Si-4ws "Cita" - Cobalt Blue Pearl
                      91-AUDM-Si-4ws "Cita Lux Edition"- Gun Metal Grey

                      Comment


                        #12
                        Another method which I just thought of now!! (dammit no light bulb icon but this will do)

                        Simply visit the jy and get a set of the old rubbery seals from the lights and fit them on yours (on top of your old ones) so you have 2 layers.

                        It will increase the bulk so surface pressure will increase (and a seal) will once again occur once you tighten them.

                        Note: Not to over tighten

                        Try it
                        Rides:

                        Accord
                        92-JDM-2.0 Si- "4ws" - Cobalt Blue Pearl
                        96-AUDM-2.2 VTiS- Heather Mist

                        CR-X
                        88-JDM-Si- Black

                        CR-X Del Sol
                        92-JDM-SiR "Transtop" Motegi Edition - Silver
                        95-JDM-SiR "Transtop" Daytona Edition - Silver
                        92-JDM-SiR "Transtop" - Black

                        Prelude
                        91-JDM-Si-4ws "Si States" - Phoenix Red
                        91-AUDM-Si-4ws "Cita Lux Edition" - Bordeaux Red Pearl
                        91-AUDM-Si-4ws "Cita" - Cobalt Blue Pearl
                        91-AUDM-Si-4ws "Cita Lux Edition"- Gun Metal Grey

                        Comment


                          #13
                          I forgot to mention this.. and it works great and helps.. get a butter knife or steak knife and when the glue is soft. Go in between the plastics and shove the knife in there.. an work ur way around.. u want to loosen the glue up, stick it back in oven, take out, and u should b able to take the lense off no prob. That's wat I did.
                          **Blk Housed Slut Crew Member #1**

                          **Don't b scared be prepared for the worst**
                          Da Drizzle's Sedan - Dr. Diy's Blk Housed Thread

                          '90 2Tone Coupe-Car Heaven_'89 Lude-Junk Yard
                          Mostly Usdm, some Jdm,Edm,&Puerto Rican RICE

                          Comment


                            #14
                            I think the mouse pad would be better b/c it's thicker. The problem is I threw them all away when I got a nice MS Trackball Explorer 12 years ago. Dawn, I know I would have needed them.

                            Comment


                              #15
                              nice this site eems to be getting brighter and brighter cb7 scientist
                              Originally posted by deevergote
                              This thread is over a year old, you fucking retard.
                              i dont know why this popped up but U MAD BRO? not my fault u is FAKE! CLOWN ASS

                              Comment

                              Working...
                              X