
this is just an extra cluster i have
Tools needed:
1.small flat head screwdriver or pocket knife
2.several other screwdrivers
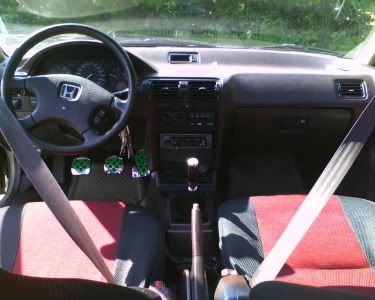
Step One: Removing Center Console
First, disconnect your battery. You do not want anything to short out while working on your car. It's better safe than sorry.
Next, you need to remove the center console where the shifter knob is located.
There are four screws that hold the center console to place. Two are near the driver and passenger seats. The other two are in the front of the console.
Take off the shifter knob and boot to remove the entire center console out of place. You can do that by taking off the two screws hidden inside the console.
Step Two: Removing Instrument Panel
Next, You need to remove the instrument panel. This is the large plastic cover that goes from the left side of the steering wheel to the bottom of the radio.
There are several screws that hold this to place. You will need to remove all of these.
Start with removing the coin box.
Use your small flat head screwdriver or a pocket knife and carefully pry the cruise control and sunroof switch off..
Do the same to the brightness controller, hazard, and rear window defogger. Once those are done, unplug the electrical connections.
Next, remove the air vents. You can do this with you small flat head screw driver. Don't be afraid of breaking them because if you are, you will never be able to take them off. So just stick you screw driver on the side of the air vents and pry one side off. Do this for all three air vents. Just take your time and everything should pop out easily.
Also remove your ashtray and remove the four screws inside it. Two are above the ashtray and two are towards the back wall. I believe there is also a screw behind the lighter as well.
Now there are several screws that you need to remove. They are located in the following places:
The left driver air vent
Inside the coin box
Inside the cruse control and sunroof switch
Inside the brightness control switch
Inside the two middle air vents. One screw for each vent.
The underside of the half dome where the gauges are. There are two located there.
and two are right above the radio
Step Three: Removing Radio & Dashboard (optional)
You might need to remove your radio. I have an aftermarket radio that required it's removal. So check your application to see if this step is necessary
Remove you radio. There is one screw behind the radio that you need to remove in order to remove your radio.
If you cannot get to it (like me) you need to remove your dashboard a little in order to fit your tools and fingers.
You can remove your glove box for a little more room. There are three screws total which two are located below the box and one is on the right side where the spring is located. Once those are off, you can remove your glove box. This will give you some more room to work, but you can try to remove the dashboard without removing the glove box if you can fit in tight areas.
There are four bolts on either side of the dash board. They are near the doors. Remove the four caps and there will be a 10 mm bolt there.
Next remove your clock. Take a flat head screw driver and pry it off. I think I pry it from the right side, but either way you should be very careful not to chip or scratch anything. There is another bolt behind the clock that you need to remove.
Then at the bottom of the dash near the shifter and under the radio towards the floor of the car, there are two bolts that you need to remove. Pull back on the carpet and you should see them. Remove the two screw that is located on either sides.
Once that is done, pull back on the dash a little and you should get another room to remove your radio from behind.
Step Four: Removing Gauge Console
Remove your instrument panel and you will see your gauges.
There are four screws holding your gauges to the car. Two on either side. Then remove the electrical connections.
Here's how to remove your OEM gauge faces


And there you have it
Tools needed:
1.small flat head screwdriver or pocket knife
2.several other screwdrivers
Step One: Removing Center Console
First, disconnect your battery. You do not want anything to short out while working on your car. It's better safe than sorry.
Next, you need to remove the center console where the shifter knob is located.
There are four screws that hold the center console to place. Two are near the driver and passenger seats. The other two are in the front of the console.
Take off the shifter knob and boot to remove the entire center console out of place. You can do that by taking off the two screws hidden inside the console.
Step Two: Removing Instrument Panel
Next, You need to remove the instrument panel. This is the large plastic cover that goes from the left side of the steering wheel to the bottom of the radio.
There are several screws that hold this to place. You will need to remove all of these.
Start with removing the coin box.
Use your small flat head screwdriver or a pocket knife and carefully pry the cruise control and sunroof switch off..
Do the same to the brightness controller, hazard, and rear window defogger. Once those are done, unplug the electrical connections.
Next, remove the air vents. You can do this with you small flat head screw driver. Don't be afraid of breaking them because if you are, you will never be able to take them off. So just stick you screw driver on the side of the air vents and pry one side off. Do this for all three air vents. Just take your time and everything should pop out easily.
Also remove your ashtray and remove the four screws inside it. Two are above the ashtray and two are towards the back wall. I believe there is also a screw behind the lighter as well.
Now there are several screws that you need to remove. They are located in the following places:
The left driver air vent
Inside the coin box
Inside the cruse control and sunroof switch
Inside the brightness control switch
Inside the two middle air vents. One screw for each vent.
The underside of the half dome where the gauges are. There are two located there.
and two are right above the radio
Step Three: Removing Radio & Dashboard (optional)
You might need to remove your radio. I have an aftermarket radio that required it's removal. So check your application to see if this step is necessary
Remove you radio. There is one screw behind the radio that you need to remove in order to remove your radio.
If you cannot get to it (like me) you need to remove your dashboard a little in order to fit your tools and fingers.
You can remove your glove box for a little more room. There are three screws total which two are located below the box and one is on the right side where the spring is located. Once those are off, you can remove your glove box. This will give you some more room to work, but you can try to remove the dashboard without removing the glove box if you can fit in tight areas.
There are four bolts on either side of the dash board. They are near the doors. Remove the four caps and there will be a 10 mm bolt there.
Next remove your clock. Take a flat head screw driver and pry it off. I think I pry it from the right side, but either way you should be very careful not to chip or scratch anything. There is another bolt behind the clock that you need to remove.
Then at the bottom of the dash near the shifter and under the radio towards the floor of the car, there are two bolts that you need to remove. Pull back on the carpet and you should see them. Remove the two screw that is located on either sides.
Once that is done, pull back on the dash a little and you should get another room to remove your radio from behind.
Step Four: Removing Gauge Console
Remove your instrument panel and you will see your gauges.
There are four screws holding your gauges to the car. Two on either side. Then remove the electrical connections.
Here's how to remove your OEM gauge faces
And there you have it


Comment