
DIY: Painting your dash trim
Tools: screwdrivers, can of SEM Gloss White interior paint, sandpaper (optional), masking tape.
Written by: me.
How-To:
1. You must first start by actually removing the dash trim:
2. the center console must come out first. There are 6 screws holding down the center console (2 are underneath of the actual console).
3. pry out all of the vents and buttons from the dash. the vents will come out if you pry them from the side with a flat head screwdriver. The buttons (4 ways, rear defroster, cruise control, etc.) will come out the same way (find the notch to pry at).
4. behind both the vents and buttons, there will be screws holding down the dash trim. there will also be screws on the dash trim above the gauge panel assembly. there will also be screws holding down the dash trim underneath of the bars separating the instrument clusters and behind the change drawer. unscrew all of these (remember where each screw went!).
5. also, if you have a CD player installed - that must come out too.
6. finally, remove the steering wheel column cover by unscrewing the three screws holding it down underneath of the steering wheel column. this must come off in order to maneuver your trim around the steering wheel column.
now you should be ready to remove your dash trim...
7. when you have the dash trim removed... clean it up with hot, soapy water and rinse it off.
8. mask off all pieces that you don't want to become painted using masking tape (cigarette lighter area, the vent housing, etc.).
* you don't need to sand down the dash trim if you don't want to. i didn't, and the paint stuck well. so, if you want - you can.. but you don't HAVE TO.
9. lay the dash trim down on a piece of cardboard somewhere well ventilated (garage, outside). apply thin, even coats onto the dash trim. i would reccommend 3-5 coats total (10 minutes apart). you will be able to tell when the surface is sufficiently coated.
10. allow the dash trim 24 hours to dry (before reinstallation).
11. re-install the dash trim the same way you took it out (reverse the process).
* DO NOT USE ARMOR ALL on the painted dash, because it will eat your paint.
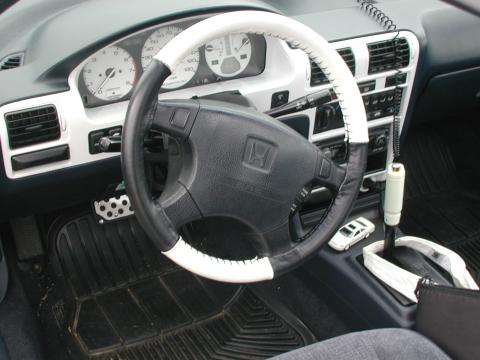
pics of what a finished dash trim will look like:

Tools: screwdrivers, can of SEM Gloss White interior paint, sandpaper (optional), masking tape.
Written by: me.
How-To:
1. You must first start by actually removing the dash trim:
2. the center console must come out first. There are 6 screws holding down the center console (2 are underneath of the actual console).
3. pry out all of the vents and buttons from the dash. the vents will come out if you pry them from the side with a flat head screwdriver. The buttons (4 ways, rear defroster, cruise control, etc.) will come out the same way (find the notch to pry at).
4. behind both the vents and buttons, there will be screws holding down the dash trim. there will also be screws on the dash trim above the gauge panel assembly. there will also be screws holding down the dash trim underneath of the bars separating the instrument clusters and behind the change drawer. unscrew all of these (remember where each screw went!).
5. also, if you have a CD player installed - that must come out too.
6. finally, remove the steering wheel column cover by unscrewing the three screws holding it down underneath of the steering wheel column. this must come off in order to maneuver your trim around the steering wheel column.
now you should be ready to remove your dash trim...
7. when you have the dash trim removed... clean it up with hot, soapy water and rinse it off.
8. mask off all pieces that you don't want to become painted using masking tape (cigarette lighter area, the vent housing, etc.).
* you don't need to sand down the dash trim if you don't want to. i didn't, and the paint stuck well. so, if you want - you can.. but you don't HAVE TO.
9. lay the dash trim down on a piece of cardboard somewhere well ventilated (garage, outside). apply thin, even coats onto the dash trim. i would reccommend 3-5 coats total (10 minutes apart). you will be able to tell when the surface is sufficiently coated.
10. allow the dash trim 24 hours to dry (before reinstallation).
11. re-install the dash trim the same way you took it out (reverse the process).
* DO NOT USE ARMOR ALL on the painted dash, because it will eat your paint.
pics of what a finished dash trim will look like:
Comment