
DISCLAIMER: The following are pictured descriptions on how I installed the Ingalls 3572 front camber kit on my 1993 Honda Accord EX Sedan. I am NOT responsible for any injuries/accidents/deaths that may occur during and after the installation. The kit comes with so-so instructions, I'm just providing the pictures. You have to be pretty unlucky to have any of the above happen while doing this. Proceed only after you've read and understood this disclaimer. If nothing else, then bust out the tools and party on!
--------------------------------------------------------------------------------
Note: All images posted are expandable to 640x480 when clicked...
--------------------------------------------------------------------------------
Requirements:
2 able-bodied individuals (always safer to partner up)
car jack
jack stands (x2 if you want to have both sides up simultaneously)
socket wrenches: 10mm, 14mm (x2), 16mm, 17mm, 18mm
hammer (optional)
patience and a hint of mechanical know-how (right = tighten, left = loosen)
--------------------------------------------------------------------------------
Out of the box...
Okay, so they don't come in fancy packagings, at least mine didn't. And no, these aren't the 3572's pictured. They are in fact the stock joints that was replaced in the process. I was too eager to install them and forgot to document it as I went along so all these images were taken a day after installation and after an alignment. As you can see, nothing that requires a rocket-scientist. Just a pair of control arm bolts + joints for each of the front wheels.
--------------------------------------------------------------------------------
Jack up the car then...
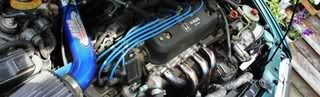
After you've jacked up the front end of the car and made sure it's safe to work in the area, proceed to loosen the stock control arm bolts from the engine bay. The bolts and nuts (on the 93 Accord) are marked by the blue arrows. Sorry the image is a little dark but you can't miss them. This doesn't involve loosening your struts so keep your paws off those nuts. Use a 17mm socket wrench for this procedure. (pictured is the front left control arm from the driver's view)
--------------------------------------------------------------------------------
Off to the side...
Now find yourself a comfortable position to crouch next to your wheel or a small stool to park your ass on. Red arrows indicate two(2) 10mm bolts that I recommend removing to facilitate control arm movement. It's not required but sure makes it easier and less chances of snapping that wire. After clearing those 2-10mm bolts, proceed with extreme caution and begin wiggling the control arm downward (green arrows). It might make it easier to dislodge the C-A bolts if your partner gently taps them from above.
Caution! Once the control arm is free, the wheel will tilt outward so prepare yourself to put up a fight and don't let the control arm dangle with too much freedom since it'll start tugging at the brake lines, etc... Bracing it with your knees (assuming your sitting on a stool) is the best and most comfortable solution that I came up with.
--------------------------------------------------------------------------------
Out with the old, in with the new...
Now with your 2-14mm socket wrenches, proceed to loosen the nut and bolt that locks each C-A joint in place (green arrows). Once the stock joints are removed, replace them with the Ingalls joint and tighten them back in. Careful not to over torque them. The blue arrows indicate the 16mm nut that you need to tighten to lock the Ingalls in place. Don't play with them just yet. After you've switched both C-A joints, reinsert them back up into the engine bay and tighten from above (18mm socket wrench). The Ingalls (at least the ones I got) came with 18mm nuts, even though the stock C-A nut removed in the beginning was 17mm.
Okay, now that you've tightened the C-A bolts from the top, you can then grab the control arm and pull it out or push it in to your desired camber settings. Of course since you don't have any accurate measuring device at hand, find an arbitrary, duplicable position and then tighten the 16mm nuts indicated by the blue arrows. (I simply pushed it all the way in which equals to minimal camber correction of +1.25�)
--------------------------------------------------------------------------------
Left side done, now to the right...
I won't go through the entire process again since they're the same instructions. The only thing different in this scenario is the bastard of a fuse box. You have to remove the 3 bolts that secures the box in place in order to gain access to the rear C-A bolt. To do so, use the 10mm socket wrench at the positions indicated by the red arrows. The blue arrow indicates the approximate position of the rear C-A bolt.
I threw in this image because it's much brighter than the one I posted for the left (driver) side. To reiterate, the C-A bolts have nothing to do with the strut tower so keep your dirty paws off those nuts, unless you're lowering your car or installing new shocks simultaneously. If that's the case, molest them all you want. Stock C-A nut is removed with the 17mm socket wrench.
--------------------------------------------------------------------------------
The finishing touches...
After you've made sure all the nuts and bolts are secured tightly, lower the car and inspect the work area. I would highly recommend that you get an alignment since you've now altered the pivot position and this will flare your wheels outward like so:
\ -H- / (front)
---
---
---
| --- | (back)
It's not enough to warrant a panic attack but the sooner you correct it, the less damage you'll do to your treads. These images were taken after I had the alignment. Sorry I didn't have any "before" pictures to compare but just take to heart that my car is lowered ~2.5" all around with Neuspeed Race Springs coupled with Koni Sports Struts (fully adjustable). At the alignment shop, the printout confirmed my front cambers now at L:-1.3�, R:-1.3�. The before readings were taken on (6/23/98) when I installed my 17" rims at L:-2.4�, R:-2.5�. Recommended camber is at -1.0 for handling and tread-life and since I was lucky during my installation to nail it at -1.3� even on both sides, I told the mech not to mess with it any more and I'll take the 0.3� difference. My rear cambers are at -1.4� for both. Not enough to warrant any changes.
--------------------------------------------------------------------------------
Good luck and be careful.
(Special Thanks To USC)
(& flooredaccord)
-This DIY was not written by me.
--------------------------------------------------------------------------------
Note: All images posted are expandable to 640x480 when clicked...
--------------------------------------------------------------------------------
Requirements:
2 able-bodied individuals (always safer to partner up)
car jack
jack stands (x2 if you want to have both sides up simultaneously)
socket wrenches: 10mm, 14mm (x2), 16mm, 17mm, 18mm
hammer (optional)
patience and a hint of mechanical know-how (right = tighten, left = loosen)
--------------------------------------------------------------------------------
Out of the box...
Okay, so they don't come in fancy packagings, at least mine didn't. And no, these aren't the 3572's pictured. They are in fact the stock joints that was replaced in the process. I was too eager to install them and forgot to document it as I went along so all these images were taken a day after installation and after an alignment. As you can see, nothing that requires a rocket-scientist. Just a pair of control arm bolts + joints for each of the front wheels.
--------------------------------------------------------------------------------
Jack up the car then...
After you've jacked up the front end of the car and made sure it's safe to work in the area, proceed to loosen the stock control arm bolts from the engine bay. The bolts and nuts (on the 93 Accord) are marked by the blue arrows. Sorry the image is a little dark but you can't miss them. This doesn't involve loosening your struts so keep your paws off those nuts. Use a 17mm socket wrench for this procedure. (pictured is the front left control arm from the driver's view)
--------------------------------------------------------------------------------
Off to the side...
Now find yourself a comfortable position to crouch next to your wheel or a small stool to park your ass on. Red arrows indicate two(2) 10mm bolts that I recommend removing to facilitate control arm movement. It's not required but sure makes it easier and less chances of snapping that wire. After clearing those 2-10mm bolts, proceed with extreme caution and begin wiggling the control arm downward (green arrows). It might make it easier to dislodge the C-A bolts if your partner gently taps them from above.
Caution! Once the control arm is free, the wheel will tilt outward so prepare yourself to put up a fight and don't let the control arm dangle with too much freedom since it'll start tugging at the brake lines, etc... Bracing it with your knees (assuming your sitting on a stool) is the best and most comfortable solution that I came up with.
--------------------------------------------------------------------------------
Out with the old, in with the new...
Now with your 2-14mm socket wrenches, proceed to loosen the nut and bolt that locks each C-A joint in place (green arrows). Once the stock joints are removed, replace them with the Ingalls joint and tighten them back in. Careful not to over torque them. The blue arrows indicate the 16mm nut that you need to tighten to lock the Ingalls in place. Don't play with them just yet. After you've switched both C-A joints, reinsert them back up into the engine bay and tighten from above (18mm socket wrench). The Ingalls (at least the ones I got) came with 18mm nuts, even though the stock C-A nut removed in the beginning was 17mm.
Okay, now that you've tightened the C-A bolts from the top, you can then grab the control arm and pull it out or push it in to your desired camber settings. Of course since you don't have any accurate measuring device at hand, find an arbitrary, duplicable position and then tighten the 16mm nuts indicated by the blue arrows. (I simply pushed it all the way in which equals to minimal camber correction of +1.25�)
--------------------------------------------------------------------------------
Left side done, now to the right...
I won't go through the entire process again since they're the same instructions. The only thing different in this scenario is the bastard of a fuse box. You have to remove the 3 bolts that secures the box in place in order to gain access to the rear C-A bolt. To do so, use the 10mm socket wrench at the positions indicated by the red arrows. The blue arrow indicates the approximate position of the rear C-A bolt.
I threw in this image because it's much brighter than the one I posted for the left (driver) side. To reiterate, the C-A bolts have nothing to do with the strut tower so keep your dirty paws off those nuts, unless you're lowering your car or installing new shocks simultaneously. If that's the case, molest them all you want. Stock C-A nut is removed with the 17mm socket wrench.
--------------------------------------------------------------------------------
The finishing touches...
After you've made sure all the nuts and bolts are secured tightly, lower the car and inspect the work area. I would highly recommend that you get an alignment since you've now altered the pivot position and this will flare your wheels outward like so:
\ -H- / (front)
---
---
---
| --- | (back)
It's not enough to warrant a panic attack but the sooner you correct it, the less damage you'll do to your treads. These images were taken after I had the alignment. Sorry I didn't have any "before" pictures to compare but just take to heart that my car is lowered ~2.5" all around with Neuspeed Race Springs coupled with Koni Sports Struts (fully adjustable). At the alignment shop, the printout confirmed my front cambers now at L:-1.3�, R:-1.3�. The before readings were taken on (6/23/98) when I installed my 17" rims at L:-2.4�, R:-2.5�. Recommended camber is at -1.0 for handling and tread-life and since I was lucky during my installation to nail it at -1.3� even on both sides, I told the mech not to mess with it any more and I'll take the 0.3� difference. My rear cambers are at -1.4� for both. Not enough to warrant any changes.
--------------------------------------------------------------------------------
Good luck and be careful.
(Special Thanks To USC)
(& flooredaccord)
-This DIY was not written by me.


 You have to think outside the box to get IN the box!


 pictures?

 )
)
Comment