
5-Lug Rear Big Brake Upgrade:
This is to upgrade your 10.3 rear rotors to 11.1, my previous setup prior to this was the prelude hubs with ITR rotors and 93 EX Calipers.
Special Thanks again to NH503P-3 for the help with this DIY as well. Hopefully this will help others to find ways to upgrade their brakes for looks and stopping power!
THIS DIY ONLY WORKS IF YOU ARE 5 LUG!
Parts needed:
2005-2007 Honda Accord Hybrid rear caliper Bracket and mounting hardware
2008-2011 Honda Accord Rear Rotors
90-93 Honda Accord Rear Caliper
4 x � ID, 7/8 OD, and 1.18mm thick Washers
90-93 Honda Accord Rear Brake Pads
OR
2004-2008 TSX Rear Brake Pads
Tools Needed:
Jackstands
Jack
12mm Socket / Wrench
14mm Socket / Wrench
Philips Head screwdriver
Philips Head Impact Screwdriver Punch
Brake Cleaner
Rubber Mallet or Ball Pen (depends on how gentle you want to be)
This DIY is pretty self-explanatory, If you have ever changed your rotors and or brake pads then you have already done 90% of this DIY.
Chock the front wheel and place jack stands in the appropriate places in the rear.
Remove your wheel and release your parking brake.
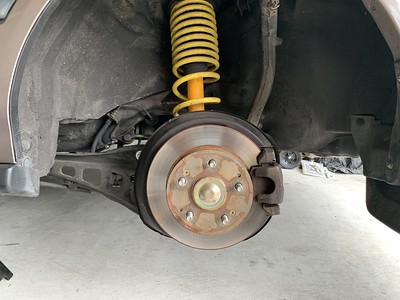
On the backside of the Caliper Bracket, there are 2 12mm bolts that connect the Caliper to the bracket.
NOTE: You can see these bolts on still attached to the (boot bolt?) on the right side of the picture
Slide the caliper off and use a piece of string, bungee cord to secure it to the spring to keep pressure off your brake line
Remove Brake Pads.
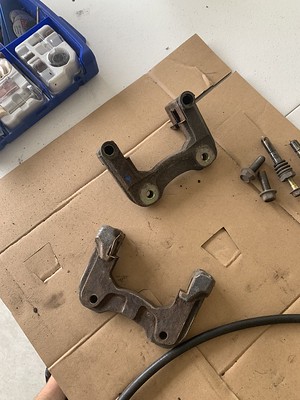
Remove the 2 14mm Bolts that mount the bracket to the knuckle.
Remove the Bracket.
If the 2 Philips head screws are installed remove and set aside
Remove Old Rotor

Spray new Rotors with Brake Cleaner to remove protective film
Install New Rotors and Install both Philips Head screws with the use of a Philips Impact punch or German Tight if you don’t have an impact.
Take your 05-07 Hybrid 14mm Bolt and place it in the knuckle
Slide the washer on the end between the knuckle and where the bracket mounts
Slide in 05-07 Hybrid Bracket
Torque 14mm Bolts to 80-Ft-lbs
Install Brake pads
NOTE: If you are using new pads you will have to push the caliper back in.
Slide your Caliper back in place, You may have to hammer it a bit to get it to slide on, biggest thing is make sure the nipple is lined up with the cross pattern on the caliper piston
Install and torque your 12mm bolts to 50 Ft-lbs (I personally just did good and tight)
Reinstall wheel.
Lower Car back on ground
NOTE: If you pushed the piston back into the caliper, you will need to pump the brakes until the pedal firms up before going for a drive.
Bed your new rotors and possible pads IAW how you prefer.
NOTE: My personal tech is 4 semi aggressive stops from 30-15, then 8 aggressive braking from 65-15, do not come to a complete stop and make sure you have enough spacing between you and any car as your brakes may fade initially
Enjoy your Big Brake Setup in the rear.

As always please let me know if you find any errors with this DIY.
This is to upgrade your 10.3 rear rotors to 11.1, my previous setup prior to this was the prelude hubs with ITR rotors and 93 EX Calipers.
Special Thanks again to NH503P-3 for the help with this DIY as well. Hopefully this will help others to find ways to upgrade their brakes for looks and stopping power!
THIS DIY ONLY WORKS IF YOU ARE 5 LUG!
Parts needed:
2005-2007 Honda Accord Hybrid rear caliper Bracket and mounting hardware
2008-2011 Honda Accord Rear Rotors
90-93 Honda Accord Rear Caliper
4 x � ID, 7/8 OD, and 1.18mm thick Washers
90-93 Honda Accord Rear Brake Pads
OR
2004-2008 TSX Rear Brake Pads
Tools Needed:
Jackstands
Jack
12mm Socket / Wrench
14mm Socket / Wrench
Philips Head screwdriver
Philips Head Impact Screwdriver Punch
Brake Cleaner
Rubber Mallet or Ball Pen (depends on how gentle you want to be)
This DIY is pretty self-explanatory, If you have ever changed your rotors and or brake pads then you have already done 90% of this DIY.
Chock the front wheel and place jack stands in the appropriate places in the rear.
Remove your wheel and release your parking brake.
On the backside of the Caliper Bracket, there are 2 12mm bolts that connect the Caliper to the bracket.
NOTE: You can see these bolts on still attached to the (boot bolt?) on the right side of the picture
Slide the caliper off and use a piece of string, bungee cord to secure it to the spring to keep pressure off your brake line
Remove Brake Pads.
Remove the 2 14mm Bolts that mount the bracket to the knuckle.
Remove the Bracket.
If the 2 Philips head screws are installed remove and set aside
Remove Old Rotor
Spray new Rotors with Brake Cleaner to remove protective film
Install New Rotors and Install both Philips Head screws with the use of a Philips Impact punch or German Tight if you don’t have an impact.
Take your 05-07 Hybrid 14mm Bolt and place it in the knuckle
Slide the washer on the end between the knuckle and where the bracket mounts
Slide in 05-07 Hybrid Bracket
Torque 14mm Bolts to 80-Ft-lbs
Install Brake pads
NOTE: If you are using new pads you will have to push the caliper back in.
Slide your Caliper back in place, You may have to hammer it a bit to get it to slide on, biggest thing is make sure the nipple is lined up with the cross pattern on the caliper piston
Install and torque your 12mm bolts to 50 Ft-lbs (I personally just did good and tight)
Reinstall wheel.
Lower Car back on ground
NOTE: If you pushed the piston back into the caliper, you will need to pump the brakes until the pedal firms up before going for a drive.
Bed your new rotors and possible pads IAW how you prefer.
NOTE: My personal tech is 4 semi aggressive stops from 30-15, then 8 aggressive braking from 65-15, do not come to a complete stop and make sure you have enough spacing between you and any car as your brakes may fade initially
Enjoy your Big Brake Setup in the rear.
As always please let me know if you find any errors with this DIY.


Comment