Announcement

Collapse
No announcement yet.

apalileo : 1993 Accord DX

Collapse
X
 
  • Filter
  • Time
  • Show
Clear All
new posts

  • islandhopper
    replied
    Originally posted by apalileo View Post
    Decided to make my own Si-T style bumper lights.

    Started with some eBay clear lenses


    Picked up some 90-91 bumper light refraction lenses


    Traced them onto the housings


    Dremeled


    Here you can see they are definitely taller than the housing of the 92-93 lights (which is why I chose them, I didn't want to drop in the lens and lose it in the housing)


    JB KwikWelded


    I opted for this method since separating the lens from the housing seemed too risky.


    May 2017 - Headlight Refresh

    Since the bumper lights were getting a refresh, it was time for the headlights to get cleaned up. I didn't photograph the process, but it's pretty straightforward.

    Before


    I used a mix of 3M wet/dry sandpaper and a Mother's NuLens kit I had sitting around.

    400 grit > 800 grit > 1000 grit > 2000 grit followed by the 3000 grit sanding pad and the Mother's polish. Here's where it got me:


    Using the 400 grit, I wet sanded all the way down to the plastic, making sure none of the OEM UV clear remained (it stays "clearer" than the areas around it when sanding). Removing the clear ensured a uniform and ideal finishing surface.

    Wrapped the headlights in 3M Scotchgard Pro Series Paint Protection Film


    I opted for this film for three reasons:
    1) it offers UV protection, ensuring the film won't yellow or crack and will protect the plastic underneath
    2) it fills the fine imperfections in the surface beneath it
    3) the Pro Series has the smoothest finish of any film I've ever used.

    I had some spare standard 3M Scotchgard Paint Protection Film and wrapped the bumper lights with it.

    Ready for action!


    The Morimoto Mini D2S X-Lenses really stand out with the crystal clear lenses! Since it's late I'll have to post installed pics tomorrow.
    Legit retofit work and excellent polishing. I remember working on my lights and it was a labor of love. You will really enjoy these im sure.

    Nice work.

    Leave a comment:


  • GTRON
    replied
    Those bumper lights are so cool! What a cool idea!

    Leave a comment:


  • HenRoc
    replied
    Beautiful. I won't lie. This inspired me to re-think my sedan. I recently picked up a wagon to daily drive while the sedan goes down for some much needed love. I've read all 6 pages and really really like how you thought out everything on this car.

    It's stuff like this that makes me really appreciate the forums and the hardwork that people like you put in. - Henry

    Leave a comment:


  • apalileo
    replied
    May 2017 - Si-T Lights (styled)!

    Decided to make my own Si-T style bumper lights.

    Started with some eBay clear lenses


    Picked up some 90-91 bumper light refraction lenses


    Traced them onto the housings


    Dremeled


    Here you can see they are definitely taller than the housing of the 92-93 lights (which is why I chose them, I didn't want to drop in the lens and lose it in the housing)


    JB KwikWelded


    I opted for this method since separating the lens from the housing seemed too risky.


    May 2017 - Headlight Refresh

    Since the bumper lights were getting a refresh, it was time for the headlights to get cleaned up. I didn't photograph the process, but it's pretty straightforward.

    Before


    I used a mix of 3M wet/dry sandpaper and a Mother's NuLens kit I had sitting around.

    400 grit > 800 grit > 1000 grit > 2000 grit followed by the 3000 grit sanding pad and the Mother's polish. Here's where it got me:


    Using the 400 grit, I wet sanded all the way down to the plastic, making sure none of the OEM UV clear remained (it stays "clearer" than the areas around it when sanding). Removing the clear ensured a uniform and ideal finishing surface.

    Wrapped the headlights in 3M Scotchgard Pro Series Paint Protection Film


    I opted for this film for three reasons:
    1) it offers UV protection, ensuring the film won't yellow or crack and will protect the plastic underneath
    2) it fills the fine imperfections in the surface beneath it
    3) the Pro Series has the smoothest finish of any film I've ever used.

    I had some spare standard 3M Scotchgard Paint Protection Film and wrapped the bumper lights with it.

    Ready for action!


    The Morimoto Mini D2S X-Lenses really stand out with the crystal clear lenses! Since it's late I'll have to post installed pics tomorrow.

    Leave a comment:


  • apalileo
    replied
    Thanks for the encouragement! It's not always good news though...

    Only a week after installing the new manual converted rack, the passenger side bushing and o-ring backed out

    There was synthetic grease throughout the shaft, but I cleaned it off before taking the photo since I didn't want metal shavings gathering in it while cutting

    I cut the piston from the rack

    I'm curious how this is installed. It's got to be some sort of heating and cooling process

    Cylinder sleeve and spring that went back in


    All else was installed as usual. I have to get it realigned on Monday.

    Last night I was coming home from downtown LA and I noticed a knocking sound coming from the steering. I thought a ball joint had gone out. I drove home as carefully as possible and lifted it up. Did the customary 12 and 6 wiggle and the 9 and 3 wiggle. Nothing. I turned the wheels out and checked the tie rods and the passenger side was shifting in all directions and banging on something.

    This morning the whole rack had to come out and I discovered the bushing and o-ring free floating on the rack shaft. The banging noise was the shaft against the opening in the outer rack sleeve where the bushing and o-ring are normally seated. I grabbed my cutting wheel and carefully cut into the piston from both sides and broke it off with my chisel and Thor hammer. With the cylinder and retaining spring back in place, I hope to never have this issue again.

    I know a lot of other manual racks have been done this way (removing the cylinder sleeve), and they have driven with no issue. My neighbor and I came to the conclusion that it's the overall stiffness of my suspension (polyurethane bushings, 600 lbs/in spring on stiff set Koni Sport struts as well as the Rigid Collars) that caused this. All the vibration had to transmit somewhere and that bushing ended up taking the beating.

    Leave a comment:


  • islandhopper
    replied
    Wow! Good stuff!

    Leave a comment:


  • Mike1357
    replied
    Phenomenal update post! This thing looks like it has the makings of a great track day/autocross sleeper.

    Leave a comment:


  • apalileo
    replied
    @Granite & SSM: I do my best as always. These forums play a huge role in my decision making and are my go to guide for modifications.

    The Rigid Collars an interestingly simple concept to say the least. I stumbled on them during my customary "CB7 Accord" search on eBay. I watched a few videos about them and bought them on impulse (they're about $180 for just those 8 collars). Some of the install videos made it seem so easy, but when I loosened the four cross member bolts, nothing happened. I realized the rear engine mount was preventing it from dropping. I ended up using a pry bar to pivot the cross member and create space for the upper collar (between the cross member and chassis) and even then I discovered that the cross member was shifted toward the passenger side. A little push and pull and they seated. Installed the additional collars on the bolts and torqued to spec.

    I don't imagine the cross member moves around that much in normal driving conditions, but in instances where you hit more substantial imperfections in the road, I'm sure there can be some deflection even within the small clearances between the bolt holes and the bolts. Hopefully I don't have to ever replace the cross member because these are like crush washers. Really expensive crush washers.

    Thanks for linking that thread to me Granite. I didn't know Cheddas was offering replacements and I didn't even think to get in touch with them. I was hesitant to attempt drilling them out in fear of splitting or cracking them (they're rather solid as opposed to polyurethane, they feel like delrin almost). However, with the rear lower strut mounts having been swapped with the stiffer polyurethane, I'm thinking it's better to have some flexibility up top to prevent bending the strut rods in harsher driving conditions.

    Leave a comment:


  • SSMAccord
    replied
    This looks like a very thorough suspension overhaul. Well done. I am intrigued by the rigid collars, that seems like a very worthwhile mod.

    Leave a comment:


  • Granite CB7
    replied
    I've been wondering what you've been up to, thanks for the update, everything looks top notch You're the first person I've heard of running the rigid collar setup, it's a neat concept and I'm not surprised it made a good difference. Prothane is my absolute favorite plus it's super nice to not have to "set" every single bushing at ride height adjustments. That's too bad the green bushings don't fit the larger Koni sleeves. Could you drill them out w/ a drill? Drill press would be way better. Other than that I know Jordain will exchange yours for the correct ones for the Konis, see post #69:
    http://cb7tuner.com/vbb/showthread.php?t=208089&page=4

    Leave a comment:


  • apalileo
    replied
    May 2017 - Suspension Complete!

    It's been long awaited, but I finally did it. I finished my suspension goals! Over the course of several months I've been saving up parts and prepping. After several days of working on it, I got it all buttoned up.

    Prothane rear bushings


    Pressed into CB9 rear lower control arms. I was going to use the stamped steel arms I picked up a while back, but I happened upon some wagons at the yard and figured it was worth the upgrade to cast iron


    New trailing arm bushings (I also bought the little ones that connect to the rear knuckle


    Then I decided to reinforce them with polyurethane


    Bored out the recesses a bit with the ol' Dremel


    Masked


    Filled


    Installed into replacement rear arms I picked up from the yard

    This was my first time using liquid urethane. I wasn't aware just how fast this stuff cures! The left one came out great. The right one looks lumpy because the liquid was already setting from me taking so long to pour the first one.

    Bought these

    Couldn't use them though since I have Koni yellows... had to stick with the stock rubber.

    SPC adjustable rear upper control arms with Energy ball joint boots

    The bushings in my stock arms were completely gone. After snapping this picture I pushed the mounts out by hand. The rubber had completely separated on both arms

    While taking the arms out, I addressed the rear lower strut mounts

    You can't tell from this photo, but the inner race is at an angle. The rubber is old and worn. I left the toe arms in place to give the knuckle some stability while drilling

    Drilled out the bushings with a 1.25" hole saw


    Grinded out the old rubber with my Dremel


    Prothane front upper control arm anchor bushings installed

    They are literally a perfect fit. They went in with as much interference as the anchor bushings did with my Energy master kit

    Three out of four control arms came out without issue. The eccentric bolt on the driver side toe arm was siezed in the inner race and I was forced to cut it out


    Upgraded to a Progress Technology rear sway bar


    Up front I swapped in a Napa remanufactured rack and pinion

    I performed a full manual conversion. In addition, I filled the passage in the valve body for the directional pin with JB Weld to secure the pin and further eliminate steering wheel play (didn't take photos though)

    Napa outer tie rods (actually made by Sankei 555)


    JDM


    My impulse buy: Spoon Sports Rigid Collars

    Not much to show in terms of install. Had to use a pry bar to get them in since the rear engine mount prevented the front cross member from descending. Once in they just look like new washers

    Only thing left was to get it on the rack and get it aligned!

    Sway bar is nice and subtle. As you can tell by my use of black bushings and stock parts, I'm not big on being flashy

    To finish it all up, I upgraded to Continental ExtremeContact DWS 06's in 225/50-16. I debated between this size and 205/55-16, but the fact that I'm running 16"x8" wheels made more sense to have the 225's.


    Meaty

    Alignment is set to -0.9° front and -1.9° rear with 0° toe.

    My car rides better than it ever has. All of the old rubber is finally gone! The rear end is much more stiff, my steering is more crisp and the tires ride comfortable and surprisingly quiet (probably the quietest tires I've ever purchased). The Rigid Collars actually did give the front end a more solid feel and sound on the road. I thought it might be just a placebo effect, but nothing other than the steering rack was changed out up front and I'd been driving on the Energy master kit for a while now so I definitely noticed the subtle change.

    In the end it was all worth it and I'm enjoying the daily drive that much more!
    Last edited by apalileo; 05-24-2017, 12:49 PM.

    Leave a comment:


  • apalileo
    replied
    Sold my old wheels


    Kind of miss them...
    Last edited by apalileo; 05-08-2017, 04:42 AM. Reason: Sold

    Leave a comment:


  • apalileo
    replied
    @Granite CB7 Thank you! I agree about the helper springs. It's surprising Ground-Control and other established companies don't already include them in their sets.

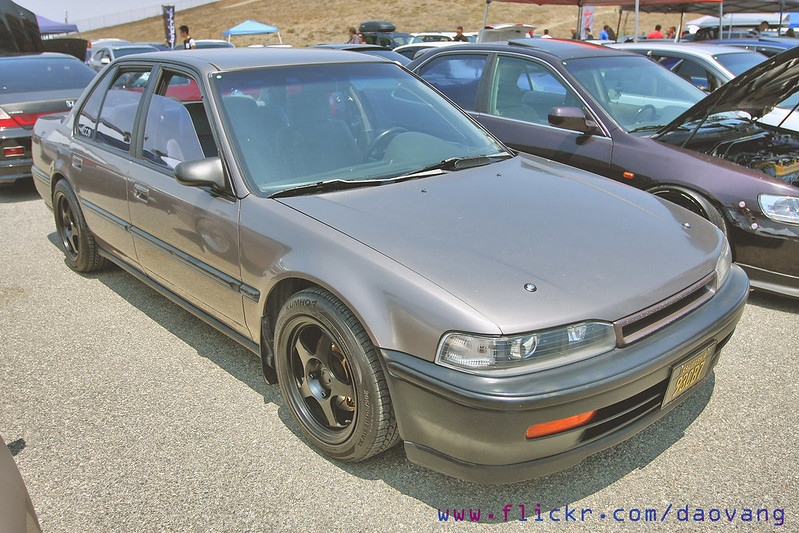
    @daovangphotos Thanks for the link. This is best photo of my car by far! I wish I had painted my wiper arms before the meet haha! Sucks we didn't get to meet in person. You may have seen me, I was the guy with the little shaved white Pomeranian at the meet. He met more people at CAM than I did!

    @HenRoc I appreciate it! I used to want to swap in power features or even pick up an LX or EX and swap everything over, but I have embraced the "DX'ness" of my CB7. No security yet, but it's in the pipeline.

    Leave a comment:


  • HenRoc
    replied
    While I was never a huge fan of the DX basically because I like everything powered I really really like what you have done with yours man.

    Everything is so methodically and cleanly put together. Do you at least have an alarm system in it?

    Keep up the good work man.

    Leave a comment:


  • daovangphotos
    replied


    Here's a link to multiple sizes you can download:

    https://www.flickr.com/photos/daovan...57246/sizes/o/

    Leave a comment:

Working...
X