
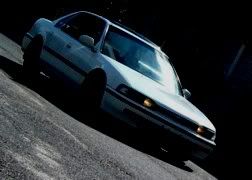
Better Angle Pics Posted 4/20/05
Disclaimer: This is how I did mine, you may have different results with a different method of installing. I take no responsibility for any damages you may cause to your lip or car when installing.
Introduction: This is a DIY install and paint for a TYPE-R Style Lip for a 1995 Accord-Fabricated onto a 1993 Accord. Different methods can be used to install, I found this way to be easiest and strongest in terms of being attached.
Tools & Materials: 1 Can of Plasti-Kote Bumper and Trim Primer, 1 Can of Plasti-Kote Bumper and Trim Flat Black, 1 Package of self-tapping screws, 600 Grit sandpaper, 1 Drill with phillips-head bit (screws go in easily through Both lips)

1. I put lip on and measured out the ends that needed to be cut off. This lip is slightly longer, made to fit a 1994-1995 Accord, so modification was necessary. I measured it by having someone hold the lip against my car while i measured how much needed to be cut off on each end with a pen/marker.
2. I cut off the ends using a hacksaw, dremels are fine, the material is abs plastic-therefore it cuts pretty easily. After cutting the ends off you are left with a rough edge, I used 300 grit sandpaper to really work the edges down to a smooth finish, followed by a 600 grit sandpaper.

3. THE LIP MUST BE PLACED ON THE EXISITING LIP (therefore, you must already have the EX lip to attach this one. Ifyou look on the Type-R Lip you will see there is extra plastic in the middle to be slotted in between the bumper and the existing lip. So, you have to loosen your existing lip and slip the Type-R lip in there. Next, tighten the bolts back up, and you will see the Type-R lip stays in place-held together like a vice in between the old lip and your bumper.
4. Using SELF-TAPPING screws with a flat head, apply (2) on each side, one towards the very end of the lip, and another 5 inches away (The second screw is used for extra support but not necessary). The other screws can be applied under the lip through the existing lip and the type R-Lip into the undercarriage of your bumper (however, also not completely necessary because the "vice" of holding them together, which I spoke about in step 3 holds the type-r lip TIGHTLY. (You may also put one screw through the middle of the lip-directly under the license plate for extra support (like i did).

5. Newspaper the bumper up and cover accordingly. Sand down the Type-R Lip using 600 grit sandpaper (before hand, clean using rubbing alcohol if desired). Than apply 2-3 coats of Bumper Trim Primer. Sand down using 600 grit sandpaper after the final coat. Follow directions on the can on drying time. Than apply 2-3 coats of the Bumper trim paint, I used flat black, which made it look less glossy more matte finish which I was going for. Allow to dry at least 3-4 hours. **The reason I didn't apply paint before install, is because I was afraid I would scratch the paint when tapping the screws (like an accident)**

6. Remove newspaper, sit back and stare at your beautiful new addition to your cb7. Also, Since some of you may not want to see the screws sticking out .1 milimeters, so I suggest using bondo over the screws and sand down and paint over so it will look ultra clean. (I might do this eventually).


Disclaimer: This is how I did mine, you may have different results with a different method of installing. I take no responsibility for any damages you may cause to your lip or car when installing.
Introduction: This is a DIY install and paint for a TYPE-R Style Lip for a 1995 Accord-Fabricated onto a 1993 Accord. Different methods can be used to install, I found this way to be easiest and strongest in terms of being attached.
Tools & Materials: 1 Can of Plasti-Kote Bumper and Trim Primer, 1 Can of Plasti-Kote Bumper and Trim Flat Black, 1 Package of self-tapping screws, 600 Grit sandpaper, 1 Drill with phillips-head bit (screws go in easily through Both lips)
1. I put lip on and measured out the ends that needed to be cut off. This lip is slightly longer, made to fit a 1994-1995 Accord, so modification was necessary. I measured it by having someone hold the lip against my car while i measured how much needed to be cut off on each end with a pen/marker.
2. I cut off the ends using a hacksaw, dremels are fine, the material is abs plastic-therefore it cuts pretty easily. After cutting the ends off you are left with a rough edge, I used 300 grit sandpaper to really work the edges down to a smooth finish, followed by a 600 grit sandpaper.
3. THE LIP MUST BE PLACED ON THE EXISITING LIP (therefore, you must already have the EX lip to attach this one. Ifyou look on the Type-R Lip you will see there is extra plastic in the middle to be slotted in between the bumper and the existing lip. So, you have to loosen your existing lip and slip the Type-R lip in there. Next, tighten the bolts back up, and you will see the Type-R lip stays in place-held together like a vice in between the old lip and your bumper.
4. Using SELF-TAPPING screws with a flat head, apply (2) on each side, one towards the very end of the lip, and another 5 inches away (The second screw is used for extra support but not necessary). The other screws can be applied under the lip through the existing lip and the type R-Lip into the undercarriage of your bumper (however, also not completely necessary because the "vice" of holding them together, which I spoke about in step 3 holds the type-r lip TIGHTLY. (You may also put one screw through the middle of the lip-directly under the license plate for extra support (like i did).
5. Newspaper the bumper up and cover accordingly. Sand down the Type-R Lip using 600 grit sandpaper (before hand, clean using rubbing alcohol if desired). Than apply 2-3 coats of Bumper Trim Primer. Sand down using 600 grit sandpaper after the final coat. Follow directions on the can on drying time. Than apply 2-3 coats of the Bumper trim paint, I used flat black, which made it look less glossy more matte finish which I was going for. Allow to dry at least 3-4 hours. **The reason I didn't apply paint before install, is because I was afraid I would scratch the paint when tapping the screws (like an accident)**
6. Remove newspaper, sit back and stare at your beautiful new addition to your cb7. Also, Since some of you may not want to see the screws sticking out .1 milimeters, so I suggest using bondo over the screws and sand down and paint over so it will look ultra clean. (I might do this eventually).


 . Unfortunately, I can't measure the ends because I threw them out...but, I wouldn't use that as a guideline, because I have 2 of these lips, and one was a different length than the one I installed. It was only slightly off, but enough to make a difference. If i remember correctly though, I cut off just about 4 inches on each side. Hope that helps. I could measure the whole lip though, if anyone needs. Enjoy
Comment