
Does anyone know the parts and installation on the trunk conversion for the lid that comes straight up instead of lifting up at the angle? I see that shit on ebay all the time too.
-
-
flip flop trunk, the link included in a list of diy's on this site no longer works.
google search:
http://www.v6z24.com/howto/fliptrunk
http://www.domestictunerz.com/lofive...hp?t13141.html
http://www.honda-acura.net/forums/ar...p/t-68839.html
absence of evidence is not evidence of absence. -
thanks
Comment
-
i did this 3 years ago, when the idea started to come out. and have been using it since.
Disregard females, acquire currency.

 My 2003 Nissan Maxima Members Ride Thread
DIY: HOW TO POST PIC(S)
Comment
-
Materials:
- (2) 3-inch latches, regular size latches will work fine, heavy duty ones just make for more work
- (2) triangular hinges like as pictured in the instructions
- (Approx. 15) Tapered head screws (the ones that could be flushed into the hinges)
Before you begin:
- Take the 2 hinges and bend one side at a 90-degree angle (the length to the bend will vary depending on how wide your trunk bracket is)
- Mark all your necessary holes and pre-drill with a small drill bit (note: always start small and work your way bigger or you will have to end up buying super large screws to use on your mess-up)
- Be sure to read and understand the instructions before starting!!!
1. With trunk open, mark the trunk lid at the top of the stock brackets.
2. Remove your trunk lid by unbolting 4 bolts. Do not remove the stock brackets, only the trunk lid.
3. Attach the flat side of the enclosed hinge to trunk lid below the marked. With the bottom of the hinge facing down.
4. You will have to bend hinge.
5. With help reattach trunk lid to stock brackets using curved hinge. Be sure to pre-drill all holes before mounting new hinge. This hinge will create the fold down effect.
6. Connect enclosed latches about 2 inches from the bottom of the trunk lid. Be sure they are mounted on the inside of the stock brackets.
7. Mark a spot on the stock bracket to drill to allow the latches to latch. Be sure the latch will latch tightly. If it doesn't latch tightly you may have to replace the stock bottom bolts each time you want to fold down you trunk lid.
Disregard females, acquire currency.
My 2003 Nissan Maxima Members Ride Thread
DIY: HOW TO POST PIC(S)
Comment
-
thats a cool mod, and realativelt cheap too. i think i might look into possibly attempting it tomorrow...Comment
-
well i tried it and when i shut my hood i noticed that no only is it hard to shut (the factory arms move independently) but when i shut the trunk the top of the trunk closest to the back window pops up and stays up. when i re opened it i noticed the hinges were bent up a little bit like they bent because they werent thick enough. i took it off and im gonna get some thicker ones and try it again. i hope it works becuase while i had it on it looked cool...Comment
-
you need to use the stock bolts to lock it down... on each arm are 2 bolts, use the bottom one to lock the trunk in the "normal" position.
Disregard females, acquire currency.
My 2003 Nissan Maxima Members Ride Thread
DIY: HOW TO POST PIC(S)
Comment
-
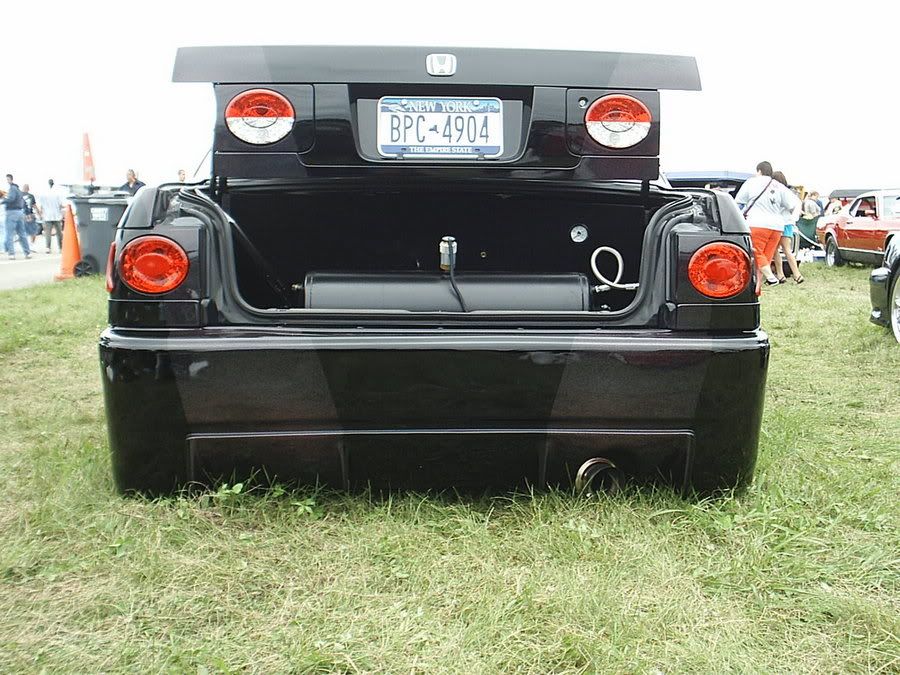
These are some really bad pics of my setup... The triangular piece is my custom made stopper, so i can stop the trunk in the 90 degree position without using and poles...Originally posted by CustomLowz
If you look at the hinge area, the top bolt is now the hinge, and the bottom bolt is there to lock the trunk in the "normal" position... If you have any questions, let me know.


Disregard females, acquire currency.
My 2003 Nissan Maxima Members Ride Thread
DIY: HOW TO POST PIC(S)
Comment
-
ok i think i got it now. thanks for the pics, cleared alot up on this end. so your basically bolting it together "regularly" until you want it to flip down then you take out the bolt and it rests on your stopper...thats what i got and it makes perfect sense. thanks for the help customlowzComment
-
Sounds like you got it! Your welcomeOriginally posted by ChunteRX
Disregard females, acquire currency.
My 2003 Nissan Maxima Members Ride Thread
DIY: HOW TO POST PIC(S)
Comment
-
what kind of problems have you run into if any?Comment
-
I havent run into any problems with my setup.Originally posted by flacopower
Disregard females, acquire currency.
My 2003 Nissan Maxima Members Ride Thread
DIY: HOW TO POST PIC(S)
Comment
Comment