
Courtesy of HondaFan81.
I am reposting this as a new thread because I found it to be useful information in another thread as a post. If a valve adjustment DIY already exists, please delete this one, as I tried but couldnt find anything.
I did this not long ago on my F22a4. Same specs.
intake .010"
exhaust .012"
Do this valve lash adjustment with engine cold (100 deg F or less)Remove spark plug boots, you can remove the spark plugs to make it easier to turn the crank by hand. Remove valve cover, be careful with gasket if you're going to reuse it (or get new). Remove distributor cap to get a visual on the rotor. Jack up front of car (2 jackstands needed) enough to get tires off ground. Remove front-driver wheel. You will notice a hole in the plastic fenderliner that has access to the crank pulley bolt (19mm). Use a 1/2" wratchet and 6" extension or so. Turn the crank in counter-clockwise direction (natural engine motion), until you see the backside of the cam pulley with the ARROW mark pointing up in 12-oclock position...then look to see if your rotor is at # 1 spark plug terminal and check the flywheel hole (pull flywheel peek-hole plug) and see if the WHITE line is in-line with the block pointer in there). If it all don't match up, keep turning the crank until you have the ARROW on back of cam hear at 12-oclock again, then check again. This is TDC on compression stroke of # 1 piston.
Then, go check valve lash on both the intake and exhaust valves on just the # 1 cylinder. Set them accordingly, 2 intake and 2 exhaust valves. Then, turn the crank 180 degrees in counterclockwise direcdtion and the cam pulley will have the ARROW on the backside of it pointing toward the exhaust manifold. This is TDC at # 3 cylinder. Now check/adjust the # 2 cylinder intake & exhaust valves.
Turn crank 180 deg again. Cam pulley ARROW pointing down at 6-oclock now. This is # 4 TDC. Check & adjust.
Turn crank 180 deg again. Cam pulley ARROW pointing toward intake manifold now. This is # 2 TDC. Check & adjust.
You will need a feeler-gauge, flathead screw driver and 10mm combo wrench.
To adjust the valve lash...put the flathead scewdriver onto the set screw, then hold the nut that's around the set screw with the 10mm combo wrench. Then, loosen the nut, while holding screw in place. Loosen the screw until you can slip the feeler gauge (set to either .010" or .012") and when you can slide it back and forth with a slight drag...then HOLD the screw in that exact spot, while you tighten the nut with combo wrench. Re-check your valve lash because as you tighten the nut, you may have set it a lil tighter..if you let the screw move. It's a job where you wish you had 3 hands, but you can manage. I was glad this was a 4 cylinder is all i kept saying to myself. When you set the nut, make sure you tighten it good...real snug, but not like red-faced about to take a crap in ur pants scenario.
Torque the valve cover nuts to 9 lb-ft or 108 in-lbs. Reconnect everything. Make sure you remove all tools (including the wratchet on the crank bolt & put wheel back on and set to ground) and reconnect everything back, etc before you start ur engine. Don't get ahead of urself. Double check if you have to.
Firing order is 1-3-4-2
You want pics?! YOU GOT DA PICS!
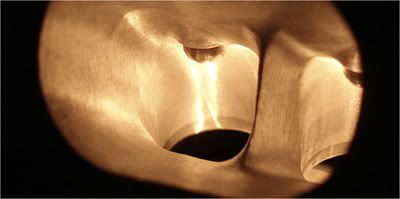
Cam at 90* (#1 Cylinder TDC)

Flywheel marks aligned (#1 Cylinder TDC)

Distributor Rotor at Cylinder #1

Loosening the Nut

Checking clearance of intake valve with feeler guage (slight drag)

Tightening Nut

Checking clearance of exhaust valve with feeler gauge (slight drag)


updated with pics from foamypirate
I am reposting this as a new thread because I found it to be useful information in another thread as a post. If a valve adjustment DIY already exists, please delete this one, as I tried but couldnt find anything.
I did this not long ago on my F22a4. Same specs.
intake .010"
exhaust .012"
Do this valve lash adjustment with engine cold (100 deg F or less)Remove spark plug boots, you can remove the spark plugs to make it easier to turn the crank by hand. Remove valve cover, be careful with gasket if you're going to reuse it (or get new). Remove distributor cap to get a visual on the rotor. Jack up front of car (2 jackstands needed) enough to get tires off ground. Remove front-driver wheel. You will notice a hole in the plastic fenderliner that has access to the crank pulley bolt (19mm). Use a 1/2" wratchet and 6" extension or so. Turn the crank in counter-clockwise direction (natural engine motion), until you see the backside of the cam pulley with the ARROW mark pointing up in 12-oclock position...then look to see if your rotor is at # 1 spark plug terminal and check the flywheel hole (pull flywheel peek-hole plug) and see if the WHITE line is in-line with the block pointer in there). If it all don't match up, keep turning the crank until you have the ARROW on back of cam hear at 12-oclock again, then check again. This is TDC on compression stroke of # 1 piston.
Then, go check valve lash on both the intake and exhaust valves on just the # 1 cylinder. Set them accordingly, 2 intake and 2 exhaust valves. Then, turn the crank 180 degrees in counterclockwise direcdtion and the cam pulley will have the ARROW on the backside of it pointing toward the exhaust manifold. This is TDC at # 3 cylinder. Now check/adjust the # 2 cylinder intake & exhaust valves.
Turn crank 180 deg again. Cam pulley ARROW pointing down at 6-oclock now. This is # 4 TDC. Check & adjust.
Turn crank 180 deg again. Cam pulley ARROW pointing toward intake manifold now. This is # 2 TDC. Check & adjust.
You will need a feeler-gauge, flathead screw driver and 10mm combo wrench.
To adjust the valve lash...put the flathead scewdriver onto the set screw, then hold the nut that's around the set screw with the 10mm combo wrench. Then, loosen the nut, while holding screw in place. Loosen the screw until you can slip the feeler gauge (set to either .010" or .012") and when you can slide it back and forth with a slight drag...then HOLD the screw in that exact spot, while you tighten the nut with combo wrench. Re-check your valve lash because as you tighten the nut, you may have set it a lil tighter..if you let the screw move. It's a job where you wish you had 3 hands, but you can manage. I was glad this was a 4 cylinder is all i kept saying to myself. When you set the nut, make sure you tighten it good...real snug, but not like red-faced about to take a crap in ur pants scenario.
Torque the valve cover nuts to 9 lb-ft or 108 in-lbs. Reconnect everything. Make sure you remove all tools (including the wratchet on the crank bolt & put wheel back on and set to ground) and reconnect everything back, etc before you start ur engine. Don't get ahead of urself. Double check if you have to.
Firing order is 1-3-4-2
You want pics?! YOU GOT DA PICS!
Cam at 90* (#1 Cylinder TDC)
Flywheel marks aligned (#1 Cylinder TDC)
Distributor Rotor at Cylinder #1
Loosening the Nut
Checking clearance of intake valve with feeler guage (slight drag)
Tightening Nut
Checking clearance of exhaust valve with feeler gauge (slight drag)
updated with pics from foamypirate


Comment