
Here is my DIY. Hope you guys find it helpful.
PROBLEM:
I can barely remember when my passenger side rear glove box closed all the way. After fixing a couple other things on my car, I decided to tackle the glove box next but I couldn't find any DIY already posted. Referencing the service manual and the online parts catalog diagrams, I set to fix it once and for all.
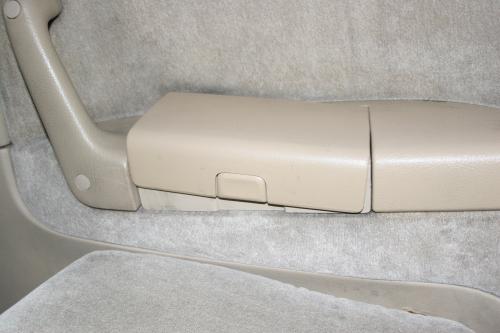
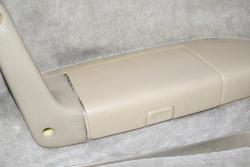
Basically, it looks like I lost the peg that holds the lid of the glove box to the body at the pivot point. It looked like this:
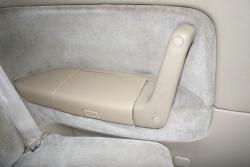
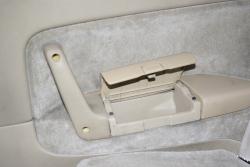
This is how it is supposed to look like:
Whenever I had passengers in the back, they'd always think they could fix it. You could press it down and it might stay for a while due to friction or whatnot, but after a while, it'd just pop back up because it was missing the peg.
SOLUTION:
I am by no means an expert DIYer so I tend to make with what I have and try to make the best of it. Therefore, I highly advise that you do not do what I did to "fix" the glove box. I'm just hoping that these instructions will help you guys get to the point of accessing the glove box but from there, any solution will probably be better than mine.
Summary:
1. Remove back set
2. Remove side panel
3. Remove glove box
4. Fix glove box
5. Put everything back
Details:
1. Follow the instructions in this post to remove the entire back seat. You actually need to remove both cushions in order to access the screws needed to remove the side panel. I didn't take any pictures of this process because 1) I wasn't patient enough and 2) because zipcreature called dibs on the DIY.
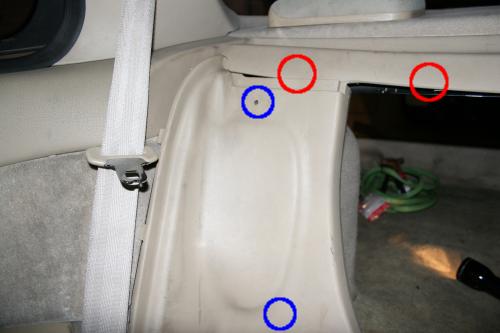
You'll also have to remove the front side trunk panel behind the upper cushion of the seat. To get that panel out, you first need to get part of the front upper trunk panel off because they overlap. The upper panel is attached with these metal clips with a plastic thing in the middle (circled in red). I'm not sure what the proper way to detach them is but I think it was easiest when I just squeezed on them from below (inside the trunk) and at the same time, pulled the panel from the top (going from outside to inside, of course). I only needed to pull up two of them and felt like that was enough. Then you just need to pull on the side panel (making sure the upper panel is out of the way) which is secured with these plastic pegs (circled in blue). I'm not sure how to detach them properly either so I just put a flathead under the head and pryed it a little then pulled the pegs out. You can probably just pull outwards on the panel with support around the pegs.
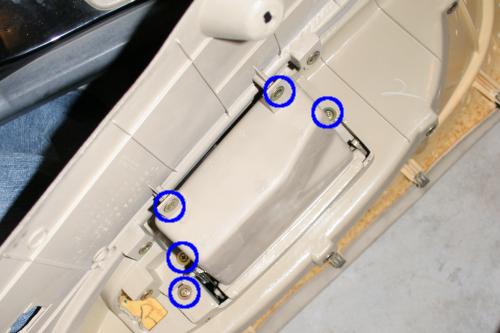
2. After you have the seat and trunk side panel out, you can take the real side panel out. First, pull off the screwhole covers on the handle and unscrew those two screws (circled in red). Then unscrew the three screws that were blocked by the seat and side panel (circled in green). For some reason, I was missing the screw on the bottom in the back but I saw the hole for it and the diagrams showed that there should be one so I'm sure everyone else has it. All five of these screws have Phillips heads. Finally, there are four metal clips that hold the side panel to the body (circled in blue). These are the same clips as the ones holding the trunk upper panel but I couldn't squeeze the clips from the other side so I just pulled outwards on the panel starting with the backmost clip. Nothing broke! After that, you just need to detach it at the bottom from the door sill plastic molding and you're done (sorry no picture of that).

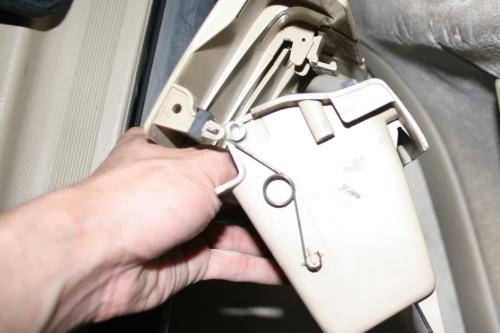
3. Looking at the back of the panel and from the bottom, the glove box is held in by five Phillips head screws (circled in blue. Just unscrew them all and the glove box will slide out of the top with no problems.
4. Here is a close up of first the broken side of the glove box and then the non-broken side:
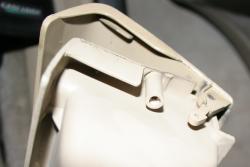
So the peg that is missing is supposed to go through the hole in the upper left of the lid and into the pit on the upper right of the body (sorry, didn't want to circle the picture so that you can see everything). I don't think the non-broken side picture came out detailed enough to see what the peg on that side looks like. It is just a hollow peg that looks copper but is probably just corroded. I'm not sure how it's being held in but it seems pretty sturdy (for now).
I looked around my apartment to see what I could use as a substitute peg but couldn't think of anything until I found a coulpe extra #2 screws (not sure what to officially call it). These screws are 1/2" long and pointy. I held it against the glove box to see if it was long enough to start drilling into the plastic but short enough to not pierce through to the other side.

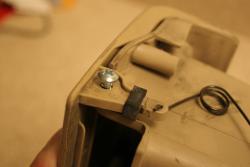
It sits in the hole and pit nicely. The screw's thickness is pretty good. However, it looked barely too long so I decided I'd stop screwing once I thought it would come out the other side (please, no jokes). To make sure it was secure, I thought I'd fill the pit with some Elmer's white glue first. How did I come up with this idea? I dunno, I just thought about those times that glue dries up into this hard piece and hoped that the same would happen, or at least it'd provide a little support by filling in any gaps and hardening a little.

Those are pictures of the screw screwed in. I didn't stop in time so you can see the plastic *about* to break on the inside (not sure if you can see it in the picture). It still felt smooth so I didn't care about it. On the outside, the screw head is sticking out a bit but I hoped that it wouldn't be a problem. I let the thing sit (with screw head pointing up) for about an hour to let the glue dry. Then I tested out my makeshift peg. It worked great! The screw felt pretty sturdy so I was happy and done (again, no jokes please).
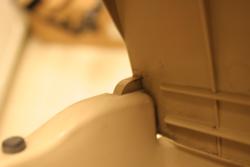
5. Pretty much just do the opposite of taking the pieces apart to put everything back together. A couple things to note: 1) I think you should screw the glove box back in while the panel is right side up. Or at least try to push it as close as possible together. My finished glove box (see picture below) is a little raised. I'm not sure how I missed it before putting everything back together again but if you care about it, make sure it looks good before putting everything back! 2) When putting back the side panel, make sure the rear window trim makes good contact with the top of the panel. Mine was curled a little because I didn't make sure it was flat so I just took a flathead screwdriver and "uncurled" it. 3) Finally, I just had to smash the side panel to get the clips back on the frame. I'm not sure if there was a better way but I just estimated where the clips where and smashed the panel with medium strength and heard it clip back on.
Anyway, here is the picture of my glove box now. Woo!
Thanks for reading my insanely long DIY.
PROBLEM:
I can barely remember when my passenger side rear glove box closed all the way. After fixing a couple other things on my car, I decided to tackle the glove box next but I couldn't find any DIY already posted. Referencing the service manual and the online parts catalog diagrams, I set to fix it once and for all.
Basically, it looks like I lost the peg that holds the lid of the glove box to the body at the pivot point. It looked like this:
This is how it is supposed to look like:
Whenever I had passengers in the back, they'd always think they could fix it. You could press it down and it might stay for a while due to friction or whatnot, but after a while, it'd just pop back up because it was missing the peg.
SOLUTION:
I am by no means an expert DIYer so I tend to make with what I have and try to make the best of it. Therefore, I highly advise that you do not do what I did to "fix" the glove box. I'm just hoping that these instructions will help you guys get to the point of accessing the glove box but from there, any solution will probably be better than mine.
Summary:
1. Remove back set
2. Remove side panel
3. Remove glove box
4. Fix glove box
5. Put everything back
Details:
1. Follow the instructions in this post to remove the entire back seat. You actually need to remove both cushions in order to access the screws needed to remove the side panel. I didn't take any pictures of this process because 1) I wasn't patient enough and 2) because zipcreature called dibs on the DIY.
You'll also have to remove the front side trunk panel behind the upper cushion of the seat. To get that panel out, you first need to get part of the front upper trunk panel off because they overlap. The upper panel is attached with these metal clips with a plastic thing in the middle (circled in red). I'm not sure what the proper way to detach them is but I think it was easiest when I just squeezed on them from below (inside the trunk) and at the same time, pulled the panel from the top (going from outside to inside, of course). I only needed to pull up two of them and felt like that was enough. Then you just need to pull on the side panel (making sure the upper panel is out of the way) which is secured with these plastic pegs (circled in blue). I'm not sure how to detach them properly either so I just put a flathead under the head and pryed it a little then pulled the pegs out. You can probably just pull outwards on the panel with support around the pegs.
2. After you have the seat and trunk side panel out, you can take the real side panel out. First, pull off the screwhole covers on the handle and unscrew those two screws (circled in red). Then unscrew the three screws that were blocked by the seat and side panel (circled in green). For some reason, I was missing the screw on the bottom in the back but I saw the hole for it and the diagrams showed that there should be one so I'm sure everyone else has it. All five of these screws have Phillips heads. Finally, there are four metal clips that hold the side panel to the body (circled in blue). These are the same clips as the ones holding the trunk upper panel but I couldn't squeeze the clips from the other side so I just pulled outwards on the panel starting with the backmost clip. Nothing broke! After that, you just need to detach it at the bottom from the door sill plastic molding and you're done (sorry no picture of that).
3. Looking at the back of the panel and from the bottom, the glove box is held in by five Phillips head screws (circled in blue. Just unscrew them all and the glove box will slide out of the top with no problems.
4. Here is a close up of first the broken side of the glove box and then the non-broken side:
So the peg that is missing is supposed to go through the hole in the upper left of the lid and into the pit on the upper right of the body (sorry, didn't want to circle the picture so that you can see everything). I don't think the non-broken side picture came out detailed enough to see what the peg on that side looks like. It is just a hollow peg that looks copper but is probably just corroded. I'm not sure how it's being held in but it seems pretty sturdy (for now).
I looked around my apartment to see what I could use as a substitute peg but couldn't think of anything until I found a coulpe extra #2 screws (not sure what to officially call it). These screws are 1/2" long and pointy. I held it against the glove box to see if it was long enough to start drilling into the plastic but short enough to not pierce through to the other side.
It sits in the hole and pit nicely. The screw's thickness is pretty good. However, it looked barely too long so I decided I'd stop screwing once I thought it would come out the other side (please, no jokes). To make sure it was secure, I thought I'd fill the pit with some Elmer's white glue first. How did I come up with this idea? I dunno, I just thought about those times that glue dries up into this hard piece and hoped that the same would happen, or at least it'd provide a little support by filling in any gaps and hardening a little.
Those are pictures of the screw screwed in. I didn't stop in time so you can see the plastic *about* to break on the inside (not sure if you can see it in the picture). It still felt smooth so I didn't care about it. On the outside, the screw head is sticking out a bit but I hoped that it wouldn't be a problem. I let the thing sit (with screw head pointing up) for about an hour to let the glue dry. Then I tested out my makeshift peg. It worked great! The screw felt pretty sturdy so I was happy and done (again, no jokes please).
5. Pretty much just do the opposite of taking the pieces apart to put everything back together. A couple things to note: 1) I think you should screw the glove box back in while the panel is right side up. Or at least try to push it as close as possible together. My finished glove box (see picture below) is a little raised. I'm not sure how I missed it before putting everything back together again but if you care about it, make sure it looks good before putting everything back! 2) When putting back the side panel, make sure the rear window trim makes good contact with the top of the panel. Mine was curled a little because I didn't make sure it was flat so I just took a flathead screwdriver and "uncurled" it. 3) Finally, I just had to smash the side panel to get the clips back on the frame. I'm not sure if there was a better way but I just estimated where the clips where and smashed the panel with medium strength and heard it clip back on.
Anyway, here is the picture of my glove box now. Woo!
Thanks for reading my insanely long DIY.


Comment