Announcement

Collapse
1 of 2 < >

ANY BUYING/SELLING IN THIS FORUM WILL RESULT IN AN INSTANT BAN!

Read the rules: http://www.cb7tuner.com/vbb/showthread.php?t=43956

Myself, and the other mods have been very nice and lenient with the rules. We have been deleting threads, and giving out warnings. Some members didn't get the clue and re-posted over and over... Now ANY member buying or selling in this section will be banned... No IF's AND's or BUT's.
2 of 2 < >

Beginner Forum Rules - EVERYBODY read! (old and new members alike!)

Beginners start here. Once you have 30 worthwhile posts (off topic doesn't count) you may post outside of the Beginner forums. Any "whoring" (posting simply to raise your post count) will return your count to 0, or result in a ban.

These are the rules. Read them. Live by them.

1) Absolutely NO flaming! "Flaming" is an outright attack on a member. ALL questions are encouraged to be asked here, no matter how basic. Members with over 30 posts will be subject to a ONE WEEK ban if caught flaming in this forum (and yes, moderators can read deleted posts). Members with under 30 posts will be subject to a ONE DAY ban.

2) Use appropriate language. Racial or sexual slurs will not be tolerated. A ban will be issued at the discretion of the cb7tuner.com staff.

3) No items may be sold in the Beginner forums. Any "for sale" threads will be deleted.

4) Temporarily banned members will be PERMANTLY banned if they are found posting on another account.

The rules can and will be added to. Any updates will be marked in the title.

The rules for the overall forum can be found here:
http://www.cb7tuner.com/vbb/forumdisplay.php?f=144
Read them. You will be expected to follow them.
See more
See less

1993 Honda. I'm having trouble installing the crankshaft sprocket back on with key.

Collapse
X
 
  • Filter
  • Time
  • Show
Clear All
new posts

    1993 Honda. I'm having trouble installing the crankshaft sprocket back on with key.

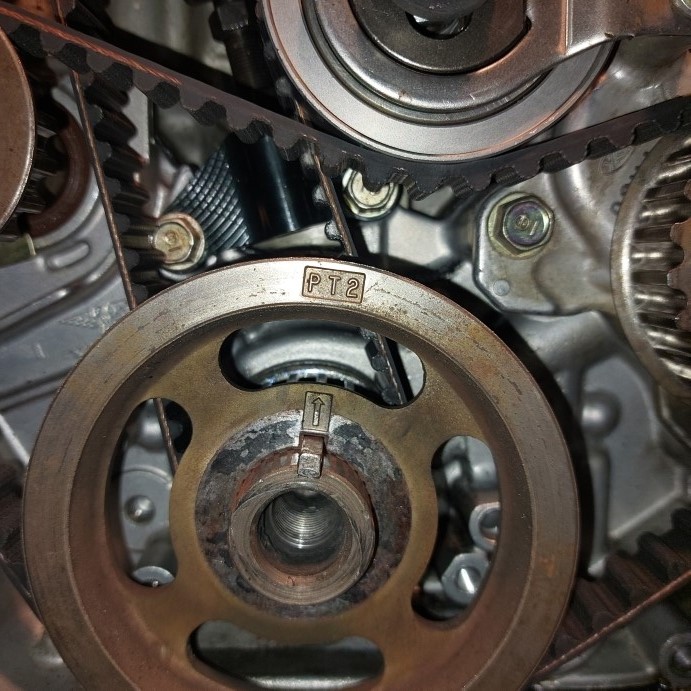
    1993 honda accord LX, having trouble installing the crankshaft sprocket back on with key

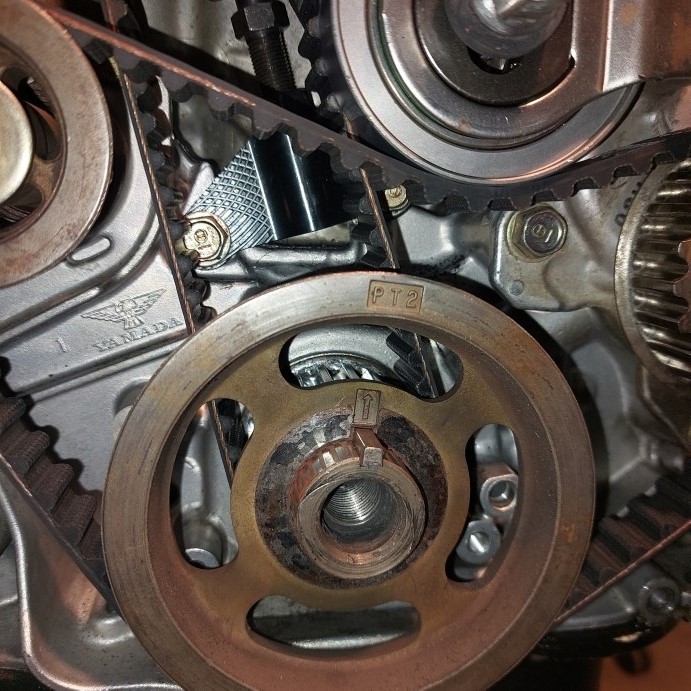
    I admit I had a problem taking it off. I had to use an extension over the key. And lightly tap on it with a hammer. And it slid right off easily (not the first time, because I didn't notice). I could take the key off really easily, and the sprocket slid off really easily.

    So imagine my confusion when I go to install it. I put the key on first. And then I put the sprocket back on, and it just doesn't slide easily. I thought it was the key. So I tried it without the key, and it had the same effect. I try to push up and down with my hands.

    So now I get some advice, just use a wooden hammer. I don't have one. About the third or fourth tool I don't have. So when I go to buy a tool, it doesn't work anyway.

    Anyway, I try to use a block of wood. Unfortunately, I only have long pieces of wood. That did help, I did get it on there somewhat. It's moving on there with the key. But the sprocket is now more flush with the shaft. So I can't smack it on there with full force because the shaft is in the way. I have to pick a side. But my confusion, does the key have to be perfectly flush with where it sits? Because even if I do manage to get it on there, I think the key is pushed in there just a tad. What's unreal about this job, I paid for a timing belt video. The 1997 Accord is completely different. It's kind of useless. Although it does have tips. Anyway, he just first puts the key on, and he just, with ease and with his hands, slides the sprocket on there like it's nothing. Maybe it's just my luck when it comes to cars, I just get stuck on the silly stuff?

    But anyway, how perfectly aligned does that key have to be? Is there any tips on this? Maybe I should go get a puller and pull the whole thing off. And maybe try to install without the key. And then put the key in there the way I want?


    #2
    if it's really that tight you might indeed need to go pull it back off. something probably isn't right. Unless they're quite rusty and gunky, they should install easily with little force (at most, a couple light taps and some wiggling). The key does need to be fully inserted in the crankshaft (and tapped down flat into it's groove with a hammer, just be gentle) before you put the pulley on, i've never had luck trying to drive them into the slot after the pulley was put on.

    the shaft and pulley must be exceptionally clean when you reinstall it. i usually even go all around both the shaft and the inside of the pulley with 360 grit sand paper until it is very shiny and use a dental pick inside all surfaces and corners of both keyways to make sure nothing is in the way. ANY amount of debris, and I really mean ANY, will make the key+sprocket almost impossible to install if it prevents the key from fully seating. clean then apply a light coat of engine oil on both surfaces with your finger.

    1-1/2" or 2" ABS drain pipe couplers from the local hardware store work well to tap on pulleys while getting past the crank snout. You won't break ABS very easily. PVC works too if they don't have ABS in 2", but wear glasses because it likes to shatter.
    Last edited by SaddleMtnMan; 01-03-2024, 12:47 AM.

    Comment


      #3
      Originally posted by SaddleMtnMan View Post
      if it's really that tight you might indeed need to go pull it back off. something probably isn't right. Unless they're quite rusty and gunky, they should install easily with little force (at most, a couple light taps and some wiggling). The key does need to be fully inserted in the crankshaft (and tapped down flat into it's groove with a hammer, just be gentle) before you put the pulley on, i've never had luck trying to drive them into the slot after the pulley was put on.

      the shaft and pulley must be exceptionally clean when you reinstall it. i usually even go all around both the shaft and the inside of the pulley with 360 grit sand paper until it is very shiny and use a dental pick inside all surfaces and corners of both keyways to make sure nothing is in the way. ANY amount of debris, and I really mean ANY, will make the key+sprocket almost impossible to install if it prevents the key from fully seating. clean then apply a light coat of engine oil on both surfaces with your finger.

      1-1/2" or 2" ABS drain pipe couplers from the local hardware store work well to tap on pulleys while getting past the crank snout. You won't break ABS very easily. PVC works too if they don't have ABS in 2", but wear glasses because it likes to shatter.
      Mine was not rusty at all. I remember it was stuck when I tried to take it out. Until I took a extension and put it over the key. And lightly tap on it with a hammer. Then I moved it back and it slid easily and the key came off easily. For some reason, I have heard when you do get the crankshaft bolt off and harmonic balancer and other pulley. Some times the key is suppose to sit there loosely and some times it will be stuck. I'm not sure.

      So what I did today, was buy some wooden blocks, and a heating gun. It did work but not easily. I did end up hammering it in flush. It's in there. The only problem, is that key is not perfectly flush where it should be. Does this matter? Here is a picture. I doubt it's coming out the way I originally took it off. There was a 10 degree difference when I took it off. Even so when I heated it with a heat gun. I thought it should go in more easily in.

      This is the screenshot, is this good enough?


      https://imgur.com/ZlHjump

      Click image for larger version  Name:	crankshaftsprocketKey.jpg Views:	0 Size:	24.4 KB ID:	4984629
      Last edited by Corrosion; 01-03-2024, 06:25 AM.

      Comment


        #4
        Is this alright or do I have to get the key all the way forward? Because it's probably not coming off so I can reposition it. I'm trying a heat gun. I heard people claim that when they finally get their crank bolt and crank pulley off that it could just sit there some times loosely. And some times it may not. But does it have to be perfectly flush forward. Because I don't see this thing coming off. I'm not sure why I'm being unlucky in this situation.

        Click image for larger version  Name:	TapitDown.jpg Views:	0 Size:	26.7 KB ID:	4984631

        https://i.imgur.com/OnVhQFW.jpg
        Last edited by Corrosion; 01-03-2024, 01:08 PM.

        Comment


          #5
          Ya, that pic looks fine. Mine, the key is flush with the end of the shaft. And I just took these sprockets off mine and they were really stuck. In my case (probably from hitting the end of the crank when taking the engine out) it was impossible to get them off the end. After reading, just took a rubber hammer and went back and forth, beating each side. They eventually came off. As for keys, some fit loose, some fit snug. The key fitment is key here. If it stands up 0.5mm you'll notice it when trying to get stuff back on.

          Comment


            #6
            Originally posted by Raf99 View Post
            Ya, that pic looks fine. Mine, the key is flush with the end of the shaft. And I just took these sprockets off mine and they were really stuck. In my case (probably from hitting the end of the crank when taking the engine out) it was impossible to get them off the end. After reading, just took a rubber hammer and went back and forth, beating each side. They eventually came off. As for keys, some fit loose, some fit snug. The key fitment is key here. If it stands up 0.5mm you'll notice it when trying to get stuff back on.
            Thanks. Yes, I had another person tell me it's fine. But I think I made a stupid mistake. Someone said in my first picture: That it wasn't flush all the way down, which means I can't get the next pulley that goes on it. So what I did was take a piece of wood. And I hit it with a hammer from the top. And this didn't work to get it completely flush all the way down. So my stupid mistake was to take a file and file the top of the key. I don't think I should have done that, or I didn't really need to do that. Because I can get the pulley on with a hammer. I just didn't want to put it back on. Until I did the water pump and the two remaining balance shaft gaskets, and belts.

            I do know it will still be snug to the left and to the right of the key when the pulley goes on. I don't know if it will be completely snug on the top now. Or it will be completely snug going forward. Even though I think it will still be alright. I just went ahead and ordered another key. I really think it's possible to get the key out if I can get a thin enough flat screwdriver. Although, the one I had was too wide. I might have to modify one. And, as you said, you used a rubber hammer. I have one now. I really think I can get the key out and reposition it anyway. But I might need more heat than a heat gun. The idea came when I saw a video on youtube. Where a guy took a angle pliers and lifted it upwards. That didn't work for me. But I'm sure the flat head will work. One thing I need to be careful of is that I don't break the tip of the flat head. But if I can get a thin enough pry bar behind the sprocket, or even just hit it with a hammer, or even get the key out, I think I can pull the key out. I may even want to use some oil, as someone suggested.

            Otherwise, do you think it's necessary? I really think that the key will maintain its purpose.

            Someone told me this: "Tolerance: While the key doesn't need to be absolutely centered in the slot, it needs to be close enough to prevent slippage between the sprocket and the crankshaft. Slight misalignment is usually compensated for by the key, but significant offset could cause timing issues and engine damage."

            And someone else said this:

            ""I'm notsure the key way being damaged would be enough to throw it out of timing, if the damage is that bad it will be because of the crank timing gear, that should probably be replaces regardless of the crank key way damage. I can see the use of jbweld with minimal scarring of the crank seeing is that its a heat treated and pressure quenched part..the design of the gear is that so if the woodruff key is compromise the next part in line doesn't cause catastrophic failure of the crank. The gear is a lot softer than the crank for that reason."

            Of course, I won't use JBweld or anything silly like that. Of course, he is talking about the keyway slot. I'm talking more about the key in general. I heard the key is a fail-safe so it doesn't slip out of time. But the crank bolt that is torqued is what keeps the key in place. And the key is the safety feature.

            Comment


              #7
              Right. We know the key isn't taking the weight of the drive line and powering the sprocket/belt. I would say it aids in it, but also allows timing to be set. (Set's things up). I think in modern models the key is part of the crank?
              The moon / angle part should fit all the way into the "hole" and enough sticking out to fill the square top part. Everything should just fit. Here is mine from last week before removing it all.


              Last edited by Raf99; 01-04-2024, 01:35 PM.

              Comment


                #8
                I quickly skimmed through the post so I apologize if I missed it. But the key does have to go in a certain way. It is more narrow on one end versus the other. The more narrow end goes in first, kind of like a wedge. Did you confirm you put the key on the right way? If not that could be causing it to jam. I have never had an issue with getting the sprocket on the crank and key to were I needed a hammer. Now getting it off is a different story.
                ~Nick~
                FSAE (F Series Accord Enthusiasts) ..."A dying breed thats taking it to the next level" Lucky #13
                MR Thread:http://www.cb7tuner.com/vbb/showthre...ight=Grumpys93

                Comment


                  #9
                  Originally posted by Grumpys93 View Post
                  I quickly skimmed through the post so I apologize if I missed it. But the key does have to go in a certain way. It is more narrow on one end versus the other. The more narrow end goes in first, kind of like a wedge. Did you confirm you put the key on the right way? If not that could be causing it to jam. I have never had an issue with getting the sprocket on the crank and key to were I needed a hammer. Now getting it off is a different story.
                  Okay, I need some help here or any tips. Well, I don't really know why it had a hard time going in. Someone claimed that the reason was because it was cold. But it was only a 10-degree difference in temperature change. And even if so, someone also tried to claim that when I was installing it. It was hard to go in because the key got jammed. But before that, I tried it without the key, and it was still very hard to install. Even if the temperature change is true,. My heat gun got it very hot to the touch. Not to the point where you burn your finger in 1 second. I did put the key in the right way that it came out. The grove goes to the bottom. And the flat part goes on top. Even with the heat, it still had a hard time going in. I had to pound on it with a piece of wood.

                  Anyway, my idea is that I get to use my heat gun again. And I have to try to pop the key out. So I will modify a flat head to fit in there and try prying it up. I have to modify a flat head because the width of the key entry is only 3.5 mm wide. I don't think they sell a flat head with that small of a size. I'm not sure how thin the flat head has to be, although. Furthermore, I guess I will find out. If I can just pop the key out, I have a new one ready to install. Also, I believe, according to my research, the crankshaft puller is the one you rent out at an auto parts store. The hooks are not thin enough to attach to the back of the crank pulley to get it out that way.

                  Here is where I need some help. So far, I got this done. I got the camshaft, crankshaft, and front balance(left) seals done. And now I finally got the water pump done.

                  My next thing I have to do is the rear balance shaft (right) O-ring seal. First, I ordered a Honda Genuine Seal Set. It did include it. Although some seals were not in its original seal packaged. I have some questions on this rear balance shaft based on some research.

                  Apparently, there are 3 bolts that I have to take off. I do have mine locked in place with a bolt thing. It's locked at the 4 o'clock position. Now, when I did the timing, I took off the timing belt and balancer belt. I had aligned it using the crankshaft pulley arrow (not the sprocket circle notch because I can't see it -it's blocking my view). I noticed the camshaft markings really don't have anything to align to, honestly. Furthermore, I did find it very hard to see circle notches. Of course, I have seen several videos showing how it is aligned just slightly on the left (arrow/circle/notch mark). It's aligned slightly above the head. And I noticed the front balance shaft(left) had its own notch, and that was aligned perfectly. So the crankshaft was aligned, and even the front balance shaft was aligned. I put the bolt in the rear balance hole to lock that in place. So when that happened,. I made my own timing marks. Some of them have been erased over time. But not the camshaft markings, which I have aligned with a tooth and made a white marker where it aligns with the up position. Which, of course, contributed to my confusion at the time. The UP mark didn't align perfectly up. It aligns slightly to the right. I have seen this in a couple of videos. I thought the UP mark was supposed to be perfectly aligned vertically UP.

                  Anyway, I'm not worried about the front balance shaft align marks (because they have an obvious marking -one on top, It's impossible to see where the left line aligns to). I'm not worried about the crankshaft align marks because with the accessory pulley off and just the crank sprocket on there,. There is a circle on a tooth that perfectly aligns with the up arrow.

                  But my main concern is that the rear balance shaft align marks are just not obvious. Although I did make my own marking (which now I think has disappeared),. Even if it's locked into place, There is still a little play there.

                  Which is why I'm concerned about the rear balance shaft o-ring. People were saying that, once you get it off, you need to pay attention to it because it can go back in any way, there is no key or notch. That's probably why they tell you to lock it in place with that access hole.

                  I have been told that when someone did this, they got vibrations because they didn't lock it in place before they took it off. Another person claimed the engine had run rough if that's not aligned correctly. Everybody has said it was good. But you have to pay attention to where the alignment marks are when you put it back on. It seems that if you have it locked into place, you will be all good.

                  But the last person chimed in and said this

                  "Just some more advice, even if you lock the rear shaft with the correct bolt, the v at the top will actually line up kinda weird with the marks(not shown in the previous post illustration)...when locked, there is a notch both to the right and left...however you will find when you put the belt on the front shaft and the crank shaft, it will either go slightly off the right mark or if you move the rear shaft one tooth counterclockwise it will line up better with the left notch. You want the left notch. Just try both spots and you will see the left notch is still within both notches, while if you put the tooth one clockwise over it will come off both notches.

                  I actually did it the wrong way before and the vibration was atrocious, however I actually drove it like that for a couple days til I could get the time to move it back one tooth counterclockwise where it would line up better and properly. It is possible to drive with the balance shaft out of time as it will not affect the timing belt but it will have a bad vibration and you would be better off not even having a balance shaft belt than having one with the timing off."

                  I'm really confused. What is he talking about? So when I actually go to put the balancer belt on, what notches should I have at the rear balance shaft? I never really saw any markings line up with the V shape with a pointer. I did see the little V-notch slot. But there never was really a notch to line it up with. Maybe it's something so small that I need a magnifying glass. If that's not confusing enough, I have no idea what notches on the rear balancer shaft have left and right ones. Now this is more confusing, as this person points out. I mean, when I'm putting the belt on, I guarantee that the front balance shaft(left) is going to move a little. I guess when I'm putting on the belt and if it moves. I have to continually move it to its proper position. But then, when I start attaching it to the crankshaft sprocket and the rear balance shaft. How do I know that thing is not moving? I guess at that point, it's still not tight. And maybe I can use my hand to take tension off the belt and keep realigning it?

                  It's almost like he is saying that when you get the balance shaft belt on the rear balance shaft and move the rear balance shaft counter clock wise by one notch, the front balance shaft's left marker (which I never really seen line up with anything) will line up perfectly? He isn't suggesting that moving the rear balance shaft with the belt on (bolt still in place for the lock), that belt can move the front balance shaft into the correct position it needs to be? Or is he saying that you move the rear balance shaft counterclock wise, and it has its own mark or notch that it lines on the left. I'm confused...

                  And I also wonder if I should replace this O-ring seal on the rear balance shaft. All these gaskets and o-rings are eating up too much time, and I have a problem with a key. I don't got much time left due to the upcoming weather. I'm not sure what to do? I think that's why the mechanic may have had trouble with a quote (so that's why I took the job). I feel annoyed; this job is taking way too much time, and I got bad weather coming up. What do I do? I mean, I think it would take a miracle to get anything done. Also, I still have the tensioner to replace as well. I might have to start working at night. I won't be able to see well.


                  Update
                  Well, the rear balance shaft gasket replacement went well. I think I now know what that guy means. When I took it out, I can finally see where the V matches up with the notch. Virtually impossible to see it once it's installed. But it's still possible when you know what it looks like. When it's locked into place it has a little play, you can turn it to the right, it might mean it's more near 5 o-clock. You turn it to the left it's more near 4 o-clock. He says that in the 5 o-clock position, it does not quite line up with that V-notch and that it's more important to line it with that notch. But mine was more near the 5 o-clock position when I took off the timing belt. I think I rather line it with that marker. I don't know if the difference of play is literally a tooth off.

                  Also, the rear balance gear little housing to uncover the gasket. I needed to hit it with a long piece of wood on the bottom to free it. I finally free'd it. The gasket was very brittle. But I don't think it was leaking regardless.

                  I took a small mini flat head screw driver. I can get it under the key for the crankshaft. I don't want to use it technically to lift it up. I feel it could break. But maybe once I modify a flat head and give it some heat. I can prop the key and it might pop out. I better still hurry. I don't think the tensioner replacement is going to take long. Finally I'm tired of doing gaskets.
                  Last edited by Corrosion; 01-10-2024, 07:23 PM.

                  Comment


                    #10
                    Sorry I have to do a reply, for some it's not registering any of my edits.


                    Well, the rear balance shaft gasket replacement went well. I think I now know what that guy means. When I took it out, I can finally see where the V matches up with the notch. Virtually impossible to see it once it's installed. But it's still possible when you know what it looks like. When it's locked into place it has a little play, you can turn it to the right, it might mean it's more near 5 o-clock. You turn it to the left it's more near 4 o-clock. He says that in the 5 o-clock position, it does not quite line up with that V-notch and that it's more important to line it with that notch. But mine was more near the 5 o-clock position when I took off the timing belt. I think I rather line it with that marker. I don't know if the difference of play is literally a tooth off.

                    Also, the rear balance gear little housing to uncover the gasket. I needed to hit it with a long piece of wood on the bottom to free it. I finally free'd it. The gasket was very brittle. But I don't think it was leaking regardless.

                    I took a small mini flat head screw driver. I can get it under the key for the crankshaft. I don't want to use it technically to lift it up. I feel it could break. But maybe once I modify a flat head and give it some heat. I can prop the key and it might pop out. I better still hurry. I don't think the tensioner replacement is going to take long. Finally I'm tired of doing gaskets.

                    Comment


                      #11
                      Originally posted by SaddleMtnMan View Post
                      if it's really that tight you might indeed need to go pull it back off. something probably isn't right. Unless they're quite rusty and gunky, they should install easily with little force (at most, a couple light taps and some wiggling). The key does need to be fully inserted in the crankshaft (and tapped down flat into it's groove with a hammer, just be gentle) before you put the pulley on, i've never had luck trying to drive them into the slot after the pulley was put on.
                      Alright, I managed to get the sprocket and key out. I had to use some penetrating oil under the sprocket. I had to use a 24 inch pry bar from the top. I also had to use a heat gun. I could not get the key out itself without taking the sprocket out. I could lift the key and loosen the key. But it would not pull out with my pliers.

                      So if I understand this correctly? I can't just install the sprocket first than tap the key in? I want to make sure it stays in the position it's suppose to stay in.

                      Comment


                        #12
                        There is an update on this. I figured what went wrong.

                        Edit:
                        I have now have it in the correct position. The key was not supposed to be pushed forward into the crank sprocket (It got stuck). In fact, it's supposed to be hanging out a tad from the shaft. It is meant to be taken in and out, even with the sprocket installed. You can slide it out. If you watch some other videos, that is the case.

                        Using penetrating oil and a heat gun. I could easily push the sprocket back and forth, thus preventing it from not even having a chance of it getting stuck. I could have prevented this mistake by not excessively hitting it with a hammer and making it get stuck.

                        Comment


                          #13
                          Glad you figured it out.

                          Comment

                          Working...
                          X