Announcement

Collapse
No announcement yet.

coilover install question

Collapse
X
 
  • Filter
  • Time
  • Show
Clear All
new posts

    #16
    Originally posted by 1990Ex
    k2motors.com i was on myspace my bad
    lol. its cool. looks loike your got some coilovers from a no name brand. but you SHOULD be ok. no garuntees. im not the people who made it. but after you save up some more money get some real lowering springs or a full coilover set up. suspension is one of the things your should NEVER cheap out on.

    try to go with name brands like Tenzo, Skunk2, Tien, Dropzone, Eibach and others. you stick with the name brands you wont have to worry about if its going to mess up your suspension. most of the people on ebay(if not all) dont do any R&D(research and development) on their products. they just mass produce it just to get some money knowing they're are people out there who will buy it. then when you have problems they disappear.

    for about $200 you can get yourself a set of GOOD new lowering springs. will give you a nice drop all around. if you want to go low try Skunk2 or Tenzo. both give you at LEAST a 2" drop, if not a 2.5".

    if you want to try it out tho, put those coilovers on. you'll get a fell as to what a dropped car feels like. handling and all. plus youll have the know-how to take your suspsension apart once you find a set up you really like.

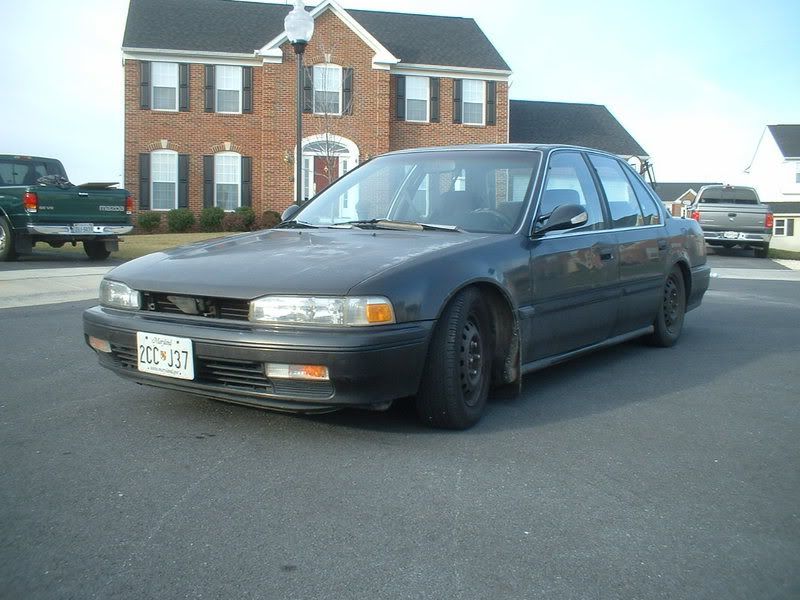
    i only tell you this stuff by my experiance. ot by my opinion. if oyu look at my members ride thread youll see some pics of what my car looked like with ebay coilovers on before i switched to dropzone. matter of fact ill post some pics of it.

    Comment


      #17
      this is what my car looked like when i had the egay coilovers on. lol. dag this thing was slammed. i didnt even have enough room to fit a finger in the fenderwell. and yes. it was bouncy. lol

      Comment


        #18
        holy shit thats slammed lol, well i just bought them to do everything you said get a feel for my first dropped car. i dont see them on the car next year
        UNDERGROUND SOCIETY
        NEW COUPE MEMBERS RIDE THREAD COMMING SOON

        Comment


          #19
          was that a 3 inch drop ? if so i dont think ima go that low
          UNDERGROUND SOCIETY
          NEW COUPE MEMBERS RIDE THREAD COMMING SOON

          Comment


            #20
            Originally posted by 1990Ex
            was that a 3 inch drop ? if so i dont think ima go that low

            lol. yeah. i think it was a 3" drop. i said it was 2.5" and 2.2Azul said it looked a little bit lower than 2.5". lol. turned out to be a 3" drop. i think it might have been a little bit lower too.

            but if you drop your car about 2.2"-2.5" then itll look great. especially with that Mugen style lip you have. but after you drop it be sure to go get an alignment. shops like Sears tire center and places like that wont do an alignment on a lowered car. or at least not one that was dropped as much as mine. lol.

            but go get an alignment tho. your stock camber kit should for now. when i had my car slammed, the shop i worked at was still able to do the alignment with my stock one. and got it done correctly too. but i need to go for another one now b/c ive swapped out my suspension since then and it sits a little bit higher now.

            Comment


              #21
              2.5 is what im going to drop it too, just to see how it looks cause i want to do more damage than good if i slamm it to the ground an then have tons of shit to fix
              UNDERGROUND SOCIETY
              NEW COUPE MEMBERS RIDE THREAD COMMING SOON

              Comment


                #22
                Originally posted by 1990Ex
                2.5 is what im going to drop it too, just to see how it looks cause i want to do more damage than good if i slamm it to the ground an then have tons of shit to fix

                from what it looks like in your sig a 2.5" drop will be just fine. or at least it should be. if you want to get into your driveway tho youll have to go in at an angle. lol. just like me. i have TWO lips on my car. a '91 EX lip and a CD5 lip on the bottom of the EX lip. and theres a dip right at the begining of my driveway. lol.

                but youll like the drop tho. to me if its not 2" or lower, its not low enough. 1.5" isnt noticeable enough to me. if you would like a 2"-2.5" drop go with Skunk2, Neuspeed(i think its sport. i cant remember. ill look tho.), H&R, or like me Dropzone.

                i have the Dropzone and they have a smooth ride and a nice drop. check out my MR to see the drop.

                Comment


                  #23
                  hey thx for all you help man, you really helped me alot
                  UNDERGROUND SOCIETY
                  NEW COUPE MEMBERS RIDE THREAD COMMING SOON

                  Comment


                    #24
                    I hope u have a camber kit if not start saving for front tires.

                    Comment


                      #25
                      Originally posted by pretty_ricky302
                      I hope u have a camber kit if not start saving for front tires.

                      yo i got all that covered lol i just didnt kno how to install them
                      UNDERGROUND SOCIETY
                      NEW COUPE MEMBERS RIDE THREAD COMMING SOON

                      Comment


                        #26
                        Strut Removal/Reinstallation

                        Tools needed:
                        • 10mm wrench
                        • 17mm wrench
                        • Adjustable wrench
                        • 10mm socket
                        • 12mm socket
                        • 14mm socket (2)
                        • 17mm socket (2)
                        • Needle nose pliars
                        • Hammer
                        • Pickle Fork
                        • Spring compressors
                        • 1/2in drive rachet with extention


                        This is the down and dirty version....

                        FRONT STRUTS:
                        • Remove cover from balljoints.
                        • Remove cotter key
                        • Remove balljoint nut
                        • Hit spindle with hammer where balljoint mounts. If that doesn't seperate the two, that's where the pickle fork comes in.
                        • Disconnect sway bar end link
                        • Remove lower strut mount bolt
                        • Open your hood.
                        • Remove upper strut bolts (3 ea).
                        • Remove Strut.


                        That's the same on both sides.

                        Upper A-Arm removal/Camber Kit installation (Front)

                        Pass Side:
                        • Remove three bolts holding in main fuse box.
                        • Remove anchor bolt nuts (2 ea)
                        • Remove A-Arm
                        • Remove anchor bolts (14mm sockets)
                        • Install camber kit
                        • Reverse for reinstallation


                        Drivers Side:
                        • Remove bolt holding lines in place over fwd mount bolt
                        • Remove anchor bolt nuts (2 ea)
                        • Remove A-Arm
                        • Remove anchor bolts (14mm sockets)
                        • Install camber kit
                        • Reverse for reinstallation


                        REAR STRUTS:

                        Interior:
                        • Remove back seat
                        • Remove side bolsters
                        • Remove Seat back braces
                        • Remove trim panels


                        Under car:
                        • Disconnect sway bar if installed
                        • Disconnect upper control arm
                        • Remove lower spindle bolt from trailing arms. (big 17mm bolt that runs thru the bottom of the spindle)
                        • Remove lower strut bolt
                        • Remove upper strut bolts (2 ea)


                        UPPER C-Arms:
                        • Remove two 14 mm bolts
                        • Remove arm


                        That's just about everything you'll need to know and some things you don't. I've done 4 cars now and just got done doing mine again this afternoon. Make sure you have jackstands under the car and have an extra jack to jack up the spindles if need be.

                        - Rob -
                        92 Auto Sedan - "Rustoration"
                        85 Toyota 4Runner
                        1977 Kawasaki KZ1000/ZX6/10R Hybrid
                        2008 HD 1200N
                        2009 HD 883N

                        Comment


                          #27
                          all that isnt needed. nothing needs to be removed but the things in the way of getting to the suspension fork at the bottom of the front struts. if you turn the wheel(or take it off and turn the steering wheel so you have more room), youll see all the parts you need to remove. putting them all on shouldnt take you no more than a couple of hours.(about 3 if your learning as you go.)

                          get a haynes manual and itll tell you all that you need to remove, but as you go along youll see the stuff that DOESNT need to be removed. those things will just it harder for you to get the job done and more stuff to put back together. trust me when i tell you. ive taken my suspension apart, both front and back, dozens of times, just for the heck of it, and all the things the haynes manual says to take off aint needed to be messed with.

                          PM me if you have any questions man. ill take some pics of the things you need to take off and ill tell you the socket sizes you need. also before you start get a bottle of PB Blaster or Liquid Wrench. either will help you take off any rusted nuts or bolts

                          Comment


                            #28
                            Originally posted by Shadow1
                            all that isnt needed. nothing needs to be removed but the things in the way of getting to the suspension fork at the bottom of the front struts. if you turn the wheel(or take it off and turn the steering wheel so you have more room), youll see all the parts you need to remove. putting them all on shouldnt take you no more than a couple of hours.(about 3 if your learning as you go.)

                            get a haynes manual and itll tell you all that you need to remove, but as you go along youll see the stuff that DOESNT need to be removed. those things will just it harder for you to get the job done and more stuff to put back together. trust me when i tell you. ive taken my suspension apart, both front and back, dozens of times, just for the heck of it, and all the things the haynes manual says to take off aint needed to be messed with.

                            PM me if you have any questions man. ill take some pics of the things you need to take off and ill tell you the socket sizes you need. also before you start get a bottle of PB Blaster or Liquid Wrench. either will help you take off any rusted nuts or bolts
                            Mkay, you're right, I'm wrong, I'll just stick to posting pictures of shit from now on. I don't even know why I bother with you people anymore.

                            - Rob -
                            92 Auto Sedan - "Rustoration"
                            85 Toyota 4Runner
                            1977 Kawasaki KZ1000/ZX6/10R Hybrid
                            2008 HD 1200N
                            2009 HD 883N

                            Comment


                              #29
                              Originally posted by 203Cree
                              Mkay, you're right, I'm wrong, I'll just stick to posting pictures of shit from now on. I don't even know why I bother with you people anymore.
                              LMAO. your right man. lol. i saw "ball joints" and i thought "you dont remove any ball joints to get the strut out." its cool man. i kinda skimmed thru your post and i didnt see where you had seperated the strut removal and the camber kit removal and install. my bad man. you way is by the book. mine is just the quick way. and sometime the quick way isnt the best. its better to do it by the book 1st. THEN you know the short cuts you can take.

                              Comment


                                #30
                                thx to both yall, pics an kinda step by step would help so much
                                UNDERGROUND SOCIETY
                                NEW COUPE MEMBERS RIDE THREAD COMMING SOON

                                Comment

                                Working...
                                X