If this is your first visit, be sure to
check out the FAQ by clicking the
link above. You may have to register
before you can post: click the register link above to proceed. To start viewing messages,
select the forum that you want to visit from the selection below.
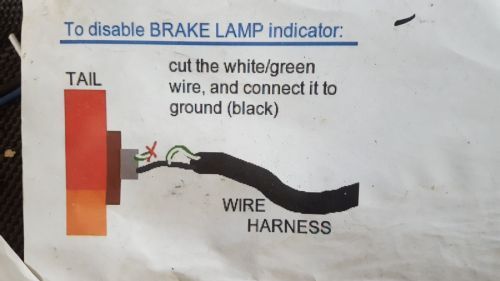
I have after market tail lights and so I have the brake lamp light on in the dash when driving. There is this hack below, does anyone know if this works and if you have to do it to both sides for the light to go out?
this "hack" is done at the brown box on the Driver side tail light. Nothing needs to be touched on the passenger side, because that is just a "slave" box feeding back to the brown box on the driver side.
What it is basically doing is bypassing the entire blown-bulb detection circuit within the brown box, and force-telling the dashboard that "yep, the bulbs are good" so the warning light turns off.
reminder (as you probably know) but this does NOT actually get the circuit to work again, like some people hope - all it does is permanently disables the warning light. if you want to actually adjust the resistances / detection limits within the box, that's a whole different story.
also: this can be done by just de-pinning one side of the harness connector, rather than actually cutting the wire itself - then using a bit of jumper wire to bridge it to the black pin. This way the change can be reversed. This hack is only utilizing ground wires, so you can leave the pin/bare wire exposed without risking electric shock or shorting anything out (personally, i used a small alligator clip)
this "hack" is done at the brown box on the Driver side tail light. Nothing needs to be touched on the passenger side, because that is just a "slave" box feeding back to the brown box on the driver side.
What it is basically doing is bypassing the entire blown-bulb detection circuit within the brown box, and force-telling the dashboard that "yep, the bulbs are good" so the warning light turns off.
reminder (as you probably know) but this does NOT actually get the circuit to work again, like some people hope - all it does is permanently disables the warning light. if you want to actually adjust the resistances / detection limits within the box, that's a whole different story.
also: this can be done by just de-pinning one side of the harness connector, rather than actually cutting the wire itself - then using a bit of jumper wire to bridge it to the black pin. This way the change can be reversed. This hack is only utilizing ground wires, so you can leave the pin/bare wire exposed without risking electric shock or shorting anything out (personally, i used a small alligator clip)
haha, ya i save a lot of cb7tuner DIY pics. So thanks eh! I did try grounding out that wire but I'll try again. I'll re-post back here and let you know the results.
haha, ya i save a lot of cb7tuner DIY pics. So thanks eh! I did try grounding out that wire but I'll try again. I'll re-post back here and let you know the results.
I want to make sure I am conveying correct information here, so I am going to try out the same thing. Just need to charge the car first, it's been sitting too long and the battery died...
I want to make sure I am conveying correct information here, so I am going to try out the same thing. Just need to charge the car first, it's been sitting too long and the battery died...
I wish i understood the manual better. Looking at the wiring diagram I understand the grn/wht wire goes to the instrument cluster. What I don't understand is why it would activate that light (what triggers it), and why the lights I have installed now trigger the light when it has all the same wires as the OEM plug.
I wish i understood the manual better. Looking at the wiring diagram I understand the grn/wht wire goes to the instrument cluster. What I don't understand is why it would activate that light (what triggers it), and why the lights I have installed now trigger the light when it has all the same wires as the OEM plug.
if you have a picture of the diagram handy, i would be happy to explain the circuitry behind it.



Comment