Announcement

Collapse
1 of 2 < >

ANY BUYING/SELLING IN THIS FORUM WILL RESULT IN AN INSTANT BAN!

Read the rules: http://www.cb7tuner.com/vbb/showthread.php?t=43956

Myself, and the other mods have been very nice and lenient with the rules. We have been deleting threads, and giving out warnings. Some members didn't get the clue and re-posted over and over... Now ANY member buying or selling in this section will be banned... No IF's AND's or BUT's.
2 of 2 < >

Beginner Forum Rules - EVERYBODY read! (old and new members alike!)

Beginners start here. Once you have 30 worthwhile posts (off topic doesn't count) you may post outside of the Beginner forums. Any "whoring" (posting simply to raise your post count) will return your count to 0, or result in a ban.

These are the rules. Read them. Live by them.

1) Absolutely NO flaming! "Flaming" is an outright attack on a member. ALL questions are encouraged to be asked here, no matter how basic. Members with over 30 posts will be subject to a ONE WEEK ban if caught flaming in this forum (and yes, moderators can read deleted posts). Members with under 30 posts will be subject to a ONE DAY ban.

2) Use appropriate language. Racial or sexual slurs will not be tolerated. A ban will be issued at the discretion of the cb7tuner.com staff.

3) No items may be sold in the Beginner forums. Any "for sale" threads will be deleted.

4) Temporarily banned members will be PERMANTLY banned if they are found posting on another account.

The rules can and will be added to. Any updates will be marked in the title.

The rules for the overall forum can be found here:
http://www.cb7tuner.com/vbb/forumdisplay.php?f=144
Read them. You will be expected to follow them.
See more
See less

CB7 Timing Belt Procdure

Collapse
X
 
  • Filter
  • Time
  • Show
Clear All
new posts

    CB7 Timing Belt Procdure

    MANUFACTURER'S SUGGESTED SCHEDULED MAINTENANCE

    For 1990-94 vehicles, the manufacturer recommends camshaft and balance shaft belts be replaced at 90,000 miles. For 1995-96 vehicles, the manufacturer recommends the belt be replaced at 90,000 miles for normal service or 60,000 miles for severe service.

    For 1997 vehicles, normal replacement interval is at 105,000 miles or 84 months. Replace at 60,000 miles if car is regularly driven in extreme temperatures (over 110 degrees F, or under -20 degrees F).

    CAUTION: This application is an interference engine. Do not rotate camshaft or crankshaft when timing belt is removed, or engine damage may occur. Inspect timing belt & balance shaft belt tensioner pullies for free-rotation, no seizure/rough-rotation. Otherwise, replace units.

    REMOVAL & INSTALLATION - TIMING & BALANCE SHAFT BELTS

    Removal

    1. Disconnect negative battery cable. Position crankshaft with cylinder No. 1 at TDC of compression stroke. See Fig. 1 , Fig. 2 or Fig. 3. Disconnect battery negative cable. Remove splash shield. Remove cruise control actuator, leaving cable connected. Remove power steering pump, leaving hoses connected.
    2. Disconnect alternator wiring. Remove wiring harness from valve cover. Remove alternator and A/C belts (if equipped). Remove valve cover and upper timing belt cover. Remove side engine mount. Remove engine oil dipstick and tube. Remove crankshaft pulley. See Fig. 4 .
    3. Support engine. Remove 2 rear bolts from engine center support beam. Lower engine enough to permit removal of lower timing belt cover. Remove rubber seal from belt tension adjuster nut. Remove lower timing belt cover.
    4. CAUTION: DO NOT rotate crankshaft or camshaft when removing timing belts.
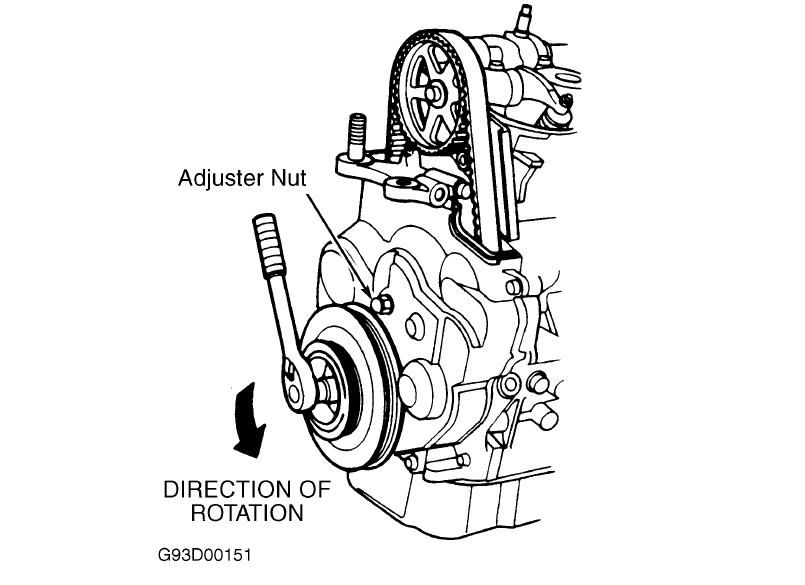
    Lock timing belt adjuster arm into position by installing one lower cover retaining bolt. Loosen belt tension adjuster bolt. See Fig. 5 . Push belt tensioner to release tension from belt. Tighten adjuster bolt. Remove balance shaft and camshaft timing belts.

    Fig. 1: Positioning Camshaft Sprocket for Valve Adjustment (2.2L SOHC - Accord)
    Courtesy of AMERICAN HONDA MOTOR CO., INC.


    Fig. 2: Positioning Camshaft Sprocket for Valve Adjustment (2.2L SOHC - Prelude)
    Courtesy of AMERICAN HONDA MOTOR CO., INC.


    Fig. 3: Positioning Camshaft Sprockets for Valve Adjustment (Prelude 2.3L DOHC)
    Courtesy of AMERICAN HONDA MOTOR CO., INC.


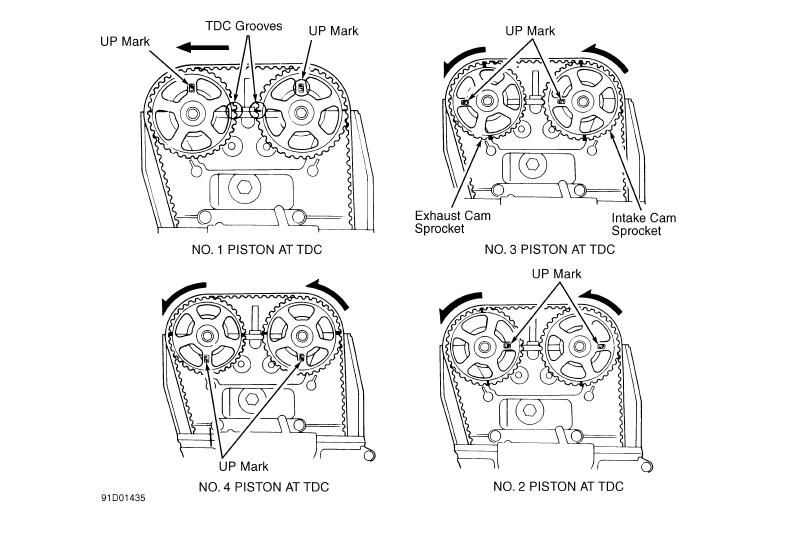
    Fig. 4: Removing & Installing Crankshaft Pulley (Typical)
    Courtesy of AMERICAN HONDA MOTOR CO., INC.


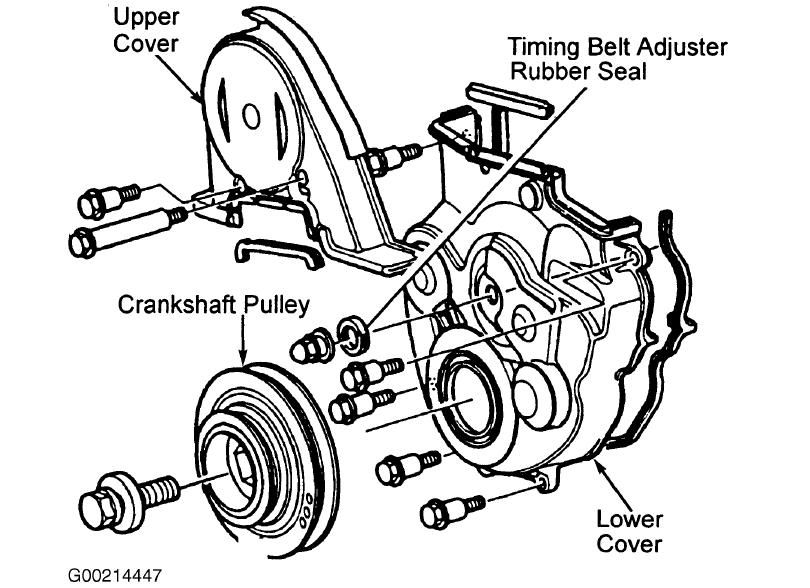
    Fig. 5: Locating Timing Belt Adjuster Nut (Typical)
    Courtesy of AMERICAN HONDA MOTOR CO., INC.
    Inspection


    With belt or belt covers removed, inspect belts for wear, cracks, or oil soaking. Inspect belt teeth for wear. Replace belt if worn, oil soaked, or cracked.
    Installation

    1. Align White mark on flywheel or drive plate (flexplate) with pointer on block. Ensure camshaft(s) is at TDC for No. 1 cylinder. See Fig. 1 , Fig. 2 or Fig. 3 . Install camshaft timing belt. See Fig. 6. Align rear timing balance shaft belt pulley by inserting a 6 x 100 mm bolt 2.9" (74 mm) into alignment access hole. Align groove on front balance shaft pulley with pointer on oil pump body. See Fig. 7 .
    2. Adjust timing belt tension by rotating crankshaft counterclockwise until No. 1 piston is at TDC of compression stroke. Loosen, but do not remove, timing belt adjustment bolt. Rotate crankshaft counterclockwise 3 teeth on camshaft pulley to create tension on timing belt. Tighten adjustment bolt to specification. See TORQUE SPECIFICATIONS .
    3. Reverse removal procedure to complete installation. Tighten crankshaft pulley bolt to specification. See TORQUE SPECIFICATIONS . Adjust drive belts to proper tension.

    Fig. 6: Removing & Installing Timing & Balance Shaft Belts
    Courtesy of AMERICAN HONDA MOTOR CO., INC.


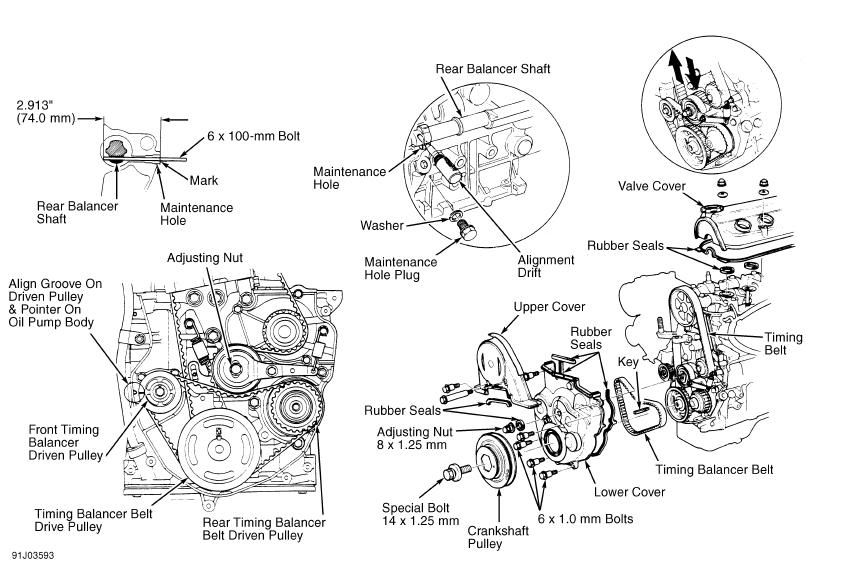
    Fig. 7: Aligning Balancer Belt Driven Pulley


    TORQUE SPECIFICATIONS

    Application Ft. Lbs. (N.m)

    A/C Compressor Bracket Bolt 37 (50)
    Alternator Bracket Adjuster Bolt 16 (22)
    Alternator Bracket Bolt 33 (45)
    Balance Shaft Pulley Bolt 22 (30)
    Camshaft Pulley Bolt
    2.2L DOHC 37 (51)
    2.2L SOHC & 2.3L 27 (37)
    Crankshaft Pulley Bolt 184 (250)
    Power Steering Belt Adjuster Nut 11 (15)
    Power Steering Pump Bracket Bolt 33 (45)
    Power Steering Pump Mounting Bolt 16 (22)
    Shift Cable Bracket Bolt 16 (22)
    Timing Belt Tension Adjuster 33 (45)

    INCH Lbs. (N.m)

    Timing Belt Cover Bolt 108 (12)
    Valve Cover Nut 108 (12)
    Water Pump Bolt 108 (12)


    CB7 Timing Belt Procdure
    CB7 Torque Specs
    CB7 Tune-Up Specs
    CB7 Fluid Capacities
    Last edited by HondaFan81; 10-29-2009, 12:56 PM.

    #2
    Originally posted by Accord R33
    i have a question to timing belt experts..

    when i was removing the crank pully from my b18, it ended up turning past TDC before the bolt broke loose. and i had to manually reset the crank and cam shafts to TDC. should everything be ok? im reallly worried i could have bent/broke something.

    As long as they were moving in unison you should be fine. If you moved them back with the belt off, you have about 2 teeth leeway most of the time.

    If you were careful and didn't feel any resistance to motion, you should be fine.

    This occasionally happens.

    I usually slide the crank pulley back on and then reset everthing to TDC with the T-belt still on the car, that way everything moves together. The key on the crankshaft makes this perfectly safe, and you don't have to worry about resetting the crank exactly, and then resetting each of the cams to exact TDC individually.

    This is the best method I have found to insure safety and ease of retiming without ending up a tooth off on something.

    That sucks, because then you have to pull it all apart and reset everything.

    Once everything is back at TDC, just slide the crank pulley back off and continue.

    Also, just FYI for this thread. Every Honda owners manual, 1990-2006 calls for a 60,000 mile timing belt change interval under "extreme" driving conditions.
    The OFFICIAL how to add me to your ignore list thread!

    Comment


      #3
      are there any marks on the water pump that has to lined up ???????


      my ride check it out
      http://www.cb7tuner.com/vbb/showthread.php?t=122926

      an if u have myspace add me
      http://profile.myspace.com/index.cfm...ndID=138825010

      Comment


        #4
        Originally posted by 92stocker View Post
        are there any marks on the water pump that has to lined up ???????
        no..The waterpump is competely independent of the crank and cam/valvetrain revolutions.

        Comment


          #5
          I'll add to this. I once had the belt off and accidentally turned the crank about 45*. I just turned it back the other way and matched the mark with the key. I also had a 3/8th drive 10" extension down the number 1 sparkplug tube and watched it rise as I turned the crank until the piston peaked. The camshaft is pretty difficult to nudge or move with the tbelt off because of the pressure of the valves.

          Once you have the engine set TDC exactly and go to pull the belt off you can rest assured that cam is not moving if you dont use your gorilla grip on it..On my first Tbelt job I kept fighting to keep the marks lined. I would put the belt on and as soon as I go to tension it the marks on the crank were off. The reason for this was because the engine was not TDC exactly. It was a lil off.

          So here I am thinking that the crank is not lining up with the cam when the cam itself isn't set right. You have the up mark on the cam gear and the tdc grooves 90* perpendicular. Use the GROOVES to line the cam flush with the top of the cylinder head.

          The reason I say that is because the engine is slanted back and the up mark on the cam gear can be decieving. Mark the grooves and get up close and make sure they are lined with the head dead on. If you are looking at the cam gear from the driver's side the top of grooved tooth on the gear should line up with the head surface. If you do that it should be one shot one kill type of deal. This applies to the F22 btw.
          Last edited by Fake Thug; 11-29-2008, 04:36 AM.

          Comment


            #6
            So here I am thinking that the crank is not lining up with the cam when the cam itself isn't set right. You have the up mark on the cam gear and the tdc grooves 90* perpendicular. Use the GROOVES to line the cam flush with the top of the cylinder head.

            The reason I say that is because the engine is slanted back and the up mark on the cam gear can be decieving. Mark the grooves and get up close and make sure they are lined with the head dead on. If you are looking at the cam gear from the driver's side the top of grooved tooth on the gear should line up with the head surface. If you do that it should be one shot one kill type of deal. This applies to the F22 btw.[/QUOTE]


            thanks for the tip....ive gotta change my timing belt this weekend
            [COLOR=DarkRed][B]I LIVE ACCORDINGLY * 93 CB7

            Comment


              #7
              Bolt Head sizes

              Bolt Sizes.
              I know everyone can use trial and error but I went through and wrote these down so after that I wanted to post them. Maybe they will help someone.
              Alternator:
              14mm top Mounting Bolt
              12mm bottom Mounting
              10mm Adjustment and ground bolt
              Power Steering:
              14mm Top
              12mm Bottom
              10mm Adjustment and Hoses
              Cruise Control:
              10mm Mounting
              Spark Plug Wire Loom Holder:
              8mm
              Valve Cover Nuts:
              10mm
              Plastic Guard bolts:
              10mm
              Crankshaft Bolt:
              19mm
              Timing Belt Tensioner:
              14mm
              Maintainance or Service bolt (back of engine that needs to have a locking pin)
              12mm
              Front Balance Shaft Bolt (only take off if you also need to replace the seals):
              12mm
              Oil Plug:
              17mm
              There may be a few more I missed because I got discouraged from doing a complete DIY for changing engine seals because it got to be a pain.

              Comment


                #8
                How hard is it?

                My Timing belt's time has come and the Accord needs a new one and I have a few questions.

                What tools do I need?

                I have done work like oil changes, Radiator, Air conditioning blower unit. How hard is changing a timing belt?

                Comment


                  #9
                  Hard, you need to read the stickies, have a manual, the right tools and lots of time. I think its on the same difficulty/expiriance level as pulling the motor. But not harder than rebuilding the motor and putting it back in if that makes sense. read the stickies and DIY's.

                  Comment


                    #10
                    Great write up CustomLowz!

                    I need to add a couple of pointers with some problems I ran into doing my 91 Wagon.

                    I made a major mistake buying a timing belt kit and water pump from Ebay, TheImportExperts. The kit was put together by PCI (prefered components inc.)

                    Got the entire job done and fired up the engine and the new belt got toasted because the new tensioner bearing was not spinning.

                    Had to tear it all appart again the next day and find the problem.

                    Here is a pic of the face where the tension bearing goes and the arrows point to the stud the bearing pivots on.


                    Here is a pic of the OEM bearing I removed on the left and the new PCI bearing on the right.


                    Look close at the new bearing and see how it is wider and closer to the pivoting bracket.

                    Here is how it looks when it is installed. I used a white plastic rod to show the pivot stud.


                    Here is a side view and what caused the bearing to sieze when I got the covers back on and made the final adjustment.


                    Because the bearing PCI provided is dead wrong and too close to the adjusting bracket it binds as soon as you tighten the adjusting nut. I had to grind off the top of the pivot post to make it work. I also had to buy a new belt and pay my mechanic for doing the job twice.

                    Lesson learned-Pay the extra cash and buy the right Honda OEM parts.

                    PCI told me to go back to the Ebay seller and the ebay seller just jerked me around.

                    Gary
                    Last edited by Gary L; 02-09-2009, 02:56 AM.

                    Comment


                      #11
                      one note...by following the procedures the belts will not be tight unless you get the updated springs for the tensioners...even then,

                      You can use your finger for the balance shaft belt, get the slack out of the balance shaft belt by LIGHTLY pushing on the idler pulley, then tighten it down.

                      For the t-belt...get it tight enough so that you can JUST barely twist the t-belt about 90 degrees but NO further...but you shouldn't have to apply a hefty amount of force either.

                      you can use a 10mm bolt to tighten down the tensioner arm...you can see where it would go on the tensioner arm...IT WILL NOT STAY THERE...also, when finished...there should be NO bolt in the tensioner arm.

                      This is common with our cars as far as I've seen.
                      ____

                      Comment


                        #12


                        is the timing balancer belt seen in the pic the belt i can leave off for the balance shaft belt removal?
                        seen in this thread - http://www.cb7tuner.com/vbb/showthre...+shaft+removal

                        Be Clean

                        Comment


                          #13
                          Originally posted by bcjammerx View Post

                          you can use a 10mm bolt to tighten down the tensioner arm...you can see where it would go on the tensioner arm...IT WILL NOT STAY THERE...also, when finished...there should be NO bolt in the tensioner arm.

                          This is common with our cars as far as I've seen.
                          dont leave the bolt like he said the results are not being able to rev high. I left mine in it runs but when i go higher than 4800 rpm i hear the belt slapping in every gear
                          Summer 11' Big plans (Bodywork/paint/rims etc..) in Progress STAY TUNED

                          CLICK THE PIC

                          Comment


                            #14
                            Originally posted by GearBangnAccord View Post
                            dont leave the bolt like he said the results are not being able to rev high. I left mine in it runs but when i go higher than 4800 rpm i hear the belt slapping in every gear
                            so leave the bolt off? the bolt for the tensioner arm?!

                            Be Clean

                            Comment


                              #15
                              Originally posted by nostringz View Post
                              so leave the bolt off? the bolt for the tensioner arm?!
                              the one to the far left in the above diagram not the one in between the spring and adjuster.
                              Summer 11' Big plans (Bodywork/paint/rims etc..) in Progress STAY TUNED

                              CLICK THE PIC

                              Comment

                              Working...
                              X