
MDX Auto On/Off Headlights
When playing with electrical stuff, make sure to disconnect your battery, in case you accidentally do something that could fry a fusebox or your electrical system.
Special thanks to Mark (NH503P-3) for helping me out through this DIY and doing most of the leg work on figuring out the pins, all I did was clean up the process and make the pin out layout easier to understand!
Parts Needed:
03-06 MDX Combo Switch w/ pig tail
03-06 MDX Control unit w/ pig tail
03-06 MDX Light Sensor w/ pig tail
90-93 Accord Combo/Wiper Switch Harness
2x 90-97 Single Pin brown plug found on door harness under the windows switch on driver panel
Standard Bosch 86 relay
Tools Needed:
10mm Socket
Philips Screw driver
De-pinning tool (I use a Jeweler Flat Head)
Wire cutters
Wire crimpers
Solder
Extra wire
T-Taps
Soldering Iron
Heat Shrink
Wire Loom
Heat Gun
03-06 Acura MDX parts and their location:
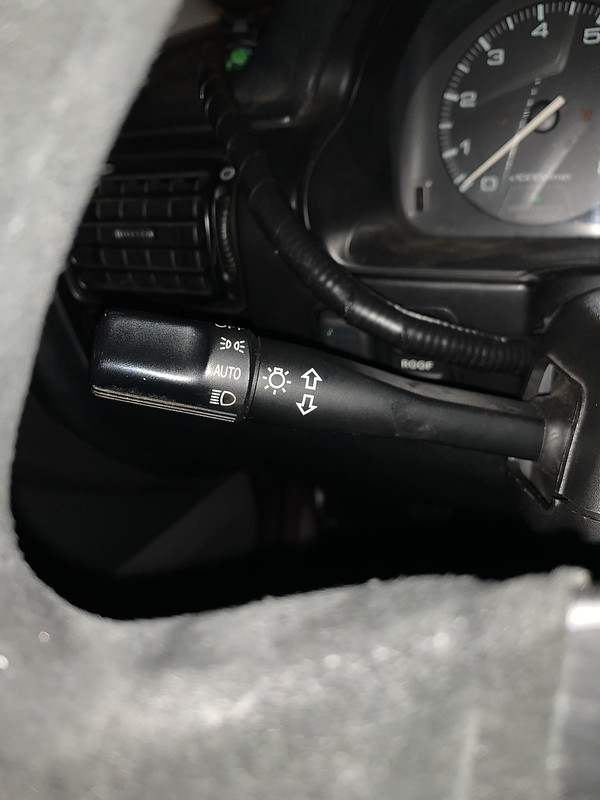
Combo switch - is in the same location as the Accord, make sure it has an Auto option and you pull the pigtail.
Auto headlights Controller- Up under the dash on the right side of the Steering Column, should only be held in by one 10mm bolt. Make sure to get the Pigtail

Light Sensor – Smack dab in the middle of the dash, use a small flat head to pop the sensor out, and give it a little pull to get some wire on the pigtail
Bosch 86 Relay – if you pull the carpet off the center console on the driver side, right underneath the shifter you should find a standard 4 pin relay, make sure to grab the pigtail as well.

90-97 Accord Parts:
Combo switch harness- You can use your own or if your like me and like to tear up a spare and not your original. On steering column and runs down the right side to a blue plug

Brown single pin connector - Found on door harness under the windows switch on driver panel
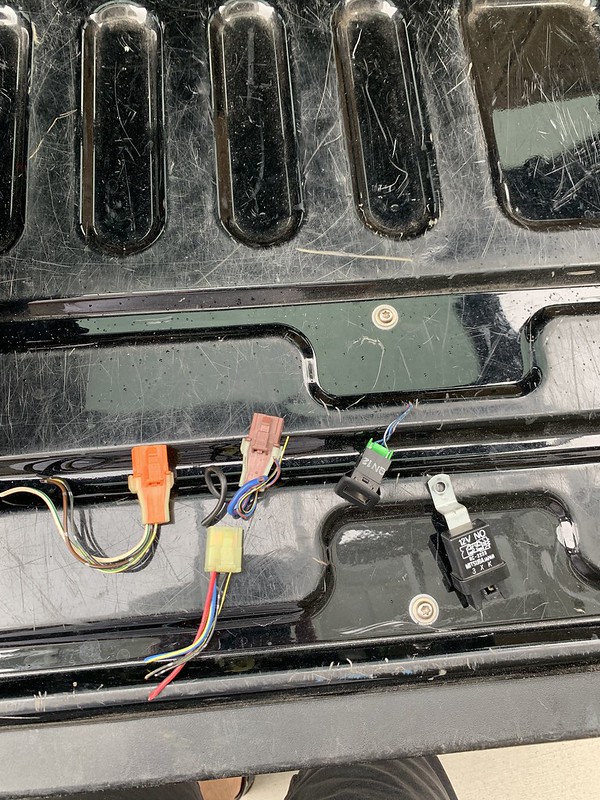
Your pile of goodies should look like this, those two relays on the top right would be used if you plan to use your fogs, however I don't have fogs so a standard Bosch relay works just fine. If your curious on how to wire the fogs in as well, NH-503 I believe has the pin out for those.

How to make your harness:
Now that you have all your parts, now the fun begins, I will list out the plug and which wire goes to which pin on which plug.
Please do not attempt this is you are not comfortable with soldering and depinning pins, as this DIY involves a lot of it.
First thing you need to do is remove your combo switch, you gain access to this by removing the steering column plastic cover, which has 5 Philip head screws. You can then pull the plastic cover off.
Next unplug the stake and wiper switch plugs and follow the harness down the right side until it ends at a blue plug and a brown plug, disconnect them and pull your combo harness out.
Next you need to remove your headlights stake, there are 2 small Philips head screws holding it in place, you may have to move the steering wheel to gain access to these, I fortunately have a removeable steering wheel so it made it easy. Once you removed those 2 small Philips head screws, you can pop it out using a flat head and sliding it towards the door.
While your in there go ahead and install your MDX Headlight stake and secure it with the 2 small Philips head screws you removed from your Accord one.
Now that you have the harness in front of you, go ahead and remove all the wire loom and electrical tape, underneath you will see that the wiper harness and headlight harness are two separate harnesses. To make things easy, I simply unpinned the one wire from the wiper harness to be able to remove it from the headlight harness, you will add it back in later
Now the fun begins, below I am going to list what pins from what plugs go to which pin in which plug, So all you have to do is de-pin some pins and relocate them and solder the others.
I made my wire length for the Light sensor about 18” long at the minimum, and 22” for the power plugs to the fuse box. I took my Original Combo harness and measured it to see how long I would need to make the new combo Harness length.
To make things easy, I simply unpinned the one wire from the wiper harness to be able to remove it from the headlight harness, you will add it back in later
Now to the pins locations:
The pin location is based off, if you were looking at the plug on the wire side where the pins get pushed into. Then starting with Pin 1 being furthest left and top row, then they make their way right until top row ends then continue to the next row on the left side working right
Starting with the Combo Plug, I simply used the Accord Combo plug and just added pins and swapped as needed.
Pin #s:
1: Open – nothing in it
2: Open – nothing in it
*3: To pin 18 on the Accord Blue 20 Pin plug & pin 5 on MDX Controller*
4: Open – nothing in it
5: Add MDX Thick Black ground- to pin 5 on the Accord Blue 20 Pin plug
6: To pin 13 on MDX Controller
7: To pin 14 on MDX Controller & Pin 2 on Relay
8: To pin 17 on the Accord Blue 20 Pin plug
9: Ground- to pin 5 on the Accord Blue 20 Pin plug
10: Open – nothing in it
11: Open- nothing in it
12: To pin 13 on the Accord Blue 20 Pin plug
13: To pin 12 on the Accord Blue 20 Pin plug
14: To Pin 14 on the Accord Blue 20 Pin plug
Now the Standard 4 pin relay:
Pin #s:
1: To pin 3 on Relay & pin 6 on the Accord Blue 20 Pin plug
2: To pin 7 on Combo Plug & pin 14 on Controller
3: To pin 1 on Relay in 6 on the Accord Blue 20 Pin plug
5: To pin 20 on the Accord Blue 20 Pin plug
MDX Controller Pin layout:
Pin #s:
1: To pin 1 on MDX Light Sensor
2: Combine with Pin 3 and solder to Single Accord Brown plug to Fusebox Port #1
3: Combine with Pin 2 and solder to Single Accord Brown plug to Fusebox Port #1
4: To pin 3 on MDX Light Sensor
5: To pin 18 on the Accord Blue 20 Pin plug
6: Open- nothing in it
7: To pin 5 on MDX Light Sensor
8: Ground - To pin 5 on the Accord Blue 20 Pin plug
9: Ground – To pin 5 on the Accord Blue 20 Pin plug
10: Solder to Single Accord Brown plug to Fusebox Port #3
11: Open – nothing in it
12: Add a T-tap and clamp it to Pin 1 on Plug C502 on the back of the Fusebox
13: To pin 6 on Combo plug
14: To pin 7 on Combo plug & pin 2 on Relay.
You should have noticed Pin 3 on the Combo switch has a star next to it, I did this because you need to swap ends, meaning the 2 wired into one pin, needs to go on the blue plug and the single wire with single pin goes to the combo plug.
I also did not attempt to de-pin the controller plug as I still haven't figured out how to de-pin it, so I simply soldered wire onto the pigtail.
To test out my harness, I simply used twist nuts on all the wires before I went ahead and soldered them to make sure everything was working correctly to test the harness, you do not need to ad the T-tap on the fusebox. That wire is only used to turn off the lights if you turn off the engine and open the door.
The 2 ports I was referring to for pins 2&3 and 12 on the Controller are these:

For the T-tap you will be looking for this plug on the back of your fuse box:


It will be the closest plug to your when you pull out the fusebox. To remove your fuse box, you have to remove the plastic covering and there are 2 or 3 10mm bolts you have to undo then you should have enough slack to pull it out.
Make sure all the switches work, turn signals, high beams, low beams, parking lights only and auto on/off feature. For the Auto on/off feature, I just took my phone light and held it by the sensor, it should turn off the headlights between 10-15 seconds, then when you remove the light should turn back on (if you are in a darkish area. My garage was dark enough to trip the lights on.

Once you have tested that your harness works solder in all the wires, make sure to heat shrink. Then just before you add the wire loom, put the wiper harness back in with the combo harness then add wire loom over the harness to protect it.

Now you will have to remove the dash and cut a small hole in the center to add the light sensor, I have no done this yet, as I haven’t removed the dash, I simply tucked the light sensor off to the side laying on top of the dash for now.
Sit back, crack a cold one and enjoy your 30 year old car having a nice hands free feature.
This was my first DIY write up so bare with me on spelling, grammar and whatever else is messed up and please let me know so I can fix them. THANKS!
When playing with electrical stuff, make sure to disconnect your battery, in case you accidentally do something that could fry a fusebox or your electrical system.
Special thanks to Mark (NH503P-3) for helping me out through this DIY and doing most of the leg work on figuring out the pins, all I did was clean up the process and make the pin out layout easier to understand!
Parts Needed:
03-06 MDX Combo Switch w/ pig tail
03-06 MDX Control unit w/ pig tail
03-06 MDX Light Sensor w/ pig tail
90-93 Accord Combo/Wiper Switch Harness
2x 90-97 Single Pin brown plug found on door harness under the windows switch on driver panel
Standard Bosch 86 relay
Tools Needed:
10mm Socket
Philips Screw driver
De-pinning tool (I use a Jeweler Flat Head)
Wire cutters
Wire crimpers
Solder
Extra wire
T-Taps
Soldering Iron
Heat Shrink
Wire Loom
Heat Gun
03-06 Acura MDX parts and their location:
Combo switch - is in the same location as the Accord, make sure it has an Auto option and you pull the pigtail.
Auto headlights Controller- Up under the dash on the right side of the Steering Column, should only be held in by one 10mm bolt. Make sure to get the Pigtail
Light Sensor – Smack dab in the middle of the dash, use a small flat head to pop the sensor out, and give it a little pull to get some wire on the pigtail
Bosch 86 Relay – if you pull the carpet off the center console on the driver side, right underneath the shifter you should find a standard 4 pin relay, make sure to grab the pigtail as well.
90-97 Accord Parts:
Combo switch harness- You can use your own or if your like me and like to tear up a spare and not your original. On steering column and runs down the right side to a blue plug
Brown single pin connector - Found on door harness under the windows switch on driver panel
Your pile of goodies should look like this, those two relays on the top right would be used if you plan to use your fogs, however I don't have fogs so a standard Bosch relay works just fine. If your curious on how to wire the fogs in as well, NH-503 I believe has the pin out for those.
How to make your harness:
Now that you have all your parts, now the fun begins, I will list out the plug and which wire goes to which pin on which plug.
Please do not attempt this is you are not comfortable with soldering and depinning pins, as this DIY involves a lot of it.
First thing you need to do is remove your combo switch, you gain access to this by removing the steering column plastic cover, which has 5 Philip head screws. You can then pull the plastic cover off.
Next unplug the stake and wiper switch plugs and follow the harness down the right side until it ends at a blue plug and a brown plug, disconnect them and pull your combo harness out.
Next you need to remove your headlights stake, there are 2 small Philips head screws holding it in place, you may have to move the steering wheel to gain access to these, I fortunately have a removeable steering wheel so it made it easy. Once you removed those 2 small Philips head screws, you can pop it out using a flat head and sliding it towards the door.
While your in there go ahead and install your MDX Headlight stake and secure it with the 2 small Philips head screws you removed from your Accord one.
Now that you have the harness in front of you, go ahead and remove all the wire loom and electrical tape, underneath you will see that the wiper harness and headlight harness are two separate harnesses. To make things easy, I simply unpinned the one wire from the wiper harness to be able to remove it from the headlight harness, you will add it back in later
Now the fun begins, below I am going to list what pins from what plugs go to which pin in which plug, So all you have to do is de-pin some pins and relocate them and solder the others.
I made my wire length for the Light sensor about 18” long at the minimum, and 22” for the power plugs to the fuse box. I took my Original Combo harness and measured it to see how long I would need to make the new combo Harness length.
To make things easy, I simply unpinned the one wire from the wiper harness to be able to remove it from the headlight harness, you will add it back in later
Now to the pins locations:
The pin location is based off, if you were looking at the plug on the wire side where the pins get pushed into. Then starting with Pin 1 being furthest left and top row, then they make their way right until top row ends then continue to the next row on the left side working right
Starting with the Combo Plug, I simply used the Accord Combo plug and just added pins and swapped as needed.
Pin #s:
1: Open – nothing in it
2: Open – nothing in it
*3: To pin 18 on the Accord Blue 20 Pin plug & pin 5 on MDX Controller*
4: Open – nothing in it
5: Add MDX Thick Black ground- to pin 5 on the Accord Blue 20 Pin plug
6: To pin 13 on MDX Controller
7: To pin 14 on MDX Controller & Pin 2 on Relay
8: To pin 17 on the Accord Blue 20 Pin plug
9: Ground- to pin 5 on the Accord Blue 20 Pin plug
10: Open – nothing in it
11: Open- nothing in it
12: To pin 13 on the Accord Blue 20 Pin plug
13: To pin 12 on the Accord Blue 20 Pin plug
14: To Pin 14 on the Accord Blue 20 Pin plug
Now the Standard 4 pin relay:
Pin #s:
1: To pin 3 on Relay & pin 6 on the Accord Blue 20 Pin plug
2: To pin 7 on Combo Plug & pin 14 on Controller
3: To pin 1 on Relay in 6 on the Accord Blue 20 Pin plug
5: To pin 20 on the Accord Blue 20 Pin plug
MDX Controller Pin layout:
Pin #s:
1: To pin 1 on MDX Light Sensor
2: Combine with Pin 3 and solder to Single Accord Brown plug to Fusebox Port #1
3: Combine with Pin 2 and solder to Single Accord Brown plug to Fusebox Port #1
4: To pin 3 on MDX Light Sensor
5: To pin 18 on the Accord Blue 20 Pin plug
6: Open- nothing in it
7: To pin 5 on MDX Light Sensor
8: Ground - To pin 5 on the Accord Blue 20 Pin plug
9: Ground – To pin 5 on the Accord Blue 20 Pin plug
10: Solder to Single Accord Brown plug to Fusebox Port #3
11: Open – nothing in it
12: Add a T-tap and clamp it to Pin 1 on Plug C502 on the back of the Fusebox
13: To pin 6 on Combo plug
14: To pin 7 on Combo plug & pin 2 on Relay.
You should have noticed Pin 3 on the Combo switch has a star next to it, I did this because you need to swap ends, meaning the 2 wired into one pin, needs to go on the blue plug and the single wire with single pin goes to the combo plug.
I also did not attempt to de-pin the controller plug as I still haven't figured out how to de-pin it, so I simply soldered wire onto the pigtail.
To test out my harness, I simply used twist nuts on all the wires before I went ahead and soldered them to make sure everything was working correctly to test the harness, you do not need to ad the T-tap on the fusebox. That wire is only used to turn off the lights if you turn off the engine and open the door.
The 2 ports I was referring to for pins 2&3 and 12 on the Controller are these:
For the T-tap you will be looking for this plug on the back of your fuse box:
It will be the closest plug to your when you pull out the fusebox. To remove your fuse box, you have to remove the plastic covering and there are 2 or 3 10mm bolts you have to undo then you should have enough slack to pull it out.
Make sure all the switches work, turn signals, high beams, low beams, parking lights only and auto on/off feature. For the Auto on/off feature, I just took my phone light and held it by the sensor, it should turn off the headlights between 10-15 seconds, then when you remove the light should turn back on (if you are in a darkish area. My garage was dark enough to trip the lights on.
Once you have tested that your harness works solder in all the wires, make sure to heat shrink. Then just before you add the wire loom, put the wiper harness back in with the combo harness then add wire loom over the harness to protect it.
Now you will have to remove the dash and cut a small hole in the center to add the light sensor, I have no done this yet, as I haven’t removed the dash, I simply tucked the light sensor off to the side laying on top of the dash for now.
Sit back, crack a cold one and enjoy your 30 year old car having a nice hands free feature.
This was my first DIY write up so bare with me on spelling, grammar and whatever else is messed up and please let me know so I can fix them. THANKS!


Comment