
PREMISE:
In your quest to customize your interior, you may be looking to swap your seatbelt color. Unfortunately dying or re-coloring them directly is impossible - they are a synthetic material so dyes won't take - nor do you want to degrade the belt fibers! This means that the only option is to swap them out for another set. Unfortunately, not all colors were available for all models of CB7. In particular, black is difficult (impossible?) to find for coupes.
SOLUTION:
Fortunately, other honda/acura models have very similar seatbelts! In many cases it was only the retractor mounting tabs that varied, and the belts themselves can be successfully swapped into a CB7.
This applies to all variations of the 1992-93 year CB7s. The following guide does NOT apply to 1990-91 models.
For the FRONT belts, follow ALL steps below.
For the REAR belts, follow ONLY steps 1, 10, and 12-19.
Click images for larger size.
DISASSEMBLY:
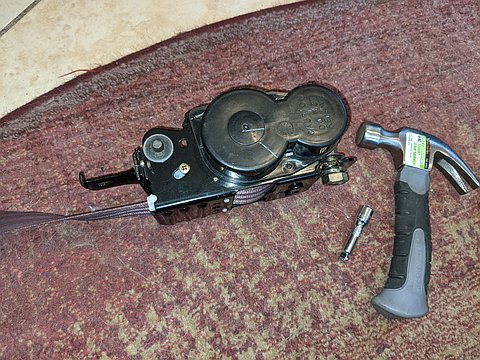
1. Remove OEM seatbelts from your car, plus the donor. The belt swapping will be done on a workbench.

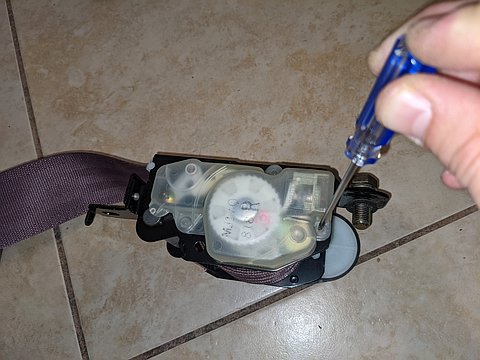
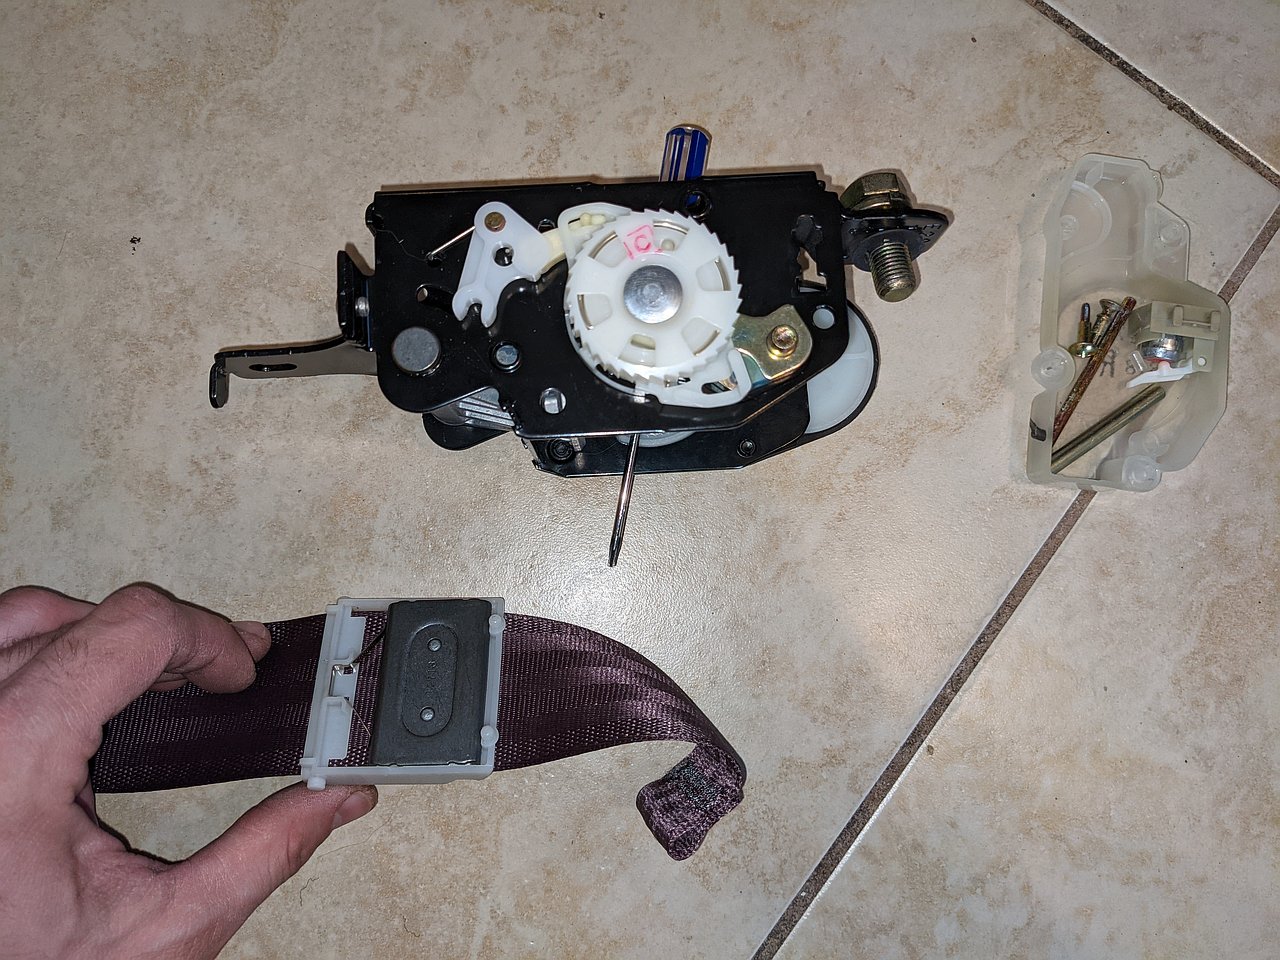
2. Using small tool, push center pins out of the 3 mounting clips.
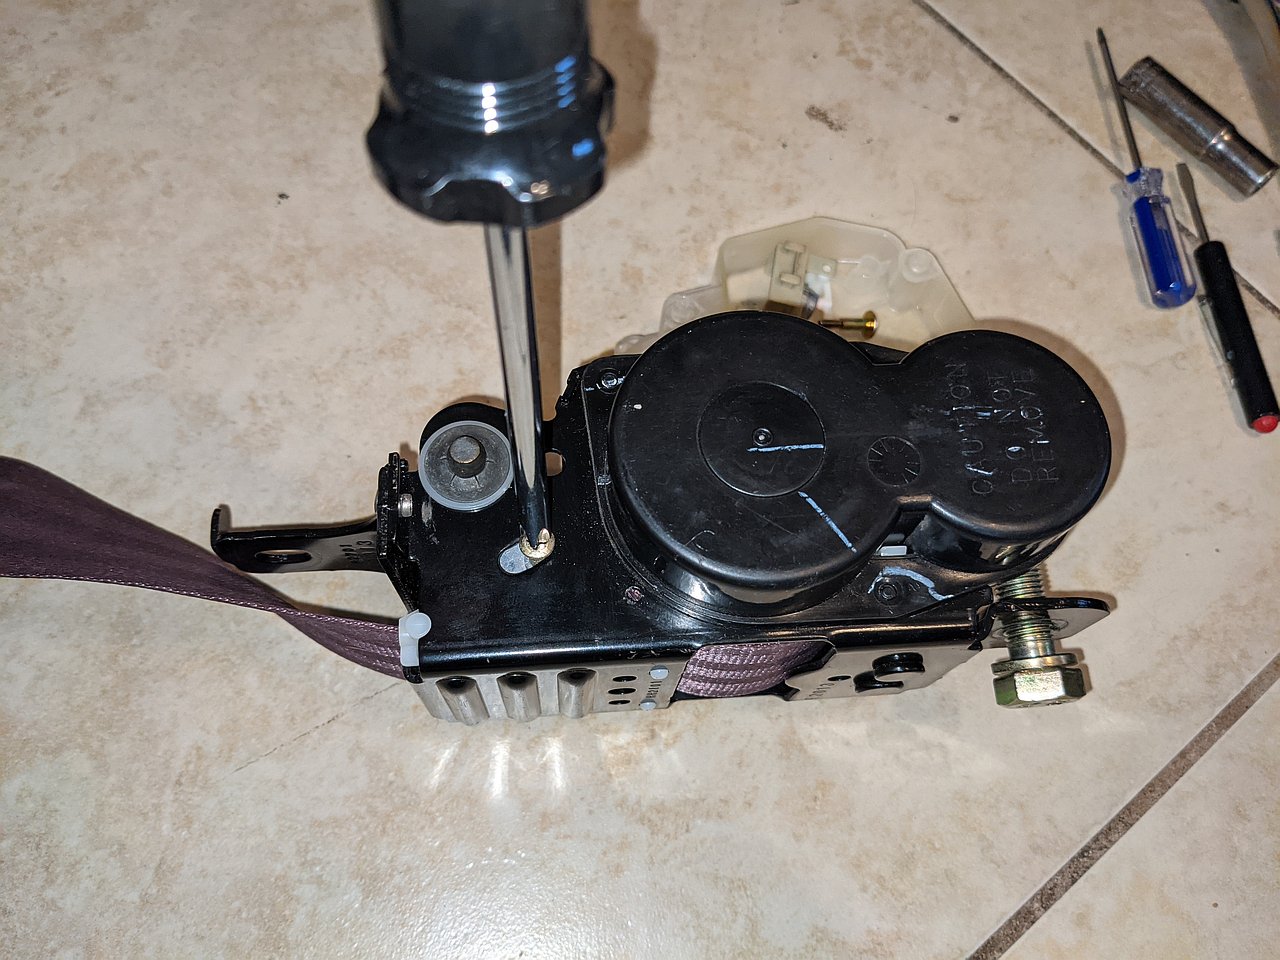
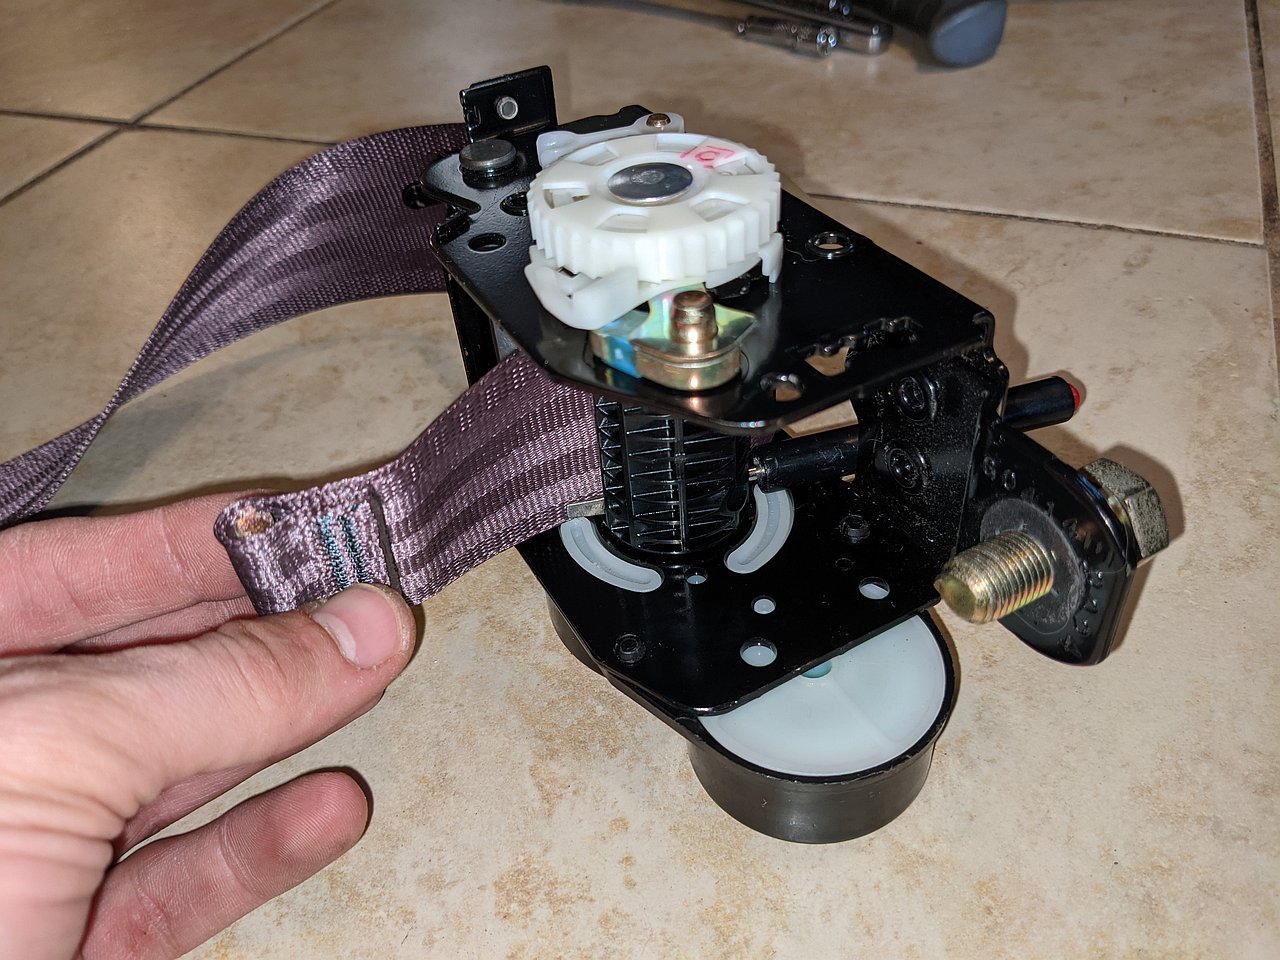
3. Pry plastic cover off of retractor.

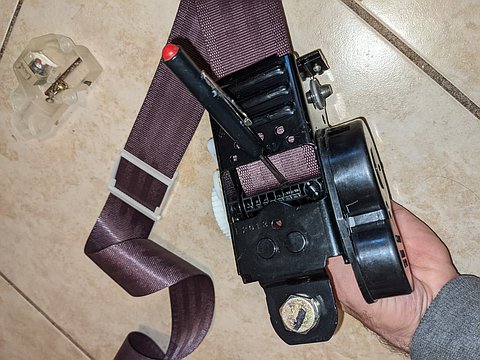
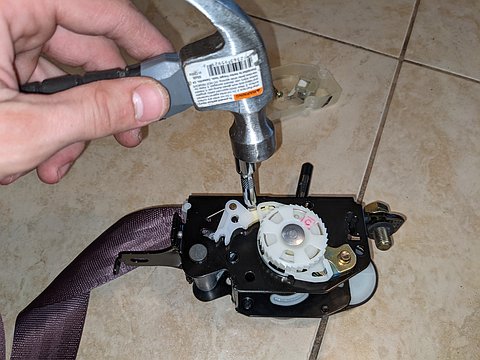
4. Flip assembly over, and place onto a soft surface.
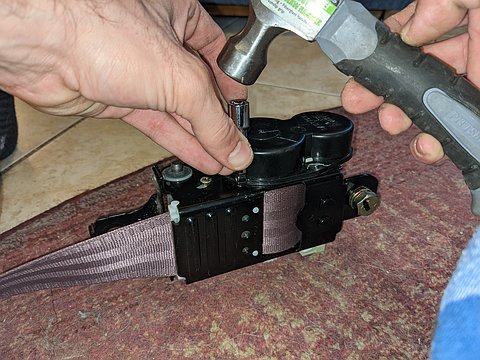
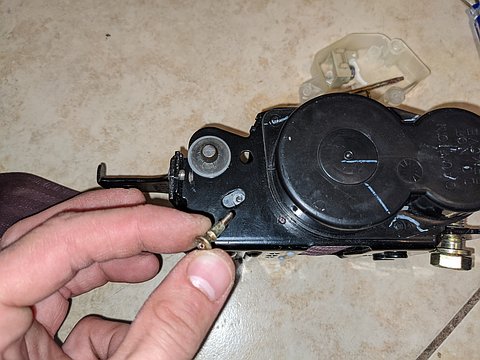
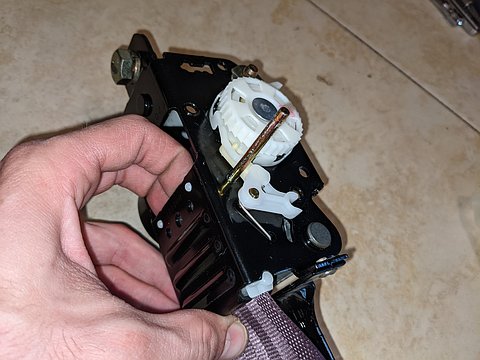
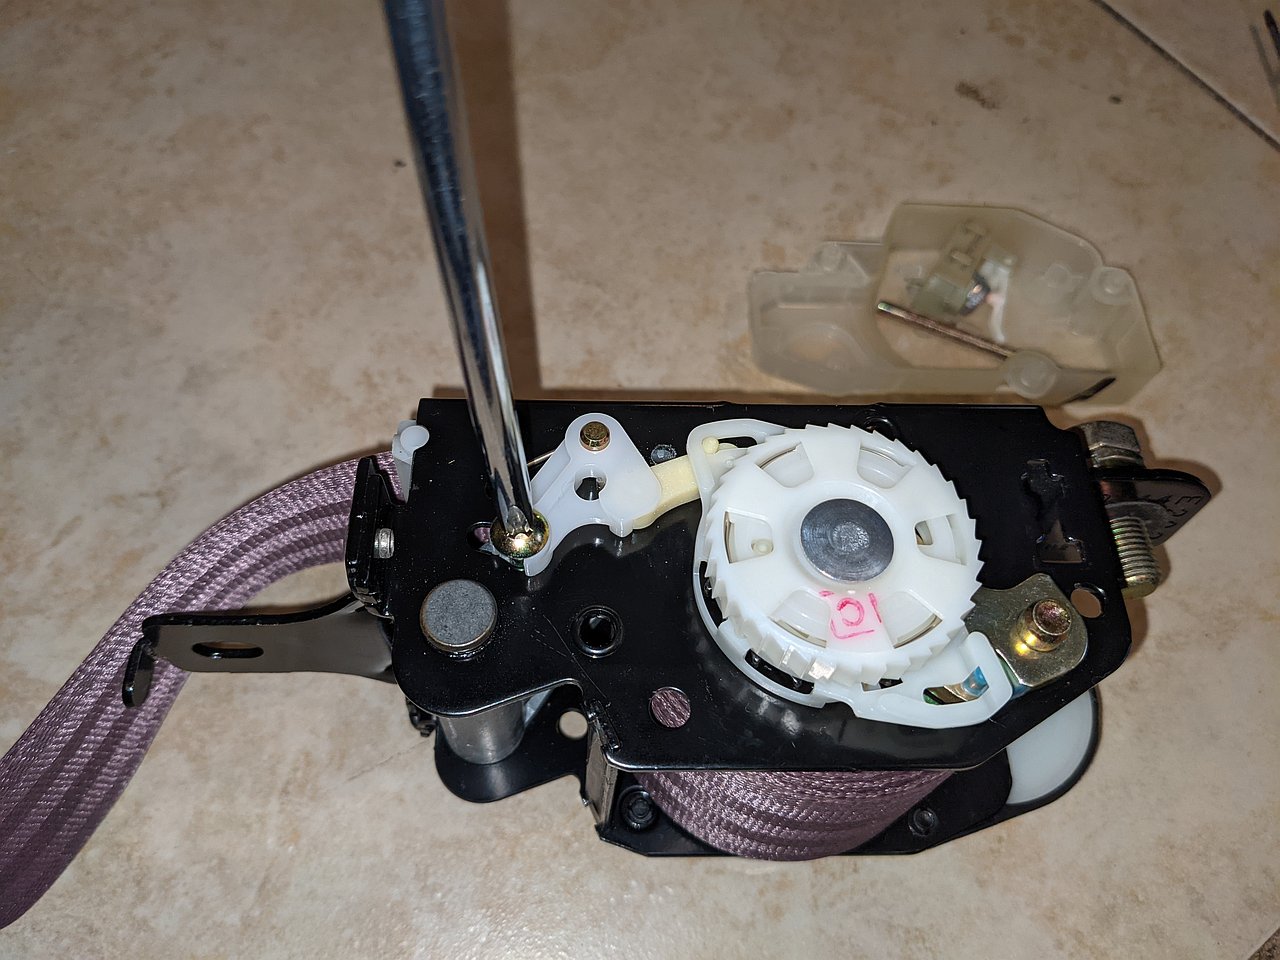
5. Using a punch tool and hammer, knock the small pin loose.
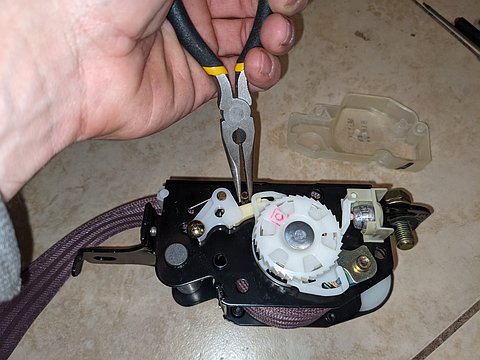
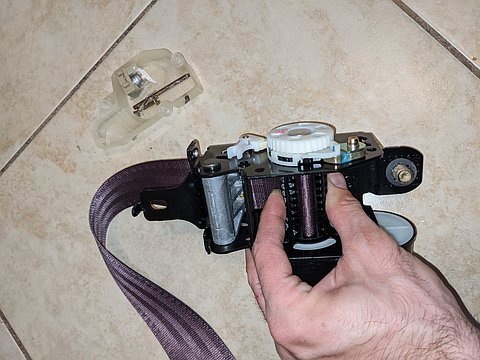
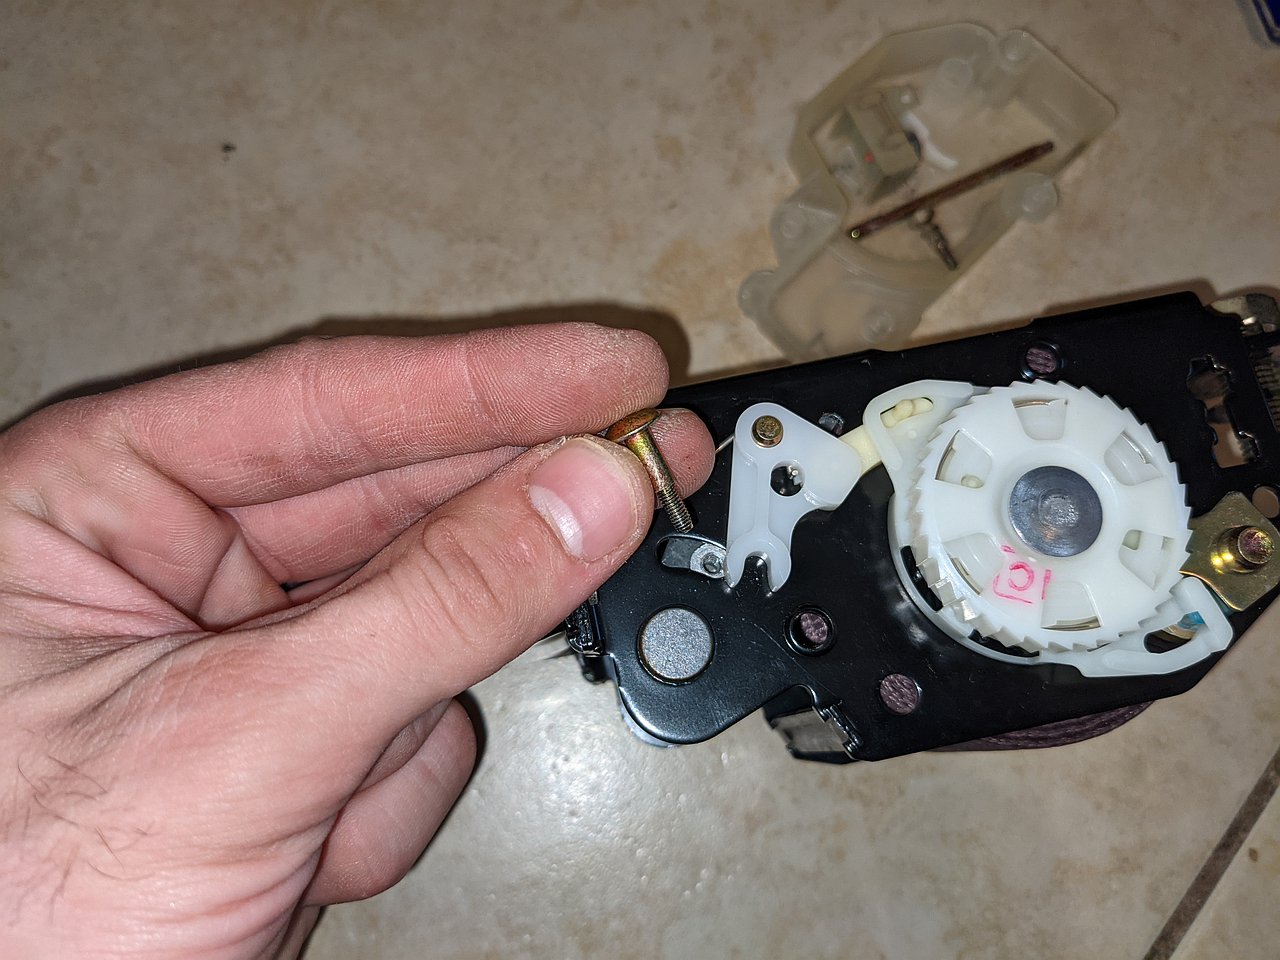
6. Flip assembly over, and use pliers to remove pin entirely.
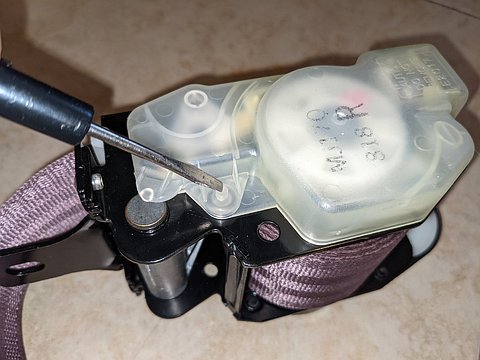
7. Slide ratcheter to the side to unclip it, and remove it.
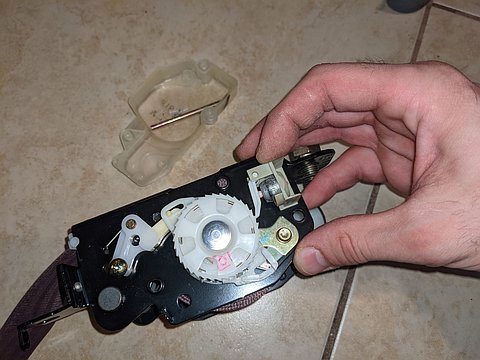
8. Remove pivot screw from the aluminum belt grabber.


9. Flip assembly over, and remove second screw from the belt grabber.

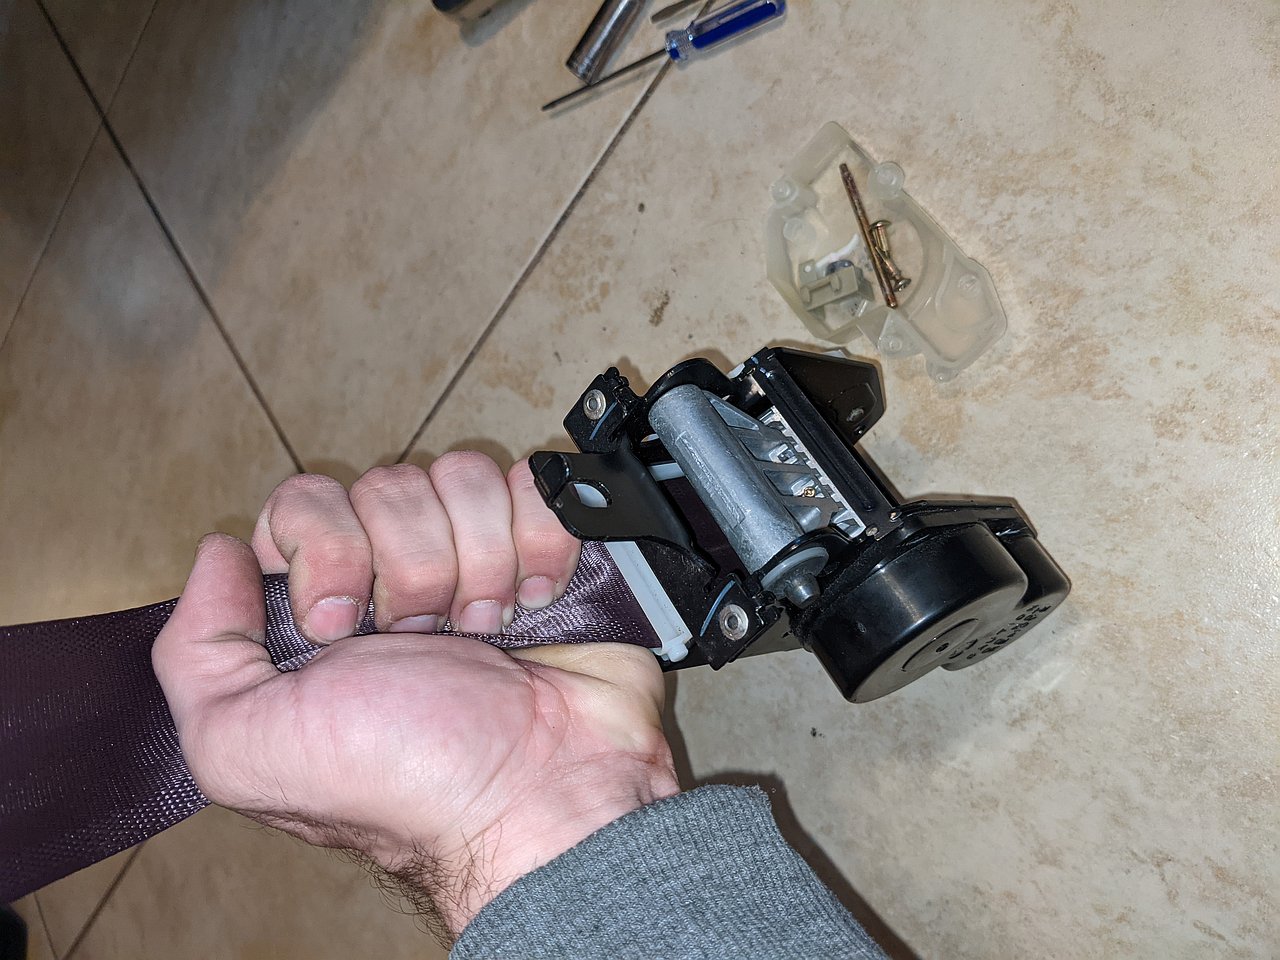
10. Stand assembly up vertically (as would be installed in the car) and pull belt out of the spool as far as possible.

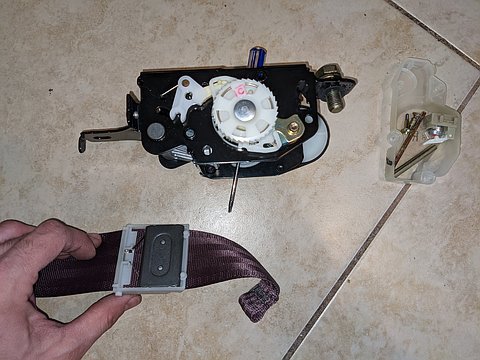
11. Dislodge the white plastic belt slider by pushing the circle tabs, and by prying along the direction of the belt. The slider stays attached to the belt, you are only separating it from the main black metal housing. Slide it down the belt and off to the side.
12. Flip assembly over, and use hand to grasp the center spool (spring loaded) to hold it in place. You should be able to see the tail end of the belt embedded within the center of the spool.
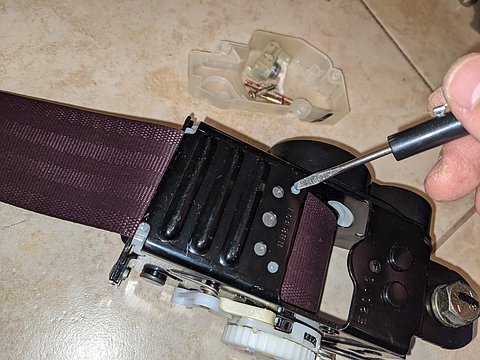
13. While still holding spool, flip assembly over. Attacking the belt from the long strap side, use a flathead screwdriver wedged into the seam of the fabric to push belt through the spool. The tail of the belt will be pushed out of the spool and into the palm of your spool hand.

14. Leaving the flathead screwdriver in place (to keep the spool from unrolling), find the metal pin lodged within the tip of the belt.

15. Push the metal pin out of the belt. This is the final piece that is removed in order to free the belt.

16. While taking care to keep the spool held in place (by a combination of holding it with your hand, and using the small flathead screwdriver) work the belt out through the spool and out of the assembly entirely.
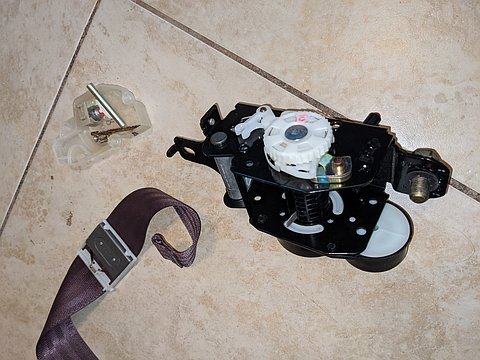
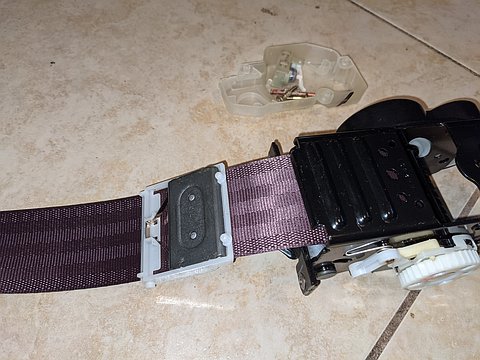
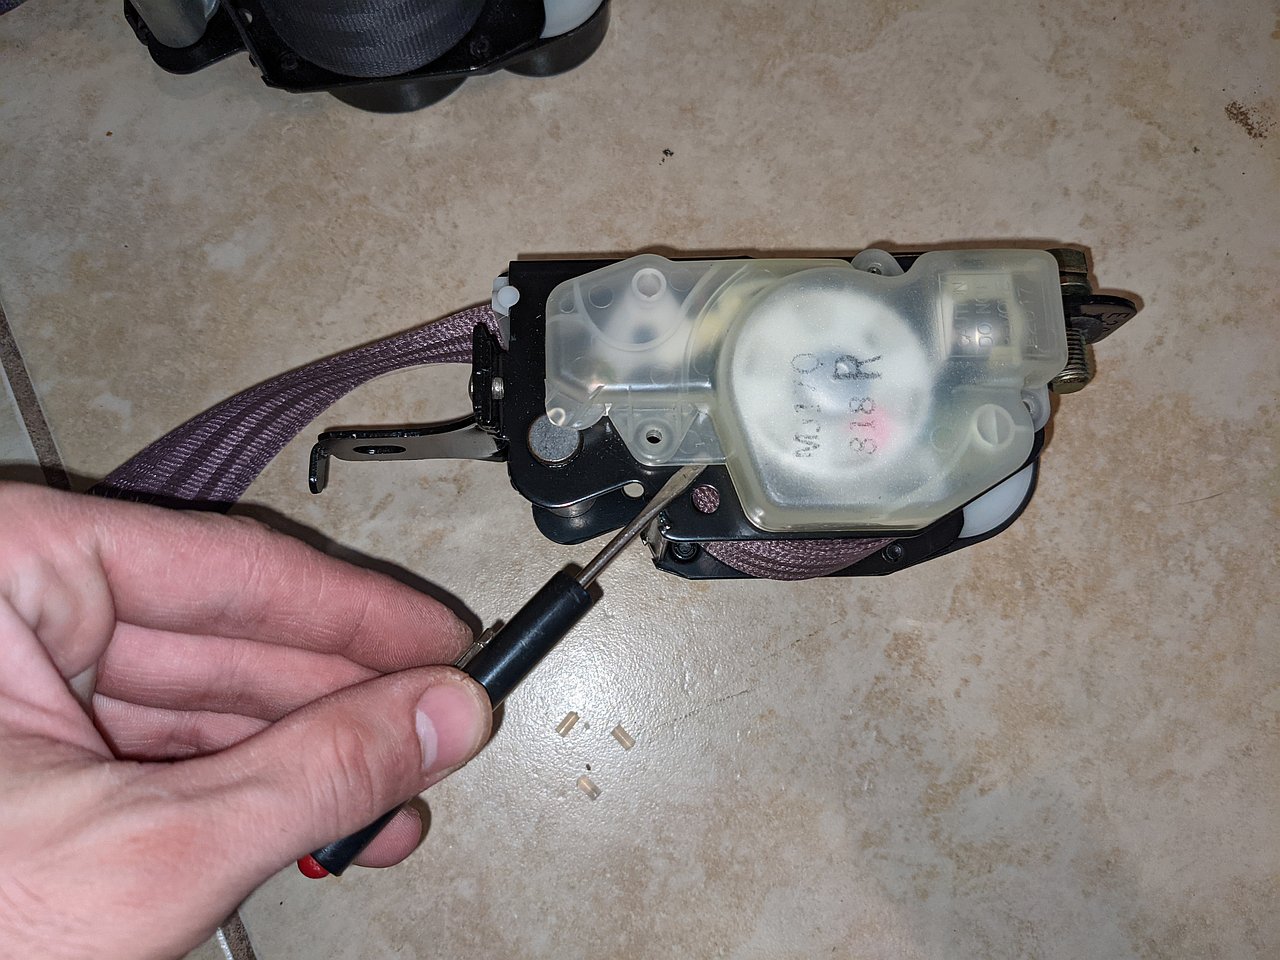
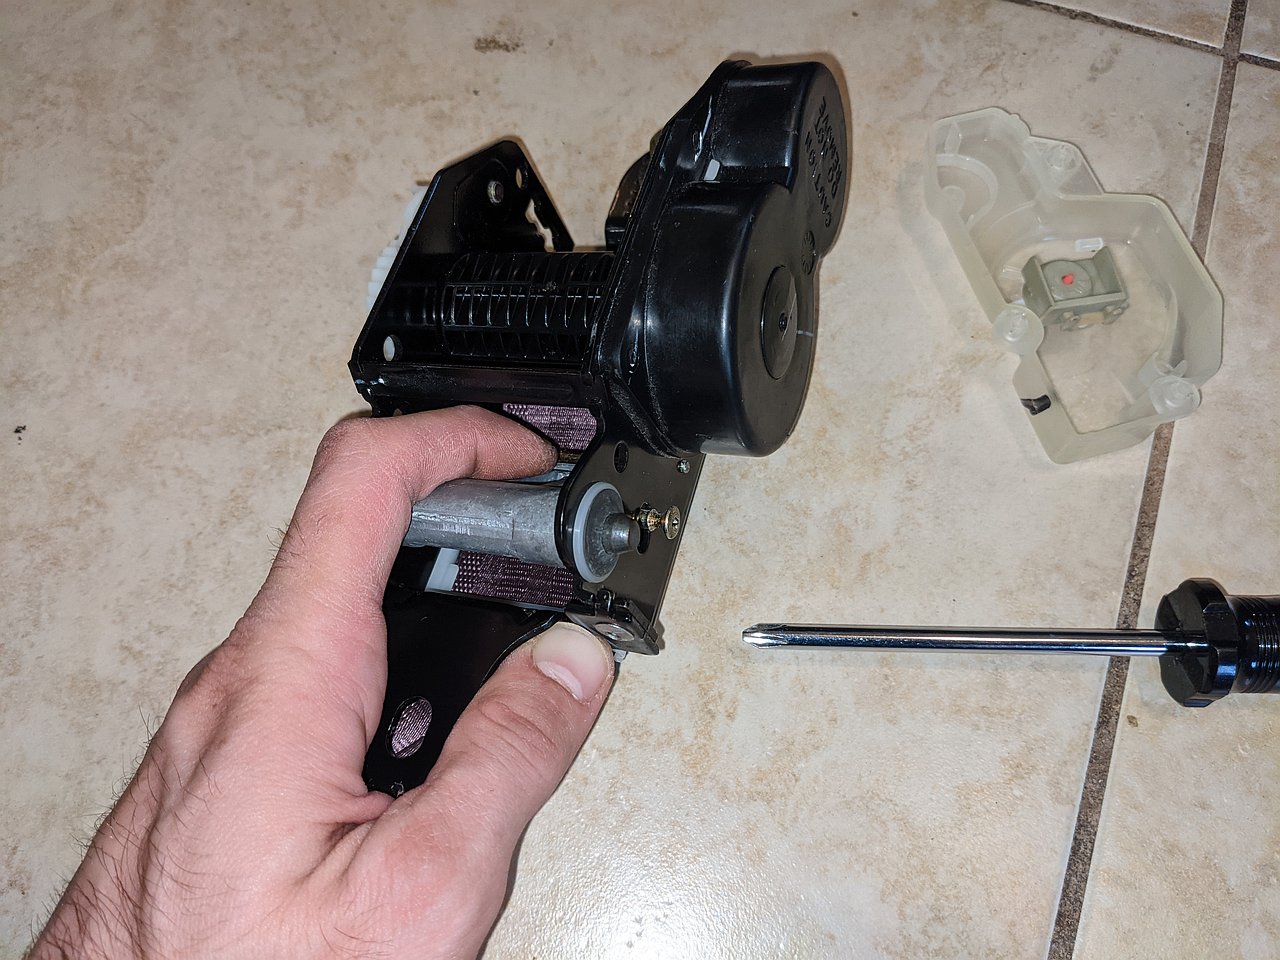
17. Your setup should now look like this. Screwdriver is used to keep spool from unrolling the spring tension. Belt is oriented in the direction it was removed for clarity.
REASSEMBLY:
18. Slide the new belt into the top of the retractor assembly, and into the back of the spool. Using a flathead screwdriver, push it through enough that the tail end is accessible fully from the other side of the spool.
19. Reinstall the metal pin into the tip of the belt, and pull the belt through, tightening it into the spool.

20. Push the white plastic belt slider back into place inside the assembly.

21. While holding the slider in place, reinsert the pin (from steps 5-6) to lock the slider in place. Make sure the small side fully aligns and inserts into the opposite side of the assembly.
22. Use punch and hammer to gently press the pin back into place.
22. While keeping the belt fully pulled out (spool empty) use your fingers to push the grey aluminum belt grabber down, and reinstall the pivot screw into the side. Be sure you are installing the correct screw onto the correct side.

23. Flip assembly over, and reinstall the second pivot screw into the belt grabber. Be sure you are installing the correct screw onto the correct side. You may need to push the plastic swing arms a little bit in order to get the screw hole to line up.
24. Reinstall the ratcheter, and push it to the side to lock it in place. It is critical that this piece is secured properly!

25. Snap plastic cover back into place over the entire mechanism.

26. Reinstall plastic pins back into the centers of the 3 mounting clips. Use the side of a flathead screwdriver to push them down flush with the surface of the plastic cover.

DONE!
Additional information:
- 90-91 models are entirely different than 92-93 models and can't be interchanged - use a similar year as your own.
- The guide works for both sedan and coupe, but the belts themselves aren't the same - swap like for like.
- Example photos in this guide were taken using a 1993 Coupe front retractor (with the burgundy belt)
In case somebody accidentally allows the spools to unwind and lose tension:
- The front retractors should be wound up 16 full rotations before the belt is attached.
- The rear retractors are wound up 20 full rotations before the belt is attached.
In your quest to customize your interior, you may be looking to swap your seatbelt color. Unfortunately dying or re-coloring them directly is impossible - they are a synthetic material so dyes won't take - nor do you want to degrade the belt fibers! This means that the only option is to swap them out for another set. Unfortunately, not all colors were available for all models of CB7. In particular, black is difficult (impossible?) to find for coupes.
SOLUTION:
Fortunately, other honda/acura models have very similar seatbelts! In many cases it was only the retractor mounting tabs that varied, and the belts themselves can be successfully swapped into a CB7.
This applies to all variations of the 1992-93 year CB7s. The following guide does NOT apply to 1990-91 models.
For the FRONT belts, follow ALL steps below.
For the REAR belts, follow ONLY steps 1, 10, and 12-19.
Click images for larger size.
DISASSEMBLY:
1. Remove OEM seatbelts from your car, plus the donor. The belt swapping will be done on a workbench.

2. Using small tool, push center pins out of the 3 mounting clips.

3. Pry plastic cover off of retractor.
4. Flip assembly over, and place onto a soft surface.

5. Using a punch tool and hammer, knock the small pin loose.

6. Flip assembly over, and use pliers to remove pin entirely.

7. Slide ratcheter to the side to unclip it, and remove it.

8. Remove pivot screw from the aluminum belt grabber.
9. Flip assembly over, and remove second screw from the belt grabber.

10. Stand assembly up vertically (as would be installed in the car) and pull belt out of the spool as far as possible.
11. Dislodge the white plastic belt slider by pushing the circle tabs, and by prying along the direction of the belt. The slider stays attached to the belt, you are only separating it from the main black metal housing. Slide it down the belt and off to the side.


12. Flip assembly over, and use hand to grasp the center spool (spring loaded) to hold it in place. You should be able to see the tail end of the belt embedded within the center of the spool.

13. While still holding spool, flip assembly over. Attacking the belt from the long strap side, use a flathead screwdriver wedged into the seam of the fabric to push belt through the spool. The tail of the belt will be pushed out of the spool and into the palm of your spool hand.


14. Leaving the flathead screwdriver in place (to keep the spool from unrolling), find the metal pin lodged within the tip of the belt.
15. Push the metal pin out of the belt. This is the final piece that is removed in order to free the belt.

16. While taking care to keep the spool held in place (by a combination of holding it with your hand, and using the small flathead screwdriver) work the belt out through the spool and out of the assembly entirely.

17. Your setup should now look like this. Screwdriver is used to keep spool from unrolling the spring tension. Belt is oriented in the direction it was removed for clarity.
REASSEMBLY:
18. Slide the new belt into the top of the retractor assembly, and into the back of the spool. Using a flathead screwdriver, push it through enough that the tail end is accessible fully from the other side of the spool.
19. Reinstall the metal pin into the tip of the belt, and pull the belt through, tightening it into the spool.

20. Push the white plastic belt slider back into place inside the assembly.

21. While holding the slider in place, reinsert the pin (from steps 5-6) to lock the slider in place. Make sure the small side fully aligns and inserts into the opposite side of the assembly.

22. Use punch and hammer to gently press the pin back into place.

22. While keeping the belt fully pulled out (spool empty) use your fingers to push the grey aluminum belt grabber down, and reinstall the pivot screw into the side. Be sure you are installing the correct screw onto the correct side.
23. Flip assembly over, and reinstall the second pivot screw into the belt grabber. Be sure you are installing the correct screw onto the correct side. You may need to push the plastic swing arms a little bit in order to get the screw hole to line up.
24. Reinstall the ratcheter, and push it to the side to lock it in place. It is critical that this piece is secured properly!

25. Snap plastic cover back into place over the entire mechanism.

26. Reinstall plastic pins back into the centers of the 3 mounting clips. Use the side of a flathead screwdriver to push them down flush with the surface of the plastic cover.


DONE!
Additional information:
- 90-91 models are entirely different than 92-93 models and can't be interchanged - use a similar year as your own.
- The guide works for both sedan and coupe, but the belts themselves aren't the same - swap like for like.
- Example photos in this guide were taken using a 1993 Coupe front retractor (with the burgundy belt)
In case somebody accidentally allows the spools to unwind and lose tension:
- The front retractors should be wound up 16 full rotations before the belt is attached.
- The rear retractors are wound up 20 full rotations before the belt is attached.


Comment